CentOS安装配置ganglia
CentOS安装配置ganglia
CentOS安装配置ganglia
1. 下载ganglia源码包并解压
[python]
wget
http://sourceforge.net/projects/ganglia/files/ganglia%20monitoring%20core/3.1.1%20%28Wien%29/ganglia-3.1.1.tar.gz/download?use_mirror=jaist
tar -zxvf ganglia-3.1.1.tar.gz
2. 安装ganglia(安装gmetad和gmond)
cd ganglia-3.1.1
在需要web frontend的机器上安装gmetad,configure参数为:
[python]
./configure --with-gmetad --enable-gexec
gmetad依赖g++、rrdtool-devel、apr-devel、libconfuse、libexpat包,先安装上述依赖包:
[python]
yum install gcc-c++
yum install rrdtool-devel
yum install apr-devel
yum安装libconfuse、libexpat失败后解决方案:
安装libconfuse:
[python]
wget http://download.savannah.gnu.org/releases/confuse/confuse-2.7.tar.gz
tar zxvf confuse-2.6.tar.gz
./configure CFLAGS=-fPIC --disable-nls--prefix=/usr/local/confuse
make
make install
64bit机器需要拷贝动态链接库:
[python]
mkdir -p /usr/local/confuse/lib64
cp -a -f /usr/local/confuse/lib/* /usr/local/confuse/lib64/
安装libexpat:
[python]
wget http://downloads.sourceforge.net/project/expat/expat/2.0.1/expat-2.0.1.tar.gz?use_mirror=cdnetworks-kr-2
tar zxvf expat-2.0.1.tar.gz
./configure --prefix=/usr/local/expat
make
make install
64bit机器需要拷贝动态链接库:
[python]
mkdir /usr/local/expat/lib64
cp -a /usr/local/expat/lib/* /usr/local/expat/lib64/
安装完依赖包后,执行./configure命令:
[python]
./configure --with-gmetad --enable-gexec--with-libconfuse=/usr/local/confuse --with-libexpat=/usr/local/expat
出现如图所示的界面时则ganglia安装成功:

按照提示make ganglia:
[python]
make
make install
在make的过程中可能会出现类似“mod_python.c:48:20: error: Python.h: No such file or directory”的错误,此时需要安装python:
[python]
yum install python-devel
安装python完成后再进行make即可
3. 服务器端配置gmetad
创建rrdtool数据目录:
[python]
mkdir -p /var/lib/ganglia/rrds
mkdir -p /var/lib/ganglia/dwoo
chown -R apache:apache /var/lib/ganglia
修改/etc/ganglia/gmetad.conf文件:
[python]
vim /etc/ganglia/gmetad.conf
data_source "suc" localhost
setuid_username "apache"
注意:若配置文件中data_source和setuid_username被“#”注释需要去掉注释
[python]
cp gmetad/gmetad.init /etc/init.d/gmetad
mkdir /etc/ganglia
cp gmetad/gmetad.conf /etc/ganglia/
cp -f gmetad /usr/sbin/gmetad
chkconfig --add gmetad
启动gmetad服务:
[python]
service gmetad start
若显示“Starting GANGLIA gmetad: [确定]”则表示gmetad运行正常
通过telnet localhost 8651验证gmetad是否正常
4. 本机客户端配置gmond
[python]
cp -f gmond/gmond.init /etc/init.d/gmond
cp -f gmond /usr/sbin/gmond
chkconfig --add gmond
gmond --default_config > /etc/ganglia/gmond.conf
修改/etc/ganglia/gmond.conf配置文件:
[python]
cluster {
name="suc" //和gmetad.conf配置文件对应
owner="apache" //和gmetad.conf配置文件对应
latlong="unspecified"
url="unspecified"
}
启动gmond服务:
[python]
service gmond start
若显示“Starting GANGLIA gmond: [确定]”则表示gmond运行正常
通过telnet localhost 8649验证gmond是否正常
5. 服务器端配置web
[python]
yum install php-common php-cli php php-gd httpd
mkdir /var/www/html/ganglia
cp -a -f web/* /var/www/html/ganglia
重启http服务:
[python]
service httpd restart
6. 打开浏览器查看ganlia web界面信息
[python]
http://localhost:/ganglia
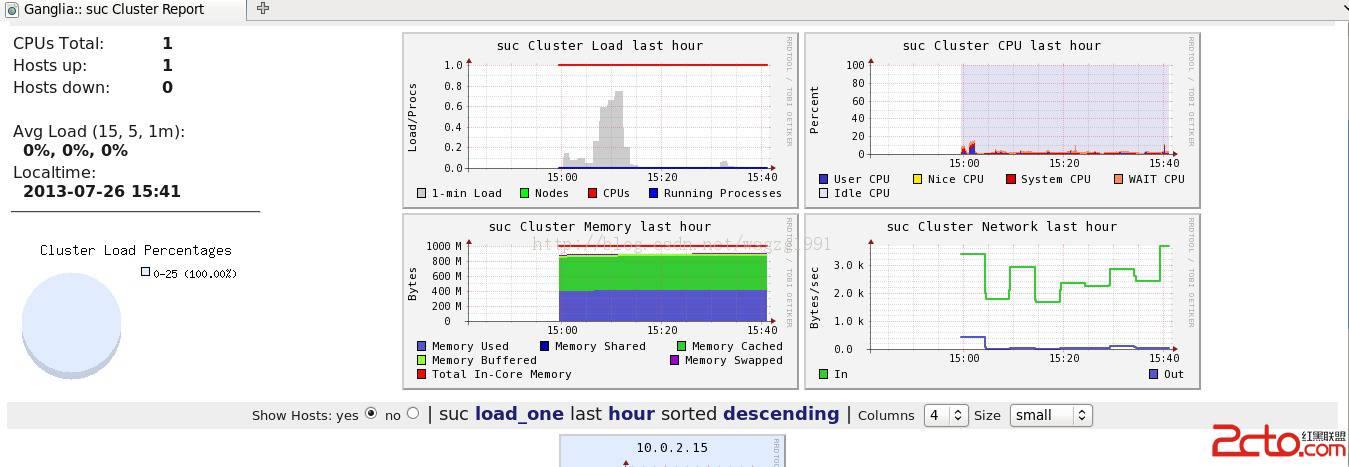
显示如图所示则表示ganglia完全安装成功:
实验环境:CentOS6.0 x86_64
[python]
<pre name="code" class="cpp"><pre name="code" class="cpp"><p></p></pre>
<pre></pre>
<pre></pre>
<pre></pre>
<pre></pre>
</pre>
评论暂时关闭