想玩BGP路由器么?无需花钱去买,本文教你用CentOS做一个(1)(2)
配置BGP对等
Quagga守护进程负责BGP的服务叫bgpd。首先我们来准备它的配置文件。
- # cp /usr/share/doc/quagga-XXXXXXX/bgpd.conf.sample /etc/quagga/bgpd.conf
在CentOS6系统中:
- # service bgpd start
- # chkconfig bgpd on
在CentOS7中:
- # systemctl start bgpd
- # systemctl enable bgpd
现在,让我们来进入Quagga 的shell。
- # vtysh
第一步,我们要确认当前没有已经配置的BGP会话。在一些版本,我们可能会发现一个AS号为7675的BGP会话。由于我们不需要这个会话,所以把它移除。
- Router-A# show running-config
- ... ... ...
- router bgp 7675
- bgp router-id 200.200.1.1
- ... ... ...
我们将移除一些预先配置好的BGP会话,并建立我们所需的会话取而代之。
- Router-A# configure terminal
- Router-A(config)# no router bgp 7675
- Router-A(config)# router bgp 100
- Router-A(config)# no auto-summary
- Router-A(config)# no synchronizaiton
- Router-A(config-router)# neighbor 100.100.0.2 remote-as 200
- Router-A(config-router)# neighbor 100.100.0.2 description "provider B"
- Router-A(config-router)# exit
- Router-A(config)# exit
- Router-A# write
路由器B将用同样的方式来进行配置,以下配置提供作为参考。
- Router-B# configure terminal
- Router-B(config)# no router bgp 7675
- Router-B(config)# router bgp 200
- Router-B(config)# no auto-summary
- Router-B(config)# no synchronizaiton
- Router-B(config-router)# neighbor 100.100.0.1 remote-as 100
- Router-B(config-router)# neighbor 100.100.0.1 description "provider A"
- Router-B(config-router)# exit
- Router-B(config)# exit
- Router-B# write
当相关的路由器都被配置好,两台路由器之间的对等将被建立。现在让我们通过运行下面的命令来确认:
- Router-A# show ip bgp summary
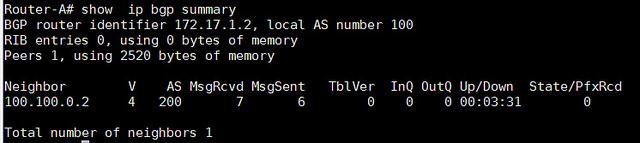
从输出中,我们可以看到"State/PfxRcd"部分。如果对等关闭,输出将会显示"Idle"或者"Active'。请记住,单词'Active'这个词在路由器中总是不好的意思。它意味着路由器正在积极地寻找邻居、前缀或者路由。当对等是up状态,"State/PfxRcd"下的输出状态将会从特殊邻居接收到前缀号。
在这个例子的输出中,BGP对等只是在AS100和AS200之间呈up状态。因此没有前缀被更改,所以最右边列的数值是0。
配置前缀通告
正如一开始提到,AS 100将以100.100.0.0/22作为通告,在我们的例子中AS 200将同样以200.200.0.0/22作为通告。这些前缀需要被添加到BGP配置如下。
在路由器-A中:
- Router-A# configure terminal
- Router-A(config)# router bgp 100
- Router-A(config)# network 100.100.0.0/22
- Router-A(config)# exit
- Router-A# write
在路由器-B中:
- Router-B# configure terminal
- Router-B(config)# router bgp 200
- Router-B(config)# network 200.200.0.0/22
- Router-B(config)# exit
- Router-B# write
在这一点上,两个路由器会根据需要开始通告前缀。
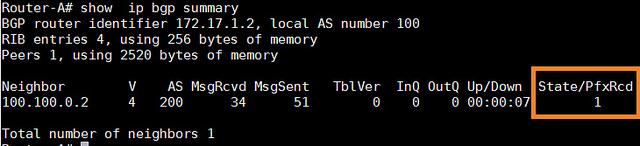
测试前缀通告
首先,让我们来确认前缀的数量是否被改变了。
- Router-A# show ip bgp summary
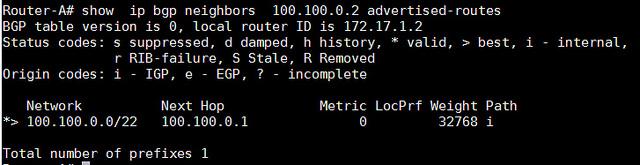
为了查看所接收的更多前缀细节,我们可以使用以下命令,这个命令用于显示邻居100.100.0.2所接收到的前缀总数。
- Router-A# show ip bgp neighbors 100.100.0.2 advertised-routes
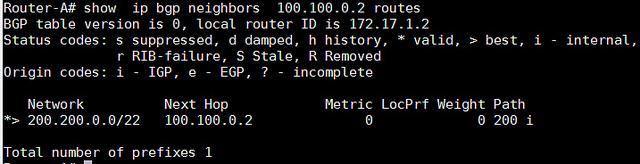
查看哪一个前缀是我们从邻居接收到的:
- Router-A# show ip bgp neighbors 100.100.0.2 routes
我们也可以查看所有的BGP路由器:
- Router-A# show ip bgp
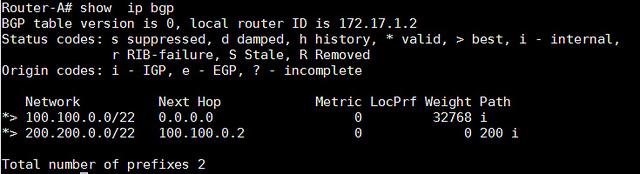
以上的命令都可以被用于检查哪个路由器通过BGP在路由器表中被学习到。
- Router-A# show ip route
- 代码: K - 内核路由, C - 已链接 , S - 静态 , R - 路由信息协议 , O - 开放式最短路径优先协议,
- I - 中间系统到中间系统的路由选择协议, B - 边界网关协议, > - 选择路由, * - FIB 路由
- C>* 100.100.0.0/30 is directly connected, eth0
- C>* 100.100.1.0/24 is directly connected, eth1
- B>* 200.200.0.0/22 [20/0] via 100.100.0.2, eth0, 00:06:45
- Router-A# show ip route bgp
- B>* 200.200.0.0/22 [20/0] via 100.100.0.2, eth0, 00:08:13
BGP学习到的路由也将会在Linux路由表中出现。
- [root@Router-A~]# ip route
- 100.100.0.0/30 dev eth0 proto kernel scope link src 100.100.0.1
- 100.100.1.0/24 dev eth1 proto kernel scope link src 100.100.1.1
- 200.200.0.0/22 via 100.100.0.2 dev eth0 proto zebra
最后,我们将使用ping命令来测试连通。结果将成功ping通。
- [root@Router-A~]# ping 200.200.1.1 -c 2
总而言之,本教程将重点放在如何在CentOS系统中运行一个基本的BGP路由器。这个教程让你开始学习BGP的配置,一些更高级的设置例如设置过滤器、BGP属性调整、本地优先级和预先路径准备等,我将会在后续的教程中覆盖这些主题。
希望这篇教程能给大家一些帮助。
via: http://xmodulo.com/centos-bgp-router-quagga.html
作者:Sarmed Rahman 译者:disylee 校对:wxy

评论暂时关闭