Jira自动化实践:基于Jenkins实现需求与代码基线关联,
Jira自动化实践:基于Jenkins实现需求与代码基线关联,

一. Jira简介
中文官网:https://www.atlassian.com/zh/software/jira

1.1 Jira可以做什么?
规划
创建项目,用户需求和事务、规划 Sprint 并跨团队分配开发任务。
跟踪
全面了解项目进度情况,安排整个团队工作的优先级排序并进行讨论。

二. 安装部署
2.1 数据中心版本
https://www.atlassian.com/zh/software/jira/pricing?tab=data-center 试用

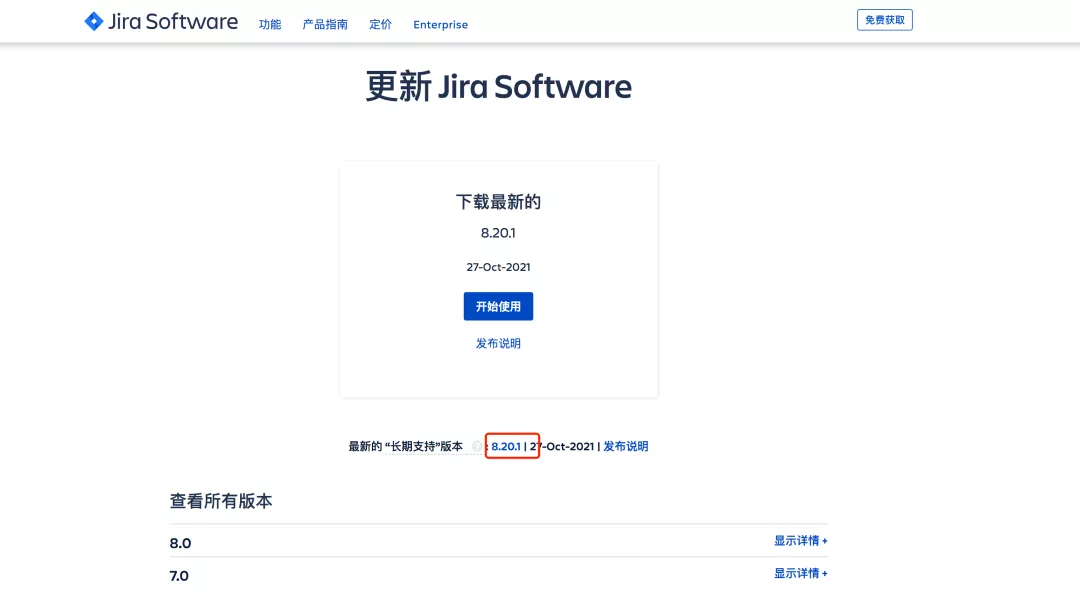
选择历史版本下载:

下载最新的LTS 长期支持版本:
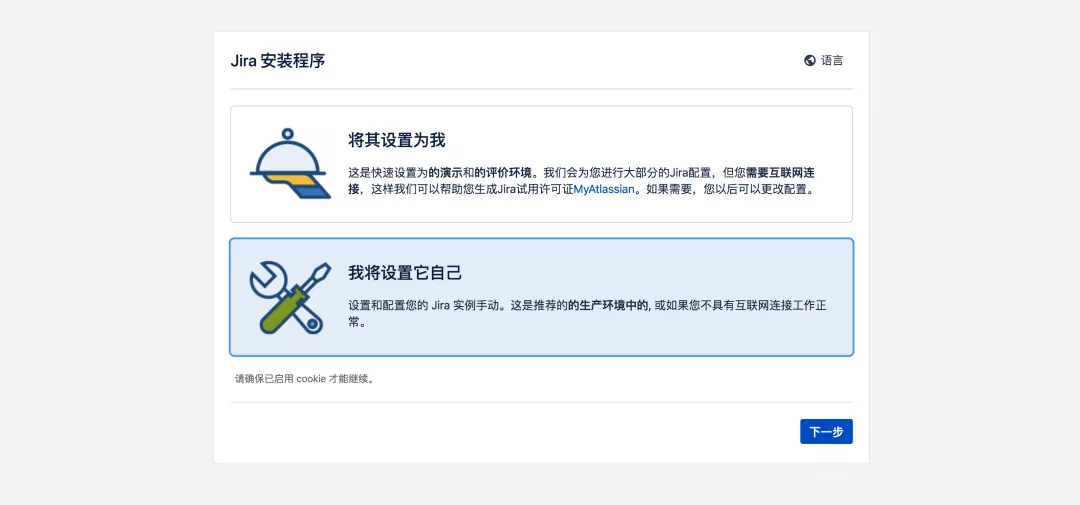
选择部署的环境:

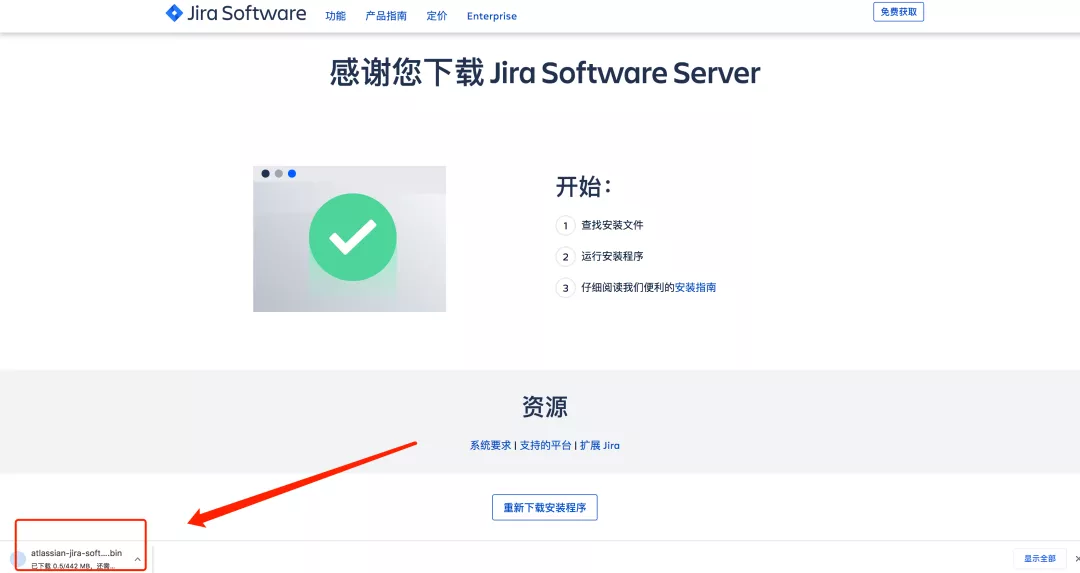
开始下载Jira Software Server安装程序:
2.2 安装部署
- scp atlassian-jira-software-8.20.1-x64.bin root@192.168.1.200:/opt/
- ## 添加权限
- [root@zeyang-nuc-service opt]# chmod +x atlassian-jira-software-8.20.1-x64.bin
- ## 运行安装程序
- [root@zeyang-nuc-service opt]# ./atlassian-jira-software-8.20.1-x64.bin
- Unpacking JRE ...
- Starting Installer ...
- This will install Jira Software 8.20.1 on your computer.
- OK [o, Enter], Cancel [c] ## 回车
- Click Next to continue, or Cancel to exit Setup.
- Choose the appropriate installation or upgrade option.
- Please choose one of the following:
- Express Install (use default settings) [1], Custom Install (recommended for advanced users) [2, Enter], Upgrade an existing Jira installation [3]
- ## 此处选择自定义安装, 输入回车
- Select the folder where you would like Jira Software to be installed.
- Where should Jira Software be installed?
- [/opt/atlassian/jira]
- ## 选择安装目录
- Default location for Jira Software data
- [/var/atlassian/application-data/jira]
- ## 选择数据目录
- Configure which ports Jira Software will use.
- Jira requires two TCP ports that are not being used by any other
- applications on this machine. The HTTP port is where you will access Jira
- through your browser. The Control port is used to startup and shutdown Jira.
- Use default ports (HTTP: 8080, Control: 8005) - Recommended [1, Enter], Set custom value for HTTP and Control ports [2]
- 2 ## 输入2 自定义服务端口
- HTTP Port Number
- [8071]
- 8801
- Control Port Number
- [8077]
- 8802
- ## 安装服务
- Jira can be run in the background.
- You may choose to run Jira as a service, which means it will start
- automatically whenever the computer restarts.
- Install Jira as Service?
- Yes [y, Enter], No [n]
- y
- Details on where Jira Software will be installed and the settings that will be used.
- Installation Directory: /opt/atlassian/jira
- Home Directory: /var/atlassian/application-data/jira
- HTTP Port: 8801
- RMI Port: 8802
- Install as service: Yes
- Install [i, Enter], Exit [e]
- Extracting files ...
- ## 启动服务
- Please wait a few moments while Jira Software is configured.
- Installation of Jira Software 8.20.1 is complete
- Start Jira Software 8.20.1 now?
- Yes [y, Enter], No [n]
- y
- Please wait a few moments while Jira Software starts up.
- Launching Jira Software ...
- Installation of Jira Software 8.20.1 is complete
- Your installation of Jira Software 8.20.1 is now ready and can be accessed
- via your browser.
- Jira Software 8.20.1 can be accessed at http://localhost:8801
- Finishing installation ...
访问:http://serverip:8801
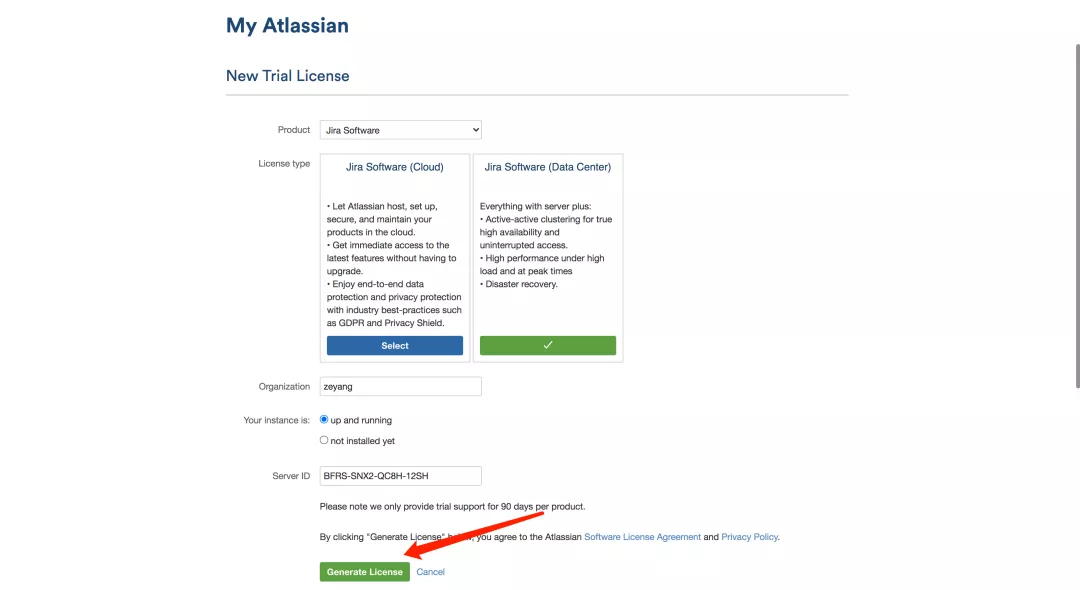
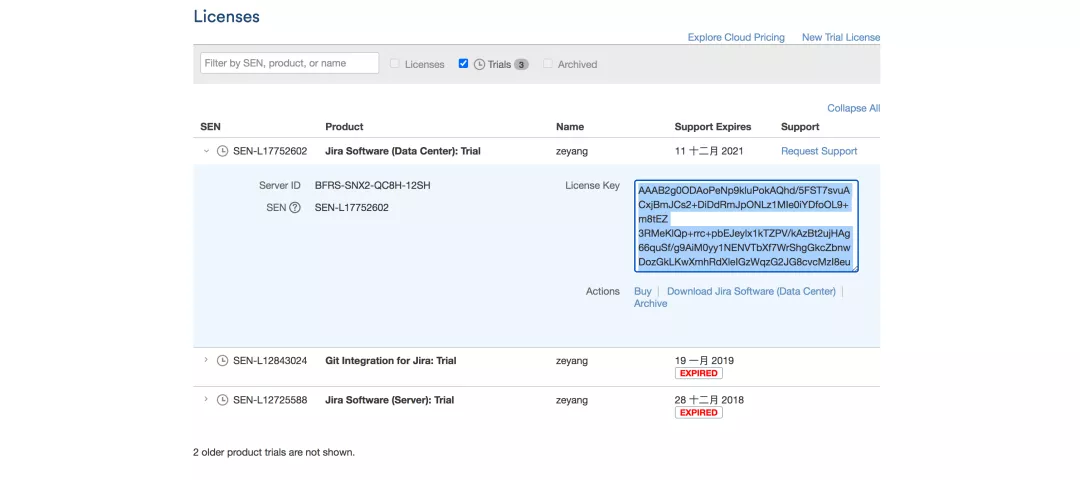
2.3 初始化配置
获取授权码:
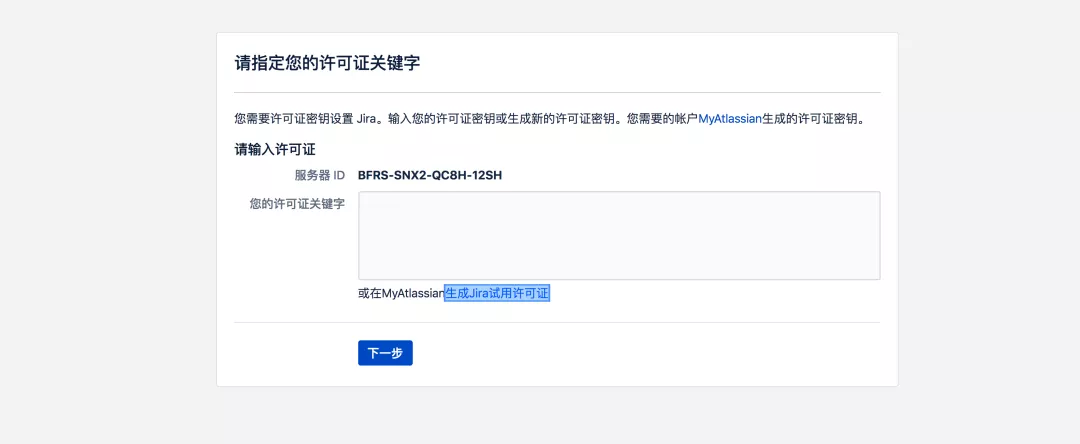
注册账号登录:生成授权码,激活实例;
三. Jira使用实践
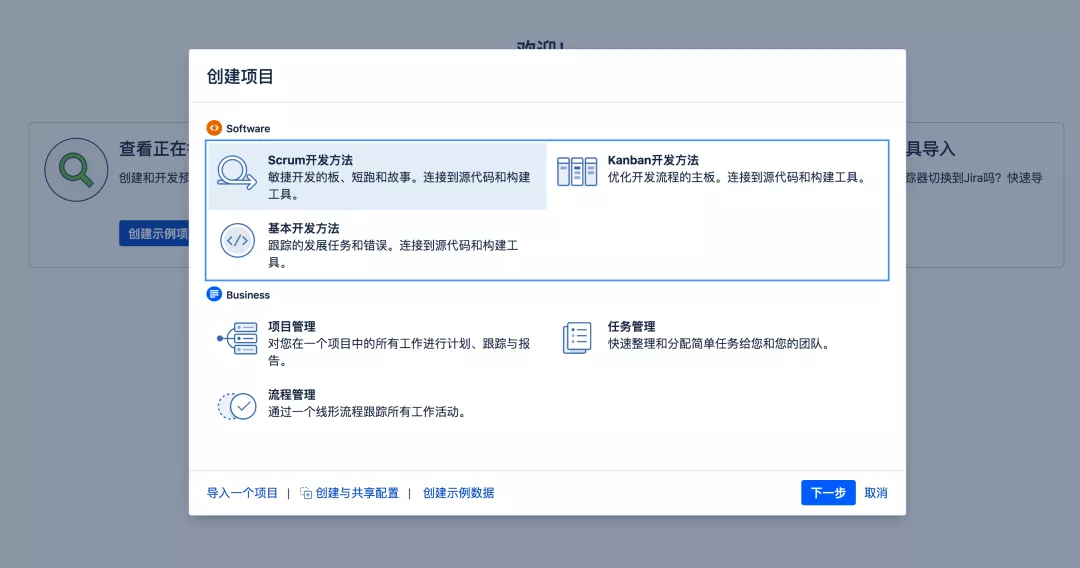
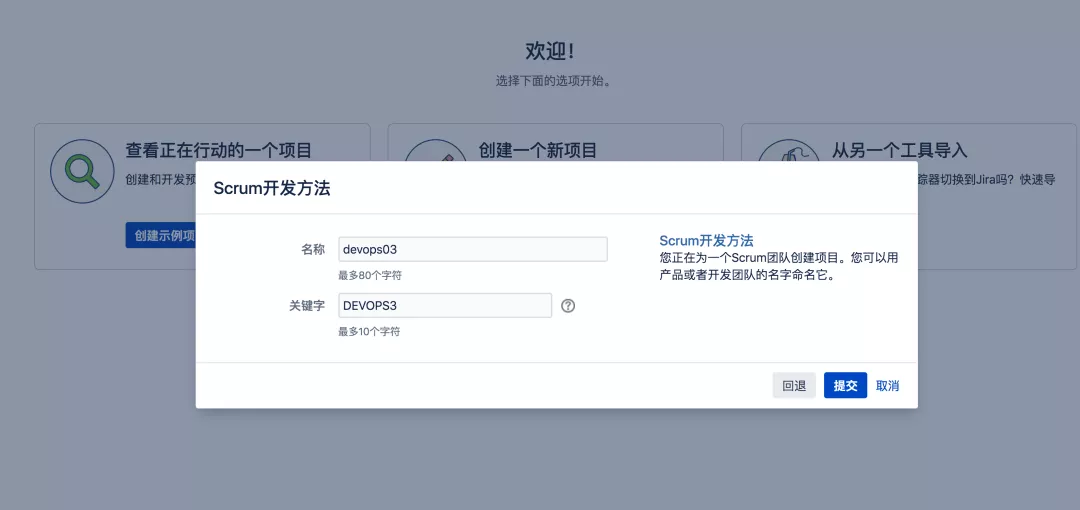
3.1 创建一个项目
注意:一个Jira 项目对应一个GitLab项目组;
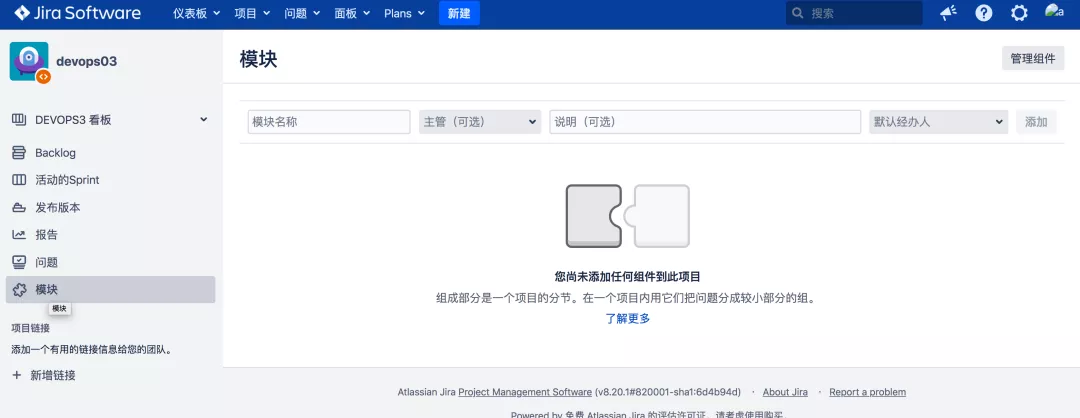
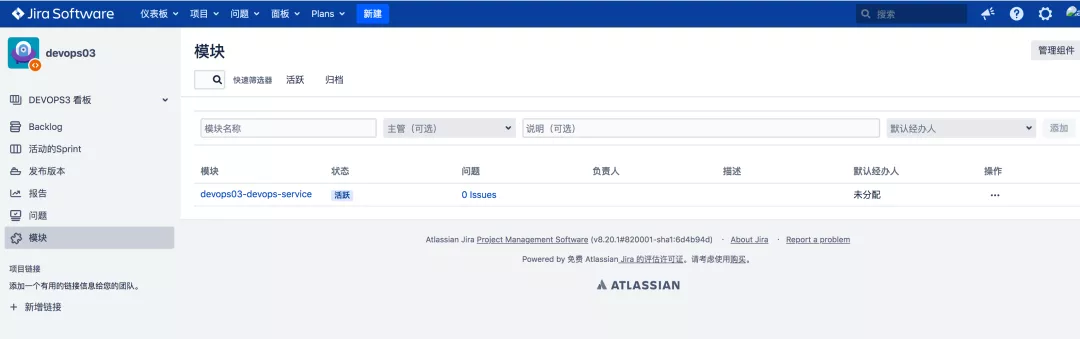
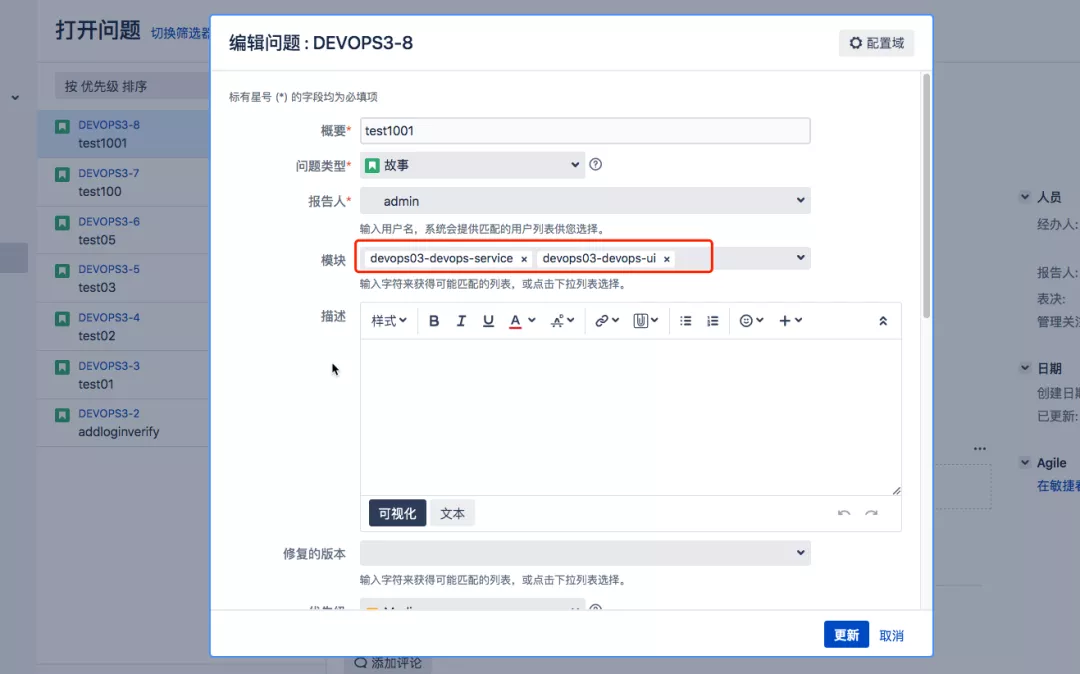
3.2 为项目添加模块
注意:一个Jira模块对应一个GitLab项目;
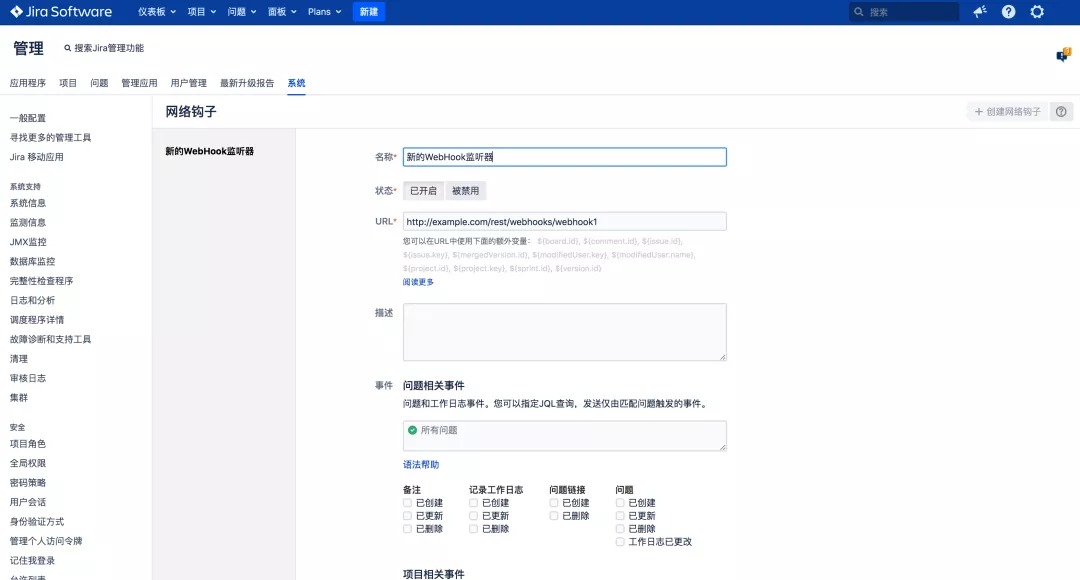
3.3 配置WebHook系统, 网络钩子(webhook)
3.4 需求/任务管理
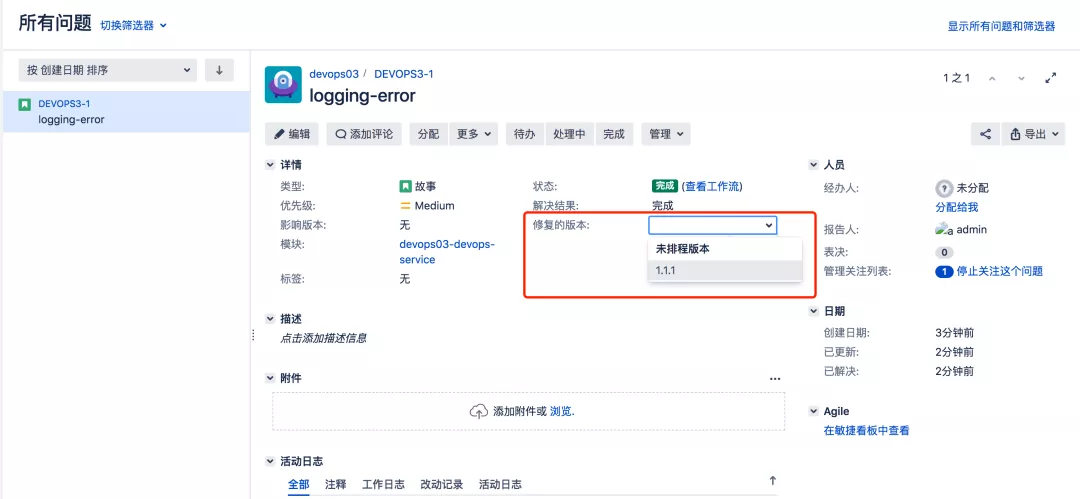
创建需求
这里在Jira上面把这个需求logging-error, 类型为故事 关联到devops03-devops-service模块;

3.5 发布Release
课程中把 发布对应为GitLab项目代码库中的版本分支;
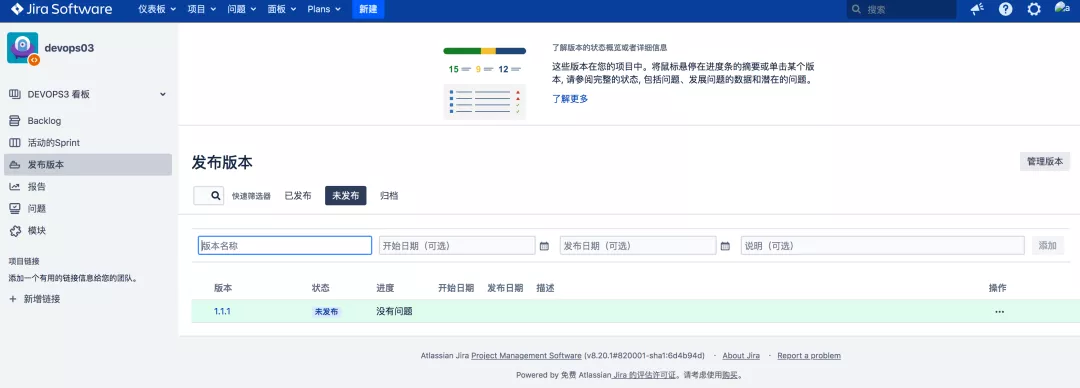
issue关联发布:可以想象成GitLab特性分支合并到版本分支;
四. Jira自动化实践
工作流

工具链集成
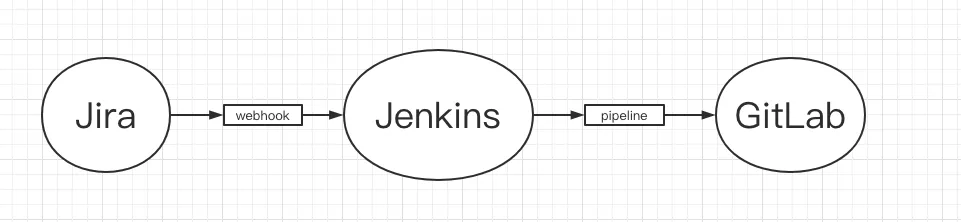
4.1 需求与代码关联

1. 创建Jenkins作业并配置webhook
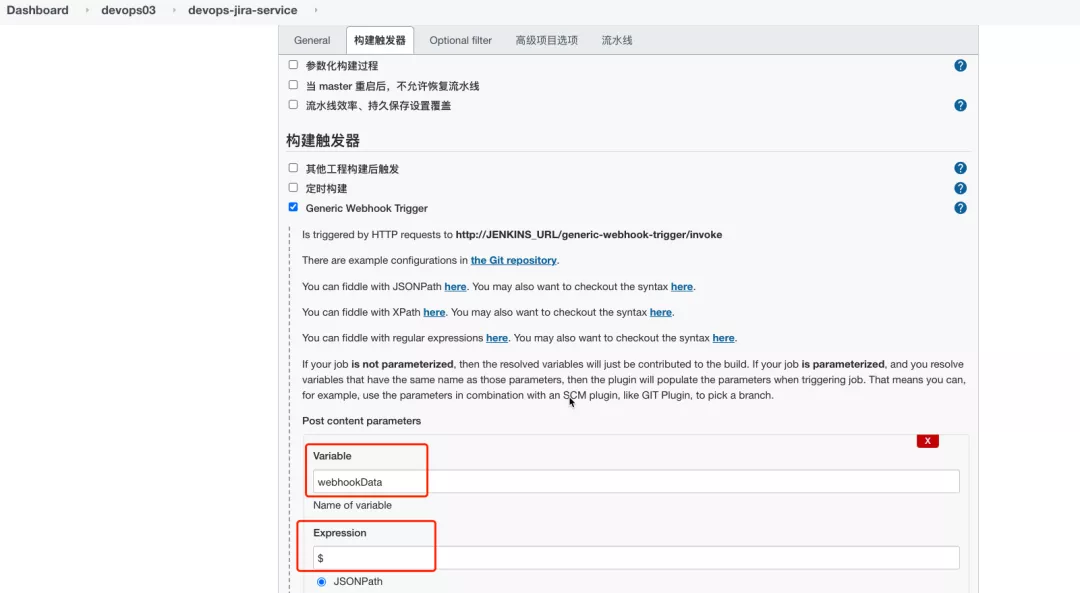
webhookData:这个变量存放的是Jira 传递的数据。
2. 为Jira配置一个系统级别的webhook
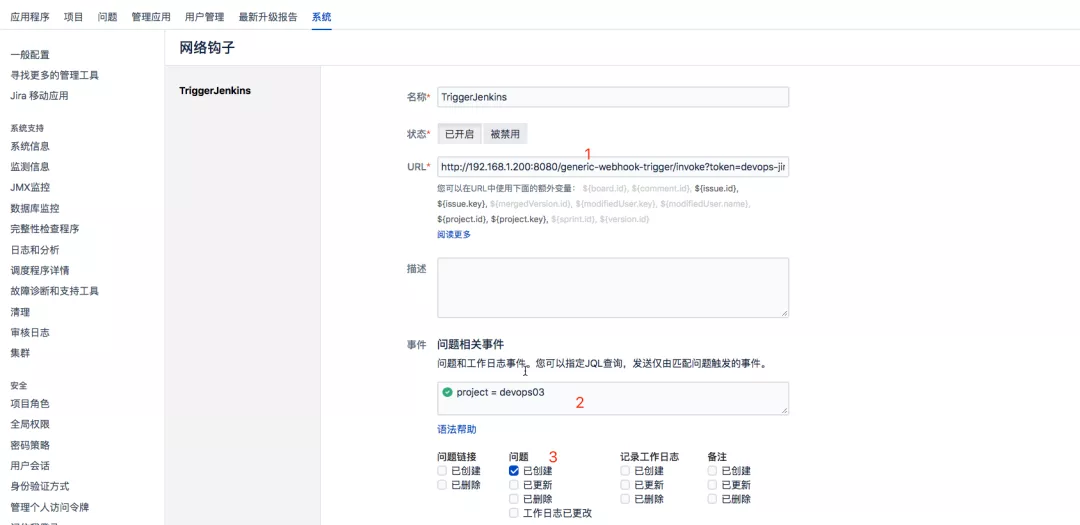
选项解释:
- 指定Jenkins的webhook触发器地址;
- 通过JQL指定,允许devops03这个项目进行触发;
- 勾选动作,触发事件;(我在jira做了什么操作之后能够触发)
3. Jenkins流水线配置
解析Jira传递过来的数据;
- webhookData = readJSON text: "${webhookData}"
- // Jira事件
- jiraEvent = webhookData.webhookEvent
- jiraProjectName = webhookData.issue.fields.project.name
- // 获取gitlab参数
- gitlabProjects = []
- gitlabBranchName = webhookData.issue.key
- gitlabGroupName = jiraProjectName
- for (i in webhookData.issue.fields.components){
- gitlabProjects.add(i["name"])
- }
- currentBuild.description = "Trigger by ${jiraEvent} \n project: ${gitlabProjects} \n branch: ${gitlabBranchName}"
封装GitLab API接口
https://docs.gitlab.com/ee/api/branches.html#create-repository-branch
- // 创建分支
- def CreateBranch(projectId, newBranchName, sourceBranchName){
- try {
- apiUrl = "projects/${projectId}/repository/branches?branch=${newBranchName}&ref=${sourceBranchName}"
- response = HttpReq('POST', apiUrl, "")
- }
- catch(Exception e) {
- println(e)
- }
- }
- // 获取所有项目的id
- def GetProjectsId(gitlabGroupName, gitlabProjects){
- gitlabProjectIds = []
- for (project in gitlabProjects){
- id = GetProjectId(gitlabGroupName, project)
- println(id)
- if (id != 0){
- gitlabProjectIds.add(id)
- }
- }
- return gitlabProjectIds
- }
- // 根据项目名称获取项目id
- def GetProjectId(groupName, projectName){
- apiUrl = "projects?search=${projectName}"
- response = HttpReq('GET', apiUrl, "")
- response = readJSON text: response.content - "\n"
- if (response.size() > 1){
- for (i in response){
- println(i["path_with_namespace"])
- println(groupName + projectName)
- if (i["path_with_namespace"] == "${groupName}/${projectName}"){
- println(i["id"])
- return i["id"]
- }
- }
- } else {
- return response[0]["id"]
- }
- }
- // 封装HTTP
- def HttpReq(reqType, reqUrl,reqBody ){
- def gitServer = "http://192.168.1.200/api/v4"
- withCredentials([string(credentialsId: '058b7907-ebe2-4d14-9b91-1ac72e071c59', variable: 'GITLABTOKEN')]) {
- response = httpRequest acceptType: 'APPLICATION_JSON_UTF8',
- consoleLogResponseBody: true,
- contentType: 'APPLICATION_JSON_UTF8',
- customHeaders: [[maskValue: false, name: 'PRIVATE-TOKEN', value: "${GITLABTOKEN}"]],
- httpMode: "${reqType}",
- url: "${gitServer}/${reqUrl}",
- wrapAsMultipart: false,
- requestBody: "${reqBody}"
- }
- return response
- }
Pipeline主程序
- pipeline {
- agent { label "build" }
- stages{
- stage("Process"){
- steps{
- script{
- println(gitlabProjects)
- println(gitlabBranchName)
- projectIds = GetProjectsId(gitlabGroupName, gitlabProjects)
- switch(jiraEvent) {
- case "jira:issue_created":
- println(projectIds)
- for (id in projectIds){
- CreateBranch(id, gitlabBranchName, "master")
- }
- break
- default:
- println("error...")
- break
- }
- }
- }
- }
- }
- }
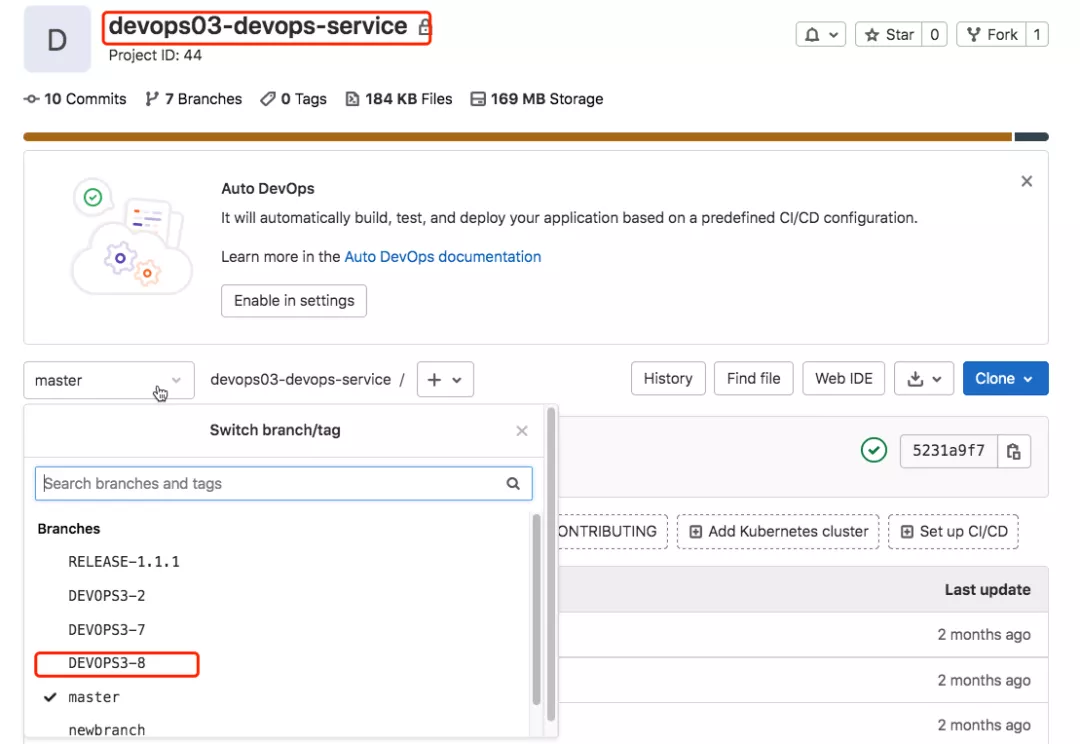
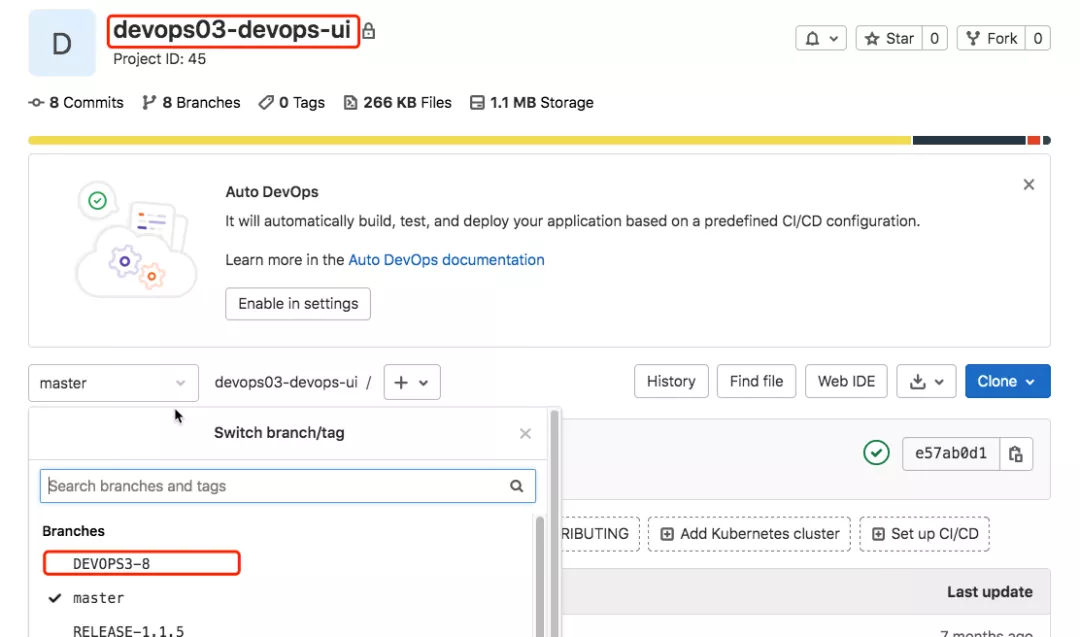
4. 效果验证
在Jira里面创建一个模块和issue, 关联项目;

Jenkins 流水线运行;
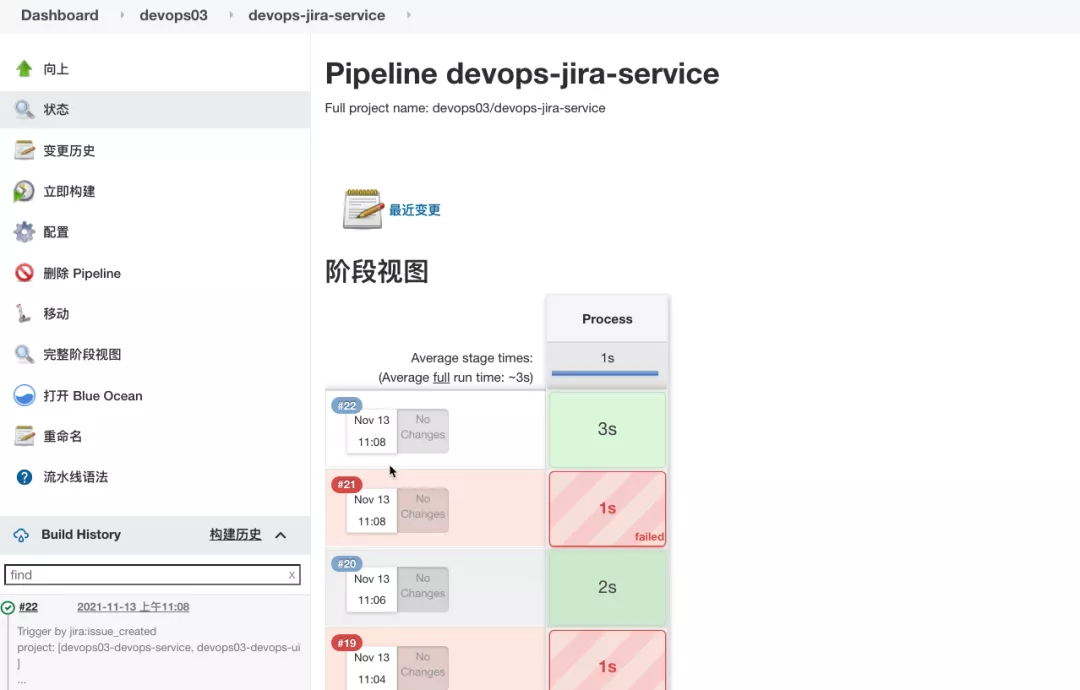
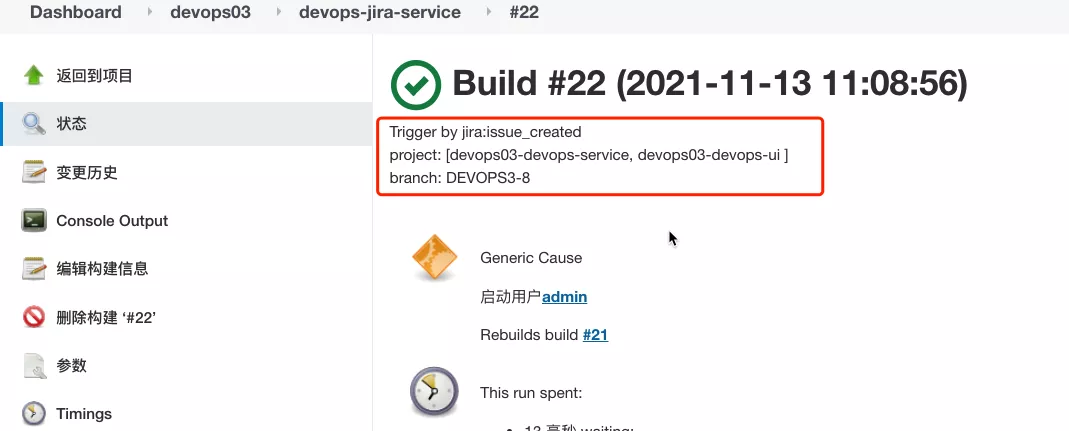
验证Gitlab中多了分支;
评论暂时关闭