piwik源码安装部署,piwik源码部署
piwik源码安装部署,piwik源码部署
一简单介绍
1.piwik介绍
Piwik是一个PHP和MySQL的开放源代码的Web统计软件,它给你一些关于你的网站的实用统计报告,比如网页浏览人数,访问最多的页面,搜索引擎关键词等等。
Piwik拥有众多不同功能的插件,你可以添加新的功能或是移除你不需要的功能,Piwik同样可以安装在你的服务器上面,数据就保存在你自己的服务器上面。你可以非常容易的插入统计图表到你的博客或是网站亦或是后台的控制面板中。安装完成后,你只需将一小段代码放到将要统计的网页中即可。
2.piwik概况
Piwik支持插件,你可以通过插件扩展Piwik的功能,或者去掉一些不需要的功能。用户的界面支持Ajax技术是可定制的,你可以轻松拖放控件,定制自己需要的报告。
使用者独立拥有自己的统计数据,而不是寄存在服务商那里,这样就可以更灵活的使用统计数据,不用担心数据丢失问题。
Piwik是安装在服务器端的统计工具,安装过程很简单,但是需要服务器支持PHP和MySQL。安装的时候上传Piwik到服务器端,然后打开浏览器,Piwik会自动运行安装,整个过程不超过5分钟。目前Piwik已支持中文
二安装
官网:https://piwik.org
我的阿里云的部署环境:
[root@iZ2zeigj97j9lf057px8tmZ ~]# cat /etc/centos-release
CentOS Linux release 7.4.1708 (Core)
可以比我这个版本高
由于我想安装piwik3.2版本
所以需要的环境最低是:php5.6和mysql5.7
网站服务用:apache和nginx都可以
为了方便环境管理,就在这里直接使用nginx环境
mysql官网:https://dev.mysql.com
php官网:http://php.net/
nginx官网:http://nginx.org/
源码包放在百度云盘中
百度云盘链接:http://pan.baidu.com/s/1dE3gUbB 密码:rpst
为了节省时间,我们使用glibc版本的mysql
2.1安装mysql
[root@iZ2zeigj97j9lf057px8tmZ software]# mkdir -pv /home/mysql/data
[root@iZ2zeigj97j9lf057px8tmZ software]# tar -zxvf mysql-5.7.18-linux-glibc2.5-x86_64.tar.gz -C /home/mysql
[root@iZ2zeigj97j9lf057px8tmZ software]# mv /home/mysql/mysql-5.7.18-linux-glibc2.5-x86_64/* /home/mysql/
[root@iZ2zeigj97j9lf057px8tmZ software]# useradd -g mysql
初始化数据库
[root@iZ2zeigj97j9lf057px8tmZ software]# /home/mysql/bin/mysqld --user=mysql --basedir=/home/mysql --datadir=/home/mysql/data --initialize

红框中的密码要牢记,一会数据库修改密码,需要用到
数据库部署
[root@iZ2zeigj97j9lf057px8tmZ software]# cp /home/mysql/support-files/mysql.server /home/mysql/support-files/mysql.server.start
[root@iZ2zeigj97j9lf057px8tmZ software]# vim /home/mysql/support-files/mysql.server.start

[root@iZ2zeigj97j9lf057px8tmZ software]# /home/mysql/support-files/mysql.server.start start
[root@iZ2zeigj97j9lf057px8tmZ software]# ln -s /home/mysql/bin/mysql /usr/bin/mysql
[root@iZ2zeigj97j9lf057px8tmZ software]# vim /etc/my.cnf
如果没有my.cnf就自己添加如下内容
[mysqld]
basedir = /home/mysql
datadir = /home/mysql/data
character_set_server=utf8
init_connect='SET NAMES utf8'
[client]
default-character-set=utf8
[root@iZ2zeigj97j9lf057px8tmZ software]# cp /home/mysql/support-files/mysql.server.start /etc/init.d/mysqld
[root@iZ2zeigj97j9lf057px8tmZ software]#chmod 755 /etc/init.d/mysqld
[root@iZ2zeigj97j9lf057px8tmZ software]#service mysqld start
修改mysql初始化密码
不过不改,会有提示
You must reset your password using ALTER USER statement before executing this statement
# 意思就是你必须重置你的密码在执行这个execute操作前
所以进入mysql后进行密码更新
[root@iZ2zeigj97j9lf057px8tmZ software]#mysql -u root -p
前面出现的密码,在这里填入
mysql> SET PASSWORD = PASSWORD('123456');
mysql> grant all on *.* to 'root'@'%' identified by '123456';
mysql> flush privileges;
完成后为了安装piwik需要创建相关数据库和权限
mysql> create database piwik;
mysql> grant all on piwik.* to piwik@locahost identified by '123456';
mysql> flush privileges;
刷新权限后,退出。
2.2安装php
[root@iZ2zeigj97j9lf057px8tmZ software]# tar -zxvf php-5.6.30.tar.gz
[root@iZ2zeigj97j9lf057px8tmZ software]# cd /software/php-5.6.30
[root@iZ2zeigj97j9lf057px8tmZ php-5.6.30]# ./configure --prefix=/software/php --with-config-file-path=/etc --with-mysql --with-mysqli=/home/mysql/bin/mysql_config --enable-inline-optimization --enable-fpm --enable-soap --with-libxml-dir --with-xmlrpc --with-openssl --with-mcrypt --with-mhash --with-pcre-regex --with-sqlite3 --with-zlib --enable-bcmath --with-iconv --with-bz2 --enable-calendar --with-curl --with-cdb --enable-dom --enable-exif --enable-fileinfo --enable-filter --with-pcre-dir --enable-ftp --with-gd --with-openssl-dir --with-jpeg-dir --with-png-dir --with-zlib-dir --with-freetype-dir --enable-gd-native-ttf --with-gettext --with-gmp --with-mhash --enable-json --enable-mbstring --disable-mbregex --disable-mbregex-backtrack --with-libmbfl --with-onig --enable-pdo --with-pdo-mysql --with-zlib-dir --with-pdo-sqlite --with-readline --enable-session --enable-shmop --enable-simplexml --enable-sockets--enable-sysvmsg --enable-sysvsem --enable-sysvshm --enable-wddx --with-libxml-dir --with-xsl --enable-zip --enable-mysqlnd-compression-support --with-pear
[root@iZ2zeigj97j9lf057px8tmZ php-5.6.30]#make && make install
[root@iZ2zeigj97j9lf057px8tmZ php-5.6.30]#cd /software/php/etc/
[root@iZ2zeigj97j9lf057px8tmZ etc]#cp php-fpm.conf.default php-fpm.conf
[root@iZ2zeigj97j9lf057px8tmZ php-5.6.30]#cp /software/php-5.6.30/php.ini-production /etc/php.ini
[root@iZ2zeigj97j9lf057px8tmZ php-5.6.30]#cp /software/php-5.6.30/sapi/fpm/init.d.php-fpm /etc/init.d/php-fpm
[root@iZ2zeigj97j9lf057px8tmZ php-5.6.30]#/software/php/sbin/php-fpm -t

[root@iZ2zeigj97j9lf057px8tmZ php-5.6.30]#service php-fpm start
[root@iZ2zeigj97j9lf057px8tmZ php-5.6.30]#netstat -ntlp | grep php-fpm

2.3安装nginx
[root@iZ2zeigj97j9lf057px8tmZ software]#tar -zxvf nginx-1.10.2.tar.gz
[root@iZ2zeigj97j9lf057px8tmZ software]#cd nginx-1.10.2
[root@iZ2zeigj97j9lf057px8tmZ software]#./configure --user=www --group=www --prefix=/software/nginx \
--conf-path=/software/nginx/conf/nginx.conf \
--pid-path=/software/nginx/run/nginx.pid \
--lock-path=/software/nginx/lock/nginx \
--with-stream \
--with-http_ssl_module \
--with-http_realip_module \
--with-http_addition_module \
--with-http_sub_module \
--with-http_dav_module \
--with-http_flv_module \
--with-http_gzip_static_module \
--with-http_stub_status_module \
--with-http_perl_module \
--with-mail \
--with-mail_ssl_module
[root@iZ2zeigj97j9lf057px8tmZ software]#make && make install
2.4修改nginx的配置文件,配合piwik的安装
[root@iZ2zeigj97j9lf057px8tmZ ~]# cat /software/nginx/conf/nginx.conf
# For more information on configuration, see:
# * Official English Documentation: http://nginx.org/en/docs/
# * Official Russian Documentation: http://nginx.org/ru/docs/
user www;
worker_processes auto;
error_log /var/log/nginx/error.log;
pid /run/nginx.pid;
# Load dynamic modules. See /usr/share/nginx/README.dynamic.
#include /usr/share/nginx/modules/*.conf;
events {
worker_connections 1024;
}
http {
log_format main '$remote_addr - $remote_user [$time_local] "$request" '
'$status $body_bytes_sent "$http_referer" '
'"$http_user_agent" "$http_x_forwarded_for"';
access_log /var/log/nginx/access.log main;
sendfile on;
tcp_nopush on;
tcp_nodelay on;
keepalive_timeout 65;
types_hash_max_size 2048;
include /etc/nginx/mime.types;
default_type application/octet-stream;
# Load modular configuration files from the /etc/nginx/conf.d directory.
# See http://nginx.org/en/docs/ngx_core_module.html#include
# for more information.
include /software/nginx/conf/conf.d/*.conf;
# server {
# listen 80 default_server;
# server_name _;
# root /usr/share/nginx/html;
#
# # Load configuration files for the default server block.
# include /etc/nginx/default.d/*.conf;
#
#
# error_page 404 /404.html;
# location = /40x.html {
# }
#
# error_page 500 502 503 504 /50x.html;
# location = /50x.html {
# }
# }
server {
listen 80;
server_name 182.92.86.125;
root /var/www/piwik;
index index.php index.html index2.htm;
location ~ \.php$ {
include fastcgi_params;
fastcgi_pass 127.0.0.1:9000;
fastcgi_index index.php;
fastcgi_param SCRIPT_FILENAME /var/www/piwik$fastcgi_script_name;
}
}
}
nginx解析php项目
location ~ \.php$ {
include fastcgi_params;
fastcgi_pass 127.0.0.1:9000;
fastcgi_index index.php;
fastcgi_param SCRIPT_FILENAME /var/www/piwik$fastcgi_script_name;
}
[root@iZ2zeigj97j9lf057px8tmZ software]#/software/nginx/sbin/nginx -t

文件正常后,启动nginx
[root@iZ2zeigj97j9lf057px8tmZ software]#/software/nginx/sbin/nginx
2.4部署piwik
[root@iZ2zeigj97j9lf057px8tmZ ~]#mkdir -pv /var/www/piwik
[root@iZ2zeigj97j9lf057px8tmZ software]#unzip piwik.zip
[root@iZ2zeigj97j9lf057px8tmZ software]#cp -r /software/piwik/* /var/www/piwik/
打开网站后报错,并提示你如何处理

[root@iZ2zeigj97j9lf057px8tmZ software]# chown -R nobody:nobody /var/www/piwik
[root@iZ2zeigj97j9lf057px8tmZ software]# chmod -R 755 /var/www/piwik/

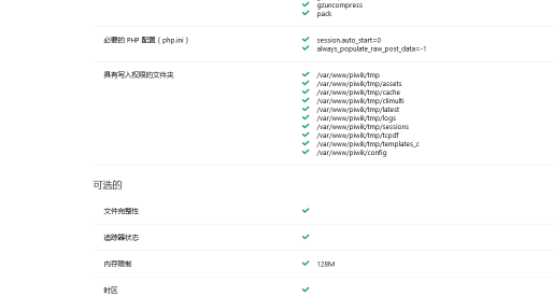
修改为中文后,继续下一步,发现一个php相关的预警报错

安装提示修改php.ini
为预防某些严重问题,您必须在 php.ini 文件中加入如下几行:always_populate_raw_post_data=-1
做过这个改动之后,请重新启您的网络服务器。
修改文件 vim /etc/php.ini
加入如下几行:always_populate_raw_post_data=-1
重启服务 service php-fpm restart
此时在看正常后,下一步
填写相关的数据库内容

点击下一步却报错了,如下图
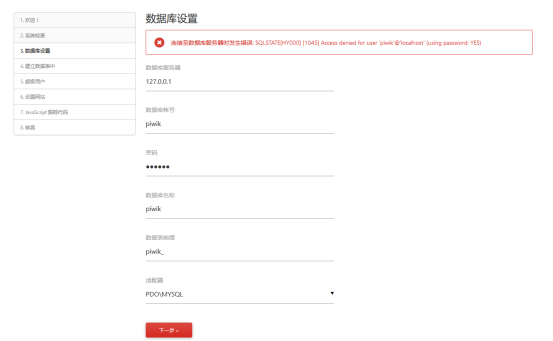
说明,数据库处理有问题,参考数据库安装管理,查看用户权限密码等
发现指定登录是没有问题的,有可能是php页面的输入写错了,重新输入看看
仍然不行,尝试放大权限看看
mysql> grant all on piwik.* to piwik@'%' identified by '123456';
Query OK, 0 rows affected, 1 warning (0.04 sec)
mysql> flush privileges;
Query OK, 0 rows affected (0.00 sec)
虽然通过了,但是报错告警了,说是有重复的数据库,于是点击,删掉

干掉重复的

于是正常的进入下一个环节了

继续进入下一个环节
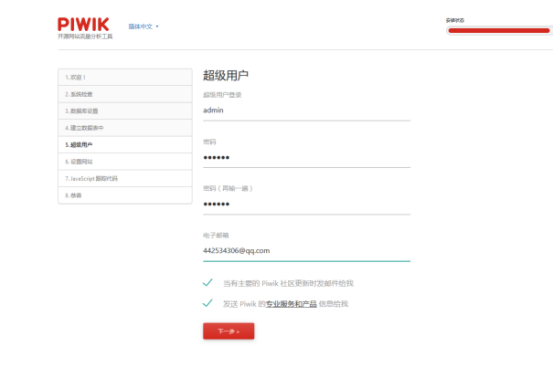
admin
123456
然后下一个环节
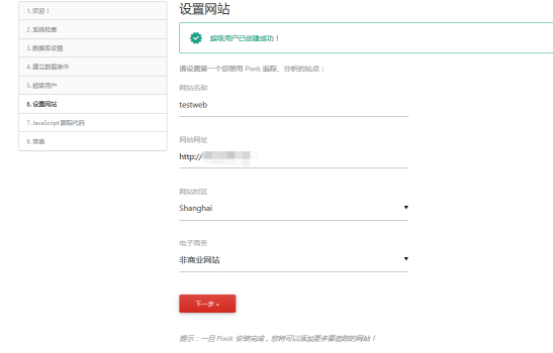
下一步

<!-- Piwik -->
<script type="text/javascript">
var _paq = _paq || [];
/* tracker methods like "setCustomDimension" should be called before "trackPageView" */
_paq.push(['trackPageView']);
_paq.push(['enableLinkTracking']);
(function() {
var u="//172.16.1.225/";
_paq.push(['setTrackerUrl', u+'piwik.php']);
_paq.push(['setSiteId', '1']);
var d=document, g=d.createElement('script'), s=d.getElementsByTagName('script')[0];
g.type='text/javascript'; g.async=true; g.defer=true; g.src=u+'piwik.js'; s.parentNode.insertBefore(g,s);
})();
</script>
<!-- End Piwik Code -->
将代码给前端处理加入,就好了,完活了
代码部署完成后,就可以看到效果了
有时你会看到这个,直接点升级就好了
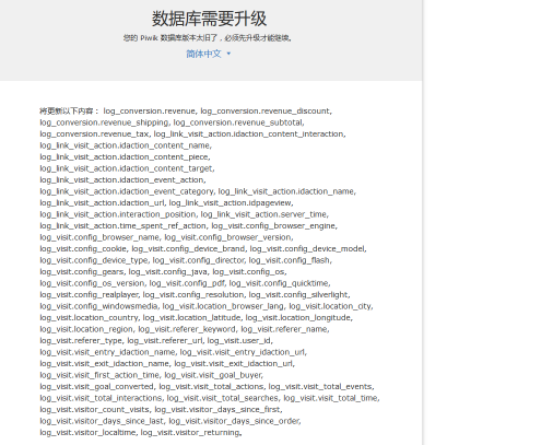
升级后效果如下
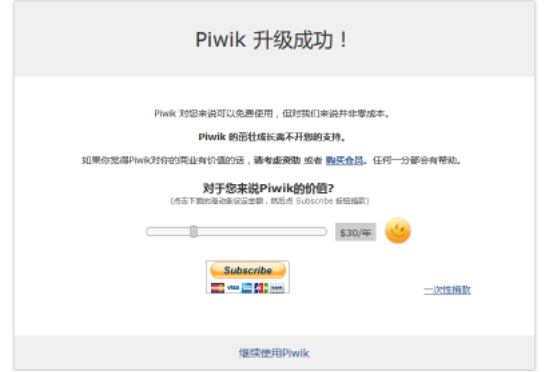
可以选择打赏,有钱的大人可以给点
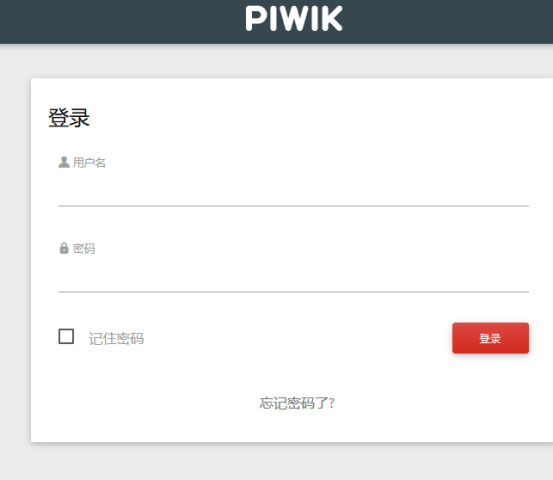
继续后,进入正式界面
和前端配合后,就可以看到效果 了
评论暂时关闭