运维神器Chef简单介绍和安装笔记
运维神器Chef简单介绍和安装笔记
首先大概解释一下Chef
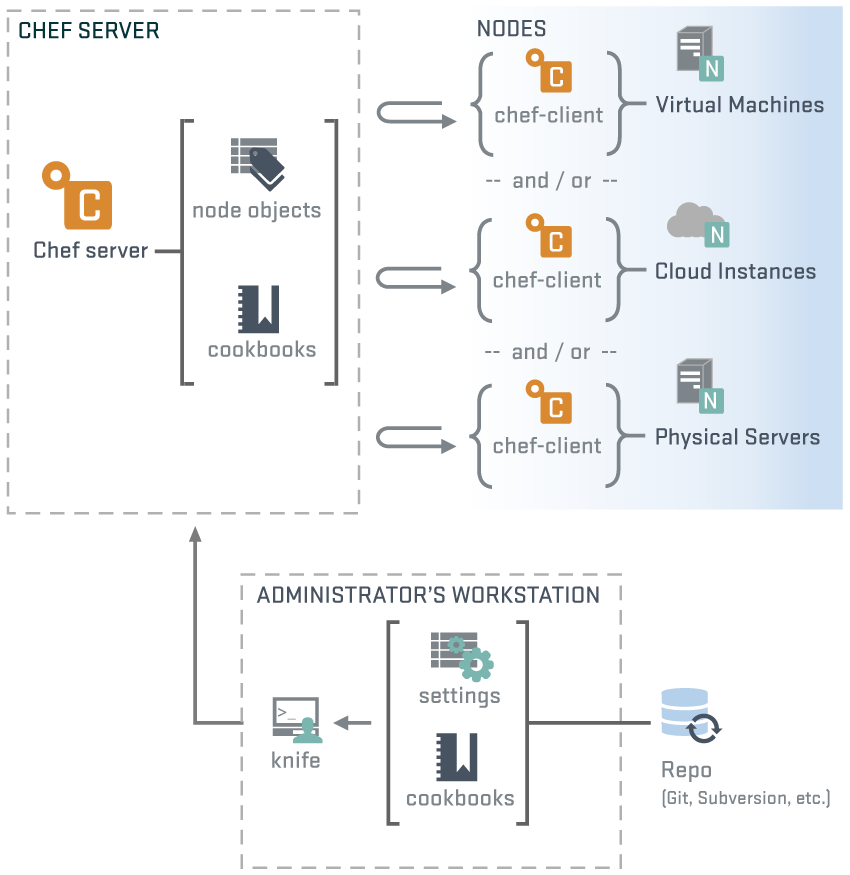
Chef有三个重要的概念:(如上图所示)
它们的合作关系大致是这样的,
Workstation把资源或者说是一些要被运行的命令上传到Chef-Server上,
Nodes自动通过Chef-Server拿到属于自己的执行任务到本地执行,这样可达到一个将军指挥千军万马的效果:smirk:。
Chef安装
安装环境为3台Ubuntu13的虚拟机(应该看出来为什么是3台了吧)和Chef11。
注意,在开始之前先把所有机器的时间更新一下,sudo ntpdate ntp.ubuntu.com,不然无法通过登录认证:worried:。
Chef提供两个安装包,一个是Server,一个是Client,其中Client包括Chef-Client和Workstation用到的knife, 也就是说Nodes和Workstation上的安装都是这个包。
下载Chef
Chef-11的安装特别简单,官方下载(传送门:http://www.getchef.com/chef/install/),里面包括Server和Client的下载, 注意Server在第二个选项卡里,选择相应的操作系统和版本就会出现下载链接。
安装命令:
//Chef Server安装
//在第一台虚拟机上运行
dpkg -i chef-server_11.1.1-1_amd64.deb
//Chef-Client安装
//在第二台和第三台虚拟机上运行,也就是Workstation和Node
dpkg -i chef_11.12.8-2_amd64.deb
Chef Server安装官方参考:http://docs.opscode.com/open_source/install_server.html
Chef-Client安装官方参考:http://docs.opscode.com/chef/install_workstation.html
运行和配置Chef
怎么让这三个东西一起工作起来呢,其实也很简单,只是开始有些概念上的东西比较模糊导致无从下手。
让Chef-Server跑起来
在第一台Ubuntu虚拟机上进行。
执行完上面的安装过程以后,运行一个配置初始化命令sudo chef-server-ctl reconfigure,然后所有服务就会自动运行了,
所生成的配置文件,包括前面提到的postgresql,rabbitmq等,放在/etc/chef-server/chef-server-running.json
如果你需要自定义其中的某些配置,需要创建文件/etc/chef-server/chef-server.rb,一个基于ruby语法的配置文件
官方参考:http://docs.opscode.com/open_source/config_rb_chef_server.html
所有配置说明和实例:http://docs.opscode.com/config_rb_chef_server_optional_settings.html
修改完成后通过sudo chef-server-ctl reconfigure命令重新生成配置文件,并自动重启有变化的服务。
更多Chef-Server操作命令请运行chef-server-ctl -h查看
官方参考:http://docs.opscode.com/open_source/ctl_chef_server.html。
现在可以通过这台机器的ip访问chef-server-webui ,用户名:admin,密码:p@ssw0rd1。
远程REST API请参考:http://docs.opscode.com/open_source/api_chef_server.html
运行Chef Workstation
在第二台Ubuntu虚拟机上进行。
克隆Workstation的目录结构:chef-repo
方法:git clone git://github.com/opscode/chef-repo.git,当然你要安装git
sudo apt-get update && sudo apt-get install git;
生成认证文件:
在chef-repo目录下创建一个目录.chef来存储workstation与server的交互认证和一些server的配置信息。
主要有三个文件:knife.rb,validator.pem USER.pem,通过命令knife configure --initial生成!
在chef-server机器的/etc/chef-server目录下找到chef-validator.pem和admin.pem两个私钥拷贝到刚才创建的.chef目录下,
然后在chef-repo目录下执行knife configure --initial,请参考以下交互信息:
admin1@localhost:~/chef-repo$ knife configure --initial
WARNING: No knife configuration file found
Where should I put the config file? [/home/admin1/.chef/knife.rb] /home/admin1/chef-repo/.chef/knife.rb
Please enter the chef server URL: [https://localhost:443] https://ubuntu:443
Please enter a name for the new user: [admin1] chefuser5
Please enter the existing admin name: [admin]
Please enter the location of the existing admin's private key: [/etc/chef-server/admin.pem] /home/admin1/chef-repo/.chef/admin.pem
Please enter the validation clientname: [chef-validator]
Please enter the location of the validation key: [/etc/chef-server/chef-validator.pem] /home/admin1/chef-repo/.chef/chef-validator.pem
Please enter the path to a chef repository (or leave blank): /home/admin1/chef-repo/cookbooks
Creating initial API user...
Please enter a password for the new user:
Created user[chefuser5]
Configuration file written to /home/admin1/chef-repo/.chef/knife.rb没什么问题的话就成功了,通过命令knife client list来测试是否安装成功:v:!
启动一个Chef Node
在第二台Ubuntu虚拟机也就是Workstation上进行,并假设第三台虚拟机的IP为192.168.0.3。
通过Workstation注册这台Node,命令:(在chef-repo目录下)
knife bootstrap 192.168.0.3 -x username -P password --sudo
其中username 和 password是虚拟机192.168.0.3上SSH登录的用户名及密码。
参考交互信息:
admin1@localhost:~/chef-repo$ knife bootstrap 192.168.0.3 -x admin1 -P 111111 --sudo
Connecting to 192.168.0.3
192.168.0.3 knife sudo password:
Enter your password:
192.168.0.3
192.168.0.3 Starting first Chef Client run...
192.168.0.3 [2014-06-13T10:14:07+08:00] WARN:
192.168.0.3 * * * * * * * * * * * * * * * * * * * * * * * * * * * * * * * * * * * * * * * *
192.168.0.3 SSL validation of HTTPS requests is disabled. HTTPS connections are still
192.168.0.3 encrypted, but chef is not able to detect forged replies or man in the middle
192.168.0.3 attacks.
192.168.0.3
192.168.0.3 To fix this issue add an entry like this to your configuration file:
192.168.0.3
192.168.0.3 ```
192.168.0.3   # Verify all HTTPS connections (recommended)
192.168.0.3   ssl_verify_mode :verify_peer
192.168.0.3
192.168.0.3   # OR, Verify only connections to chef-server
192.168.0.3   verify_api_cert true
192.168.0.3 ```
192.168.0.3
192.168.0.3 To check your SSL configuration, or troubleshoot errors, you can use the
192.168.0.3 `knife ssl check` command like so:
192.168.0.3
192.168.0.3 ```
192.168.0.3   knife ssl check -c /etc/chef/client.rb
192.168.0.3 ```
192.168.0.3
192.168.0.3 * * * * * * * * * * * * * * * * * * * * * * * * * * * * * * * * * * * * * * * *
192.168.0.3
192.168.0.3 Starting Chef Client, version 11.12.8
192.168.0.3 resolving cookbooks for run list: []
192.168.0.3 Synchronizing Cookbooks:
192.168.0.3 Compiling Cookbooks...
192.168.0.3 [2014-06-13T10:15:13+08:00] WARN: Node localhost has an empty run list.
192.168.0.3 Converging 0 resources
192.168.0.3
192.168.0.3 Running handlers:
192.168.0.3 Running handlers complete
192.168.0.3
192.168.0.3 Chef Client finished, 0/0 resources updated in 66.508732206 seconds
官方参考:http://docs.opscode.com/open_source/knife_bootstrap.html
其它参考
官方资料:http://docs.opscode.com/open_source/
安装参考:https://www.digitalocean.com/community/tutorials/how-to-install-a-chef-server-workstation-and-client-on-ubuntu-vps-instances
第二个链接讲解了管理员私钥(admin.pem)和校验私钥(chef-validator.pem)是如何产生的。
评论暂时关闭