中小规模集群----Centos6部署wordpress及java程序,java集群
中小规模集群----Centos6部署wordpress及java程序,java集群
1 概述
1.1 业务需求
公司共有两个业务,网上图书馆和一个电商网站。现要求运维设计一个安全架构,本着高可用、廉价的原则。
具体情况如下:
网上图书馆是基于jsp开发;
电商系统是基于php开发;
两个网站都是使用的mysql数据库;
要求你提供一个高可用且廉价的架构方案,部署分发业务到外网;
请画出拓扑图及通过虚拟机搭建测试环境。
2 方案设计
2.1 拓扑图
整体方案拓扑如下:
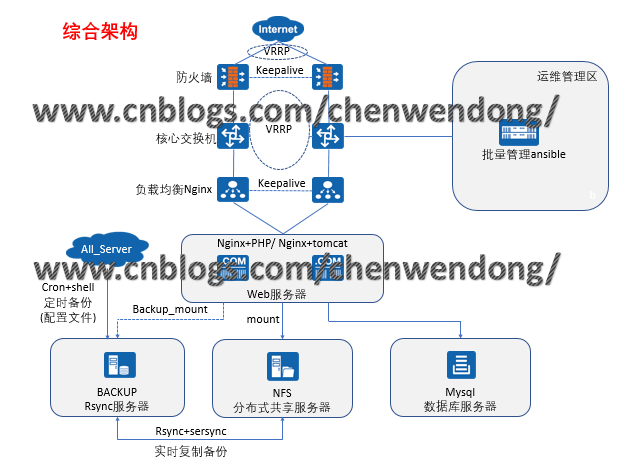
防火墙及负载均衡各使用两台服务器,采用双主的架构;防火墙主要用于发布内网资源到公网,负载均衡用于调度;两台服务器充当web集群,同时安装Nginx+Php+Tomcat,WEB集群中的静态资源存储在NFS服务器中,动态资源从MYSQL数据库服务器中调取。NFS服务器中的业务数据实时备份到backup服务器中,全网的系统及业务关键配置定时同步到backup服务器上。运维管理区的服务器暂用于批量管理;
2.2 业务规划
整体业务软件及IP规划如下表:
|
服务器名 |
物理IP地址 |
虚拟IP地址 |
系统及业务软件 |
|
FW01 |
公网10.0.0.100 内网172.16.1.100 |
公网10.0.0.200(电商) 内网172.16.1.210 |
Centos 6.7 系统自带的iptables |
|
FW02 |
公网10.0.0.101 内网172.16.1.101 |
公网10.0.0.201(图书馆) 内网172.16.1.211 |
|
|
Lb01 |
172.16.1.5 |
172.16.1.200(电商) |
Centos 6.7 nginx-1.16.1-1.el6 |
|
Lb02 |
172.16.1.6 |
172.16.1.201(图书馆) |
Centos 6.7 nginx-1.16.1-1.el6 |
|
Web01 |
172.16.1.7 |
\ |
Centos 6.7 nginx-1.16.1-1.el6 PHP7.1 tomcat-9.0.24 |
|
Web02 |
172.16.1.8 |
Centos 6.7 nginx-1.16.1-1.el6 PHP7.1 tomcat-9.0.24 |
|
|
nfs |
172.16.1.31 |
Centos 6.7 rpcbind-0.2.0-16 nfs-utils-1.2.3-78 sersync |
|
|
backup |
172.16.1.41 |
Centos 6.7 rsync-3.0.6-12 |
|
|
mysql |
172.16.1.51 |
Centos 6.7 mysql-5.7-community |
|
|
manage |
172.16.1.61 |
Centos 6.7 ansible-2.6.17-1 |
3 系统实施
3.1 基础环境部署
3.1.1 在管理服务器上配置通过密钥管理所有服务器并完成所有服务器的基础配置
1.安装ansible和sshpass软件:
yum install ansible sshpass -y
2.编写自动生成密钥,并把公钥传给所有服务器的脚本:
[root@manage ~]vim /server/scripts/ssh.sh
#!/bin/bash
ssh-keygen -f /root/.ssh/id_rsa -P '' -q
for ip in 5 6 7 8 31 41 51 100 101
do
sshpass -pAdmin@1234 ssh-copy-id -i /root/.ssh/id_rsa.pub "-o StrictHostKeyChecking=no
172.16.1.$ip"
done
3.编写测试的脚本:
[root@manage ~]#vim /server/scripts/test_ssh.sh
#!/bin/bash
if [ $# -ne 1 ];
then
echo "please input one args"
exit 1
fi
for ip in 5 6 7 8 31 41 51 100 101
do
echo "----------this is 172.16.1.$ip--------------"
ssh root@172.16.1.$ip $1
done
4.执行脚本并测试:
[root@manage ~]sh /server/scripts/ssh.sh
[root@manage ~]#sh /server/scripts/test_ssh.sh w
----------this is 172.16.1.5--------------
09:48:31 up 21 min, 1 user, load average: 0.00, 0.00, 0.00
USER TTY FROM LOGIN@ IDLE JCPU PCPU WHAT
root pts/0 10.0.0.1 09:38 9:49 0.00s 0.00s -bash
----------this is 172.16.1.6--------------
09:48:30 up 21 min, 1 user, load average: 0.00, 0.00, 0.00
USER TTY FROM LOGIN@ IDLE JCPU PCPU WHAT
root pts/0 10.0.0.1 09:38 9:48 0.00s 0.00s -bash
----------this is 172.16.1.7--------------
09:48:30 up 21 min, 1 user, load average: 0.00, 0.00, 0.00
USER TTY FROM LOGIN@ IDLE JCPU PCPU WHAT
root pts/0 10.0.0.1 09:38 9:48 0.00s 0.00s -bash
----------this is 172.16.1.8--------------
09:48:31 up 21 min, 1 user, load average: 0.00, 0.00, 0.00
USER TTY FROM LOGIN@ IDLE JCPU PCPU WHAT
root pts/0 10.0.0.1 09:38 9:48 0.00s 0.00s -bash
----------this is 172.16.1.31--------------
09:48:31 up 21 min, 1 user, load average: 0.00, 0.00, 0.00
USER TTY FROM LOGIN@ IDLE JCPU PCPU WHAT
root pts/0 10.0.0.1 09:38 9:51 0.00s 0.00s -bash
----------this is 172.16.1.41--------------
09:48:31 up 21 min, 1 user, load average: 0.00, 0.00, 0.00
USER TTY FROM LOGIN@ IDLE JCPU PCPU WHAT
root pts/0 10.0.0.1 09:38 9:50 0.00s 0.00s -bash
----------this is 172.16.1.51--------------
09:48:31 up 21 min, 1 user, load average: 0.00, 0.00, 0.00
USER TTY FROM LOGIN@ IDLE JCPU PCPU WHAT
root pts/0 10.0.0.1 09:38 9:50 0.00s 0.00s -bash
----------this is 172.16.1.100--------------
09:48:31 up 20 min, 2 users, load average: 0.00, 0.00, 0.00
USER TTY FROM LOGIN@ IDLE JCPU PCPU WHAT
root tty1 - 09:36 7:49 0.02s 0.01s bash
root pts/0 10.0.0.1 09:40 8:25 0.00s 0.00s -bash
----------this is 172.16.1.101--------------
09:48:32 up 20 min, 2 users, load average: 0.00, 0.00, 0.00
USER TTY FROM LOGIN@ IDLE JCPU PCPU WHAT
root tty1 - 09:36 7:57 0.05s 0.01s bash
root pts/0 10.0.0.1 09:41 7:10 0.00s 0.00s -bash
5.配置ansible主机清单
[root@manage ~]#vim /etc/ansible/hosts
[lb]
172.16.1.5
172.16.1.6
[nfs]
172.16.1.31
[backup]
172.16.1.41
[web]
172.16.1.7
172.16.1.8
[nginx]
172.16.1.5
172.16.1.6
172.16.1.7
172.16.1.8
[fw]
172.16.1.100
172.16.1.101
[keepalievd]
172.16.1.5
172.16.1.6
172.16.1.100
172.16.1.101
6.配置管理服务器目录
mkdir -p /ansible/{ backup,lb,nfs,nginx,playbook,web,fw,mysql}
[root@manage ~]#tree /ansible/
/ansible/
├── backup #存放backup服务器的相关脚本及软件
├── fw #存放fw服务器的相关脚本及软件
├── lb #存放lb服务器的相关脚本及软件
├── mysql #存放mysql服务器的相关脚本及软件
├── nfs #存放nfs服务器的相关脚本及软件
├── nginx #存放nginx软件
├── playbook #存放剧本
└── web #存放web服务器的相关脚本及软件
7.编写ansible-playbook部署基础环境
[root@manage /ansible/playbook]#vim jichu.yaml
- hosts: all
tasks:
- name: Add user_www #所有服务器上增加www用户
user: name=www uid=1000 create_home=no shell=/sbin/nologin
- name: Mkdir backup #所有服务器上增加/backup目录
file: dest=/backup state=directory owner=www group=www recurse=yes
- name: Mkdir data #所有服务器上增加/data目录
file: dest=/data state=directory owner=www group=www recurse=yes
- name: Mkdir /server/scripts #所有服务器上增加/server/scripts目录
file: dest=/server/scripts state=directory
8.执行jichu.yaml剧本:
[root@manage /ansible/playbook]#ansible-playbook jichu.yaml
PLAY RECAP *****************************************************************************
172.16.1.100 : ok=5 changed=4 unreachable=0 failed=0
172.16.1.101 : ok=5 changed=4 unreachable=0 failed=0
172.16.1.31 : ok=5 changed=4 unreachable=0 failed=0
172.16.1.41 : ok=5 changed=4 unreachable=0 failed=0
172.16.1.5 : ok=5 changed=4 unreachable=0 failed=0
172.16.1.6 : ok=5 changed=4 unreachable=0 failed=0
172.16.1.7 : ok=5 changed=4 unreachable=0 failed=0
172.16.1.8 : ok=5 changed=4 unreachable=0 failed=0
3.2 搭建backup服务器
1.编写ansible-playbook部署backup服务器
[root@manage /ansible/playbook]#vim rsync.yaml
- hosts: backup
tasks:
- name: Copy Rsyncd.conf To Nfs-Server #把rsync配置文件拷贝到backup服务器
copy: src=/ansible/backup/rsyncd.conf dest=/etc/rsyncd.conf
- name: Touch File /etc/rsync.passwd #在backup服务器上增加密码文件
file: dest=/etc/rsync.passwd state=touch mode=600
- name: Add Passwd to /etc/rsync.passwd #在backup服务器上配置密码
copy: content="rsync_backup:Admin@1234" dest=/etc/rsync.passwd
- name: Start Rsync.service #在backup服务器上开启rsync守护进程
shell: rsync --daemon
- name: Enable Rsync.service ##把开机自启动脚本拷贝到backup服务器
copy: src=/ansible/backup/rc.local dest=/etc/rc.d/rc.local
2.rsync的配置文件如下:
[root@manage /ansible/playbook]#cat /ansible/backup/rsyncd.conf
uid = www
gid = www
port = 873
fake super = yes
use chroot = no
max connections = 200
timeout = 600
ignore errors
read only = false
list = false
#hosts allow = 10.0.0.0/24
auth users = rsync_backup
secrets file = /etc/rsync.passwd
log file = /var/log/rsyncd.log
pid file = /var/run/rsyncd.pid
log file = /var/run/rsync.lock
#################################
[backup]
path = /backup
[data]
path = /data
3.开启自启动配置文件如下:
[root@manage /ansible/playbook]#cat /ansible/backup/rc.local
touch /var/lock/subsys/local
>/etc/udev/rules.d/70-persistent-net.rules
rsync --daemon
4.执行rsync.yaml剧本,结果如下:
[root@manage /ansible/playbook]#ansible-playbook rsync.yaml
PLAY RECAP ***************************************************************************
172.16.1.41 : ok=6 changed=5 unreachable=0 failed=0
3.3 搭建NFS服务器,并把web服务器的/data目录挂载到nfs服务器上用于测试
1.编写ansible-playbook部署nfs及web服务器
[root@manage /ansible/playbook]#vim nfs.yaml
- hosts: nfs
tasks:
- name: Install Rpcbind #安装Rpcbind
yum: name=rpcbind state=installed
- name: Install nfs-utls #安装nfs-utls
yum: name=nfs-utils state=installed
- name: Copy Config-file to nfs #把nfs配置文件拷贝到nfs服务器上
copy: src=/ansible/nfs/exports dest=/etc/exports
notify: Reload nfs #更改配置后,刷新NFS服务
- name: Start rpcbind and nfs-utils #开启rpcbind and nfs-utils服务
shell: /etc/init.d/rpcbind start && /etc/init.d/nfs start
- name: Enable Rpcbind and Nfs-utils #把开机自启动文件拷贝到NFS服务器上
copy: src=/ansible/nfs/rc.local dest=/etc/rc.d/rc.local
handlers:
- name: Reload nfs
shell: exportfs -rv
- hosts: web
tasks:
- name: Install Rpcbind #安装Rpcbind
yum: name=rpcbind state=installed
- name: Install nfs-utls #安装nfs-utls
yum: name=nfs-utils state=installed
- name: Start rpcbind and nfs-utils #开启rpcbind and nfs-utils服务
shell: /etc/init.d/rpcbind start && /etc/init.d/nfs start
- name: Mount Dir_data to Nfs #挂载目录
mount: src=172.16.1.31:/data path=/data fstype=nfs state=mounted
- name: Enable Rpcbind and Nfs-utils #把开机自启动文件拷贝到web服务器上
copy: src=/ansible/web/rc.local dest=/etc/rc.d/rc.local
2.NFS服务器配置文件如下
[root@manage /ansible/playbook]#cat /ansible/nfs/exports
/data 172.16.1.0/24(rw,sync,all_squash,anonuid=1000,anongid=1000)
3.NFS服务器开机自启动文件如下:
[root@manage /ansible/playbook]#cat /ansible/nfs/rc.local
touch /var/lock/subsys/local
>/etc/udev/rules.d/70-persistent-net.rules
/etc/init.d/rpcbind start
/etc/init.d/nfs start
4.Web服务器开机自启动文件如下:
[root@manage /ansible/playbook]#cat /ansible/web/rc.local
touch /var/lock/subsys/local
>/etc/udev/rules.d/70-persistent-net.rules
/etc/init.d/rpcbind start
/etc/init.d/nfs start
mount -a
5.执行剧本:
[root@manage /ansible/playbook]#ansible-playbook nfs.yaml
PLAY RECAP **************************************************************************
172.16.1.31 : ok=7 changed=6 unreachable=0 failed=0
172.16.1.7 : ok=6 changed=5 unreachable=0 failed=0
172.16.1.8 : ok=6 changed=5 unreachable=0 failed=0
6.验证web服务器是否挂载成功
[root@manage /ansible/playbook]#ansible web -m shell -a "df -h"
172.16.1.8 | SUCCESS | rc=0 >>
172.16.1.31:/data 19G 1.5G 16G 9% /data
172.16.1.7 | SUCCESS | rc=0 >>
172.16.1.31:/data 19G 1.5G 16G 9% /data
3.4 在NFS服务器上部署sersync软件
1.编写ansible-playbook,部署sersync:
[root@manage /ansible/playbook]#vim sersync.yaml
- hosts: nfs
tasks:
- name: Mkdir /usr/local/sersync #增加/usr/local/sersync目录
file: dest=/usr/local/sersync state=directory
- name: Copy Sersync File To Nfs #把sersync文件拷贝到NFS服务器上
copy: src=/ansible/nfs/GNU-Linux-x86/ dest=/usr/local/sersync/ mode=755
- name: Touch Rsync_Client_Pass #在NFS服务器上创建密码文件
file: dest=/etc/rsync.pass state=touch mode=600
- name: Config Rsync_Client_Pass #在NFS服务器上配置密码
copy: content="Admin@1234" dest=/etc/rsync.pass
- name: Start Sersync #在NFS服务器上启动sersync
shell: /usr/local/sersync/sersync2 -dro /usr/local/sersync/confxml.xml
- name: Enable Sersync #加入开机自启动
copy: src=/ansible/nfs/rc.local dest=/etc/rc.d/rc.local
2.编辑sersync配置文件
[root@manage /ansible/playbook]#cat /ansible/nfs/GNU-Linux-x86/confxml.xml
[root@manage /ansible/playbook]#cat /ansible/nfs/GNU-Linux-x86/confxml.xml
<?xml version="1.0" encoding="ISO-8859-1"?>
<head version="2.5">
<host hostip="localhost" port="8008"></host>
<debug start="false"/>
<fileSystem xfs="false"/>
<filter start="false">
<exclude expression="(.*)\.svn"></exclude>
<exclude expression="(.*)\.gz"></exclude>
<exclude expression="^info/*"></exclude>
<exclude expression="^static/*"></exclude>
</filter>
<inotify>
<delete start="true"/>
<createFolder start="true"/>
<createFile start="true"/>
<closeWrite start="true"/>
<moveFrom start="true"/>
<moveTo start="true"/>
<attrib start="true"/>
<modify start="true"/>
</inotify>
<sersync>
<localpath watch="/data">
<remote ip="172.16.1.41" name="data"/>
<!--<remote ip="192.168.8.39" name="tongbu"/>-->
<!--<remote ip="192.168.8.40" name="tongbu"/>-->
</localpath>
<rsync>
<commonParams params="-az"/>
<auth start="true" users="rsync_backup" passwordfile="/etc/rsync.pass"/>
<userDefinedPort start="false" port="874"/><!-- port=874 -->
<timeout start="true" time="100"/><!-- timeout=100 -->
<ssh start="false"/>
</rsync>
<failLog path="/tmp/rsync_fail_log.sh" timeToExecute="60"/><!--default every 60mins execute once-->
<crontab start="false" schedule="600"><!--600mins-->
<crontabfilter start="false">
<exclude expression="*.php"></exclude>
<exclude expression="info/*"></exclude>
</crontabfilter>
</crontab>
<plugin start="false" name="command"/>
</sersync>
<plugin name="command">
<param prefix="/bin/sh" suffix="" ignoreError="true"/> <!--prefix /opt/tongbu/mmm.sh
suffix-->
<filter start="false">
<include expression="(.*)\.php"/>
<include expression="(.*)\.sh"/>
</filter>
</plugin>
<plugin name="socket">
<localpath watch="/opt/tongbu">
<deshost ip="192.168.138.20" port="8009"/>
</localpath>
</plugin>
<plugin name="refreshCDN">
<localpath watch="/data0/htdocs/cms.xoyo.com/site/">
<cdninfo domainname="ccms.chinacache.com" port="80" username="xxxx"
passwd="xxxx"/>
<sendurl base="http://pic.xoyo.com/cms"/>
<regexurl regex="false"
match="cms.xoyo.com/site([/a-zA-Z0-9]*).xoyo.com/images"/>
</localpath>
</plugin>
</head>
3.编辑NFS服务器的自启动脚本
[root@manage /ansible/playbook]#cat /ansible/nfs/rc.local
touch /var/lock/subsys/local
>/etc/udev/rules.d/70-persistent-net.rules
/etc/init.d/rpcbind start
/etc/init.d/nfs start
/usr/local/sersync/sersync2 -dro /usr/local/sersync/confxml.xml
4.执行剧本:
[root@manage /ansible/playbook]#ansible-playbook sersync.yaml
5.验证:在web01的/data目录下创建文件,检查是否同步到backup服务器的/data目录中。
[root@manage /ansible/playbook]#ansible 172.16.1.7 -m shell -a "touch /data/web01"
172.16.1.7 | SUCCESS | rc=0 >>
[root@manage /ansible/playbook]#ansible backup -m shell -a "ls /data/"
172.16.1.41 | SUCCESS | rc=0 >>
web01
3.5 在lb及web服务器上安装nginx
1.编写ansible-playbook,部署nginx:
[root@manage /ansible/playbook]#vim nginx.yaml
- hosts: nginx
tasks:
- name: Copy Nginx.repo To web_lb #把yum文件拷贝到各服务器上
copy: src=/etc/yum.repos.d/nginx.repo dest=/etc/yum.repos.d/
- name: Install Nginx #各服务器上安装nginx
yum: name=nginx state=installed
- name: Copy Nginx_conf To Nginx_server #更改nginx基础配置后,重启nginx服务
copy: src=/ansible/nginx/nginx.conf dest=/etc/nginx/
notify: Restart Nginx_server
- name: Start Nginx #启动nginx服务
shell: /etc/init.d/nginx start
handlers: #重启nginx服务
- name: Restart Nginx_server
shell: /etc/init.d/nginx restart
- hosts: web
tasks:
- name: Enable Web_Nginx #nginx加入web服务器开机自启动
copy: src=/ansible/web/rc.local dest=/etc/rc.d/rc.local
- hosts: lb
tasks:
- name: Enable Lb_Nginx #nginx加入lb服务器开机自启动
copy: src=/ansible/lb/rc.local dest=/etc/rc.d/rc.local
2.yum源配置文件如下:
[nginx-stable]
name=nginx stable repo
baseurl=http://nginx.org/packages/centos/$releasever/$basearch/
gpgcheck=1
enabled=1
gpgkey=https://nginx.org/keys/nginx_signing.key
3.nginx基础配置如下,更改nginx进程的用户为www:
[root@manage /ansible/playbook]#cat /ansible/nginx/nginx.conf
user www;
···略
4.Web服务器的开机自启动文件如下:
[root@manage /ansible/playbook]#cat /ansible/web/rc.local
touch /var/lock/subsys/local
>/etc/udev/rules.d/70-persistent-net.rules
/etc/init.d/rpcbind start
/etc/init.d/nfs start
mount -a
/etc/init.d/nginx start
5.Lb服务器的开机自启动文件如下:
[root@manage /ansible/playbook]#cat /ansible/lb/rc.local
touch /var/lock/subsys/local
>/etc/udev/rules.d/70-persistent-net.rules
/etc/init.d/nginx start
6.执行剧本:
[root@manage /ansible/playbook]#ansible-playbook nginx.yaml
PLAY RECAP ******************************************************************************
172.16.1.5 : ok=8 changed=6 unreachable=0 failed=0
172.16.1.6 : ok=8 changed=6 unreachable=0 failed=0
172.16.1.7 : ok=8 changed=5 unreachable=0 failed=0
172.16.1.8 : ok=8 changed=5 unreachable=0 failed=0
7.验证是否安装成功:
[root@manage /ansible/playbook]#ansible nginx -m shell -a "rpm -qa nginx "
172.16.1.7 | SUCCESS | rc=0 >>
nginx-1.16.1-1.el6.ngx.x86_64
172.16.1.8 | SUCCESS | rc=0 >>
nginx-1.16.1-1.el6.ngx.x86_64
172.16.1.5 | SUCCESS | rc=0 >>
nginx-1.16.1-1.el6.ngx.x86_64
172.16.1.6 | SUCCESS | rc=0 >>
nginx-1.16.1-1.el6.ngx.x86_64
8.验证nginx进程的用户
[root@manage /ansible/playbook]#ansible nginx -m shell -a "ps -aux | grep nginx"
172.16.1.8 | SUCCESS | rc=0 >>
www 28424 0.0 0.1 47752 1812 ? S 11:01 0:00 nginx: worker process
172.16.1.6 | SUCCESS | rc=0 >>
www 27507 0.0 0.3 47752 1808 ? S 11:01 0:00 nginx: worker process
172.16.1.7 | SUCCESS | rc=0 >>
www 28490 0.0 0.1 47752 1804 ? S 11:01 0:00 nginx: worker process
172.16.1.5 | SUCCESS | rc=0 >>
www 27506 0.0 0.3 47752 1808 ? S 11:01 0:00 nginx: worker process
3.6 在WEB服务器上安装PHP
两台服务器配置一致:
1.安装yum源
[root@web01 ~]#yum localinstall http://mirror.webtatic.com/yum/el6/latest.rpm -y
2.安装PHP
[root@web01 ~]#yum -y install php71w php71w-cli php71w-common php71w-devel \
> php71w-embedded php71w-gd php71w-mcrypt php71w-mbstring php71w-pdo php71w-xml
php71w-fpm \
> php71w-mysqlnd php71w-opcache php71w-pecl-memcached php71w-pecl-redis
php71w-pecl-mongodb
3.更改php-fpm的进程用户
[root@web01 ~]#sed -i '/^user/c user = www' /etc/php-fpm.d/www.conf
[root@web01 ~]#sed -i '/^group/c group = www' /etc/php-fpm.d/www.conf
4.启动PHP
[root@web01 ~]#/etc/init.d/php-fpm start
5.加入开机自启动
[root@web01 ~]#echo "/etc/init.d/php-fpm start" >>/etc/rc.local
6.验证php进程用户
[root@manage /ansible/playbook]#ansible web -m shell -a "ps -aux | grep php-fpm"
172.16.1.8 | SUCCESS | rc=0 >>
www 28780 0.0 0.6 457984 6516 ? S 11:21 0:00 php-fpm: pool www
www 28781 0.0 0.6 457984 6516 ? S 11:21 0:00 php-fpm: pool www
www 28782 0.0 0.6 457984 6516 ? S 11:21 0:00 php-fpm: pool www
www 28783 0.0 0.6 457984 6520 ? S 11:21 0:00 php-fpm: pool www
www 28785 0.0 0.6 457984 6520 ? S 11:21 0:00 php-fpm: pool www
172.16.1.7 | SUCCESS | rc=0 >>
www 28846 0.0 0.6 457984 6516 ? S 11:21 0:00 php-fpm: pool www
www 28847 0.0 0.6 457984 6516 ? S 11:21 0:00 php-fpm: pool www
www 28848 0.0 0.6 457984 6516 ? S 11:21 0:00 php-fpm: pool www
www 28850 0.0 0.6 457984 6520 ? S 11:21 0:00 php-fpm: pool www
www 28851 0.0 0.6 457984 6520 ? S 11:21 0:00 php-fpm: pool www
root 28981 0.0 0.1 106096 1136 pts/1 S+ 11:26 0:00 /bin/sh -c ps -aux | grep
验证php是否正常工作
7.配置nginx配置文件:
[root@web01 ~]#vim /etc/nginx/conf.d/php.conf
servre {
listen 80;
server_name test.cwd.com;
location / {
root /website;
index index.html index.php;
}
location ~* \.php$ {
root /website;
fastcgi_index index.php;
fastcgi_pass 127.0.0.1:9000;
fastcgi_param SCRIPT_FILENAME $document_root$fastcgi_script_name;
include fastcgi_params;
}
[root@web01 ~]#nginx -t
nginx: the configuration file /etc/nginx/nginx.conf syntax is ok
nginx: configuration file /etc/nginx/nginx.conf test is successful
[root@web01 ~]#nginx -s reload
8.配置PHP测试脚本:
[root@web01 ~]#vim /website/index.php
<?php
phpinfo();
?>
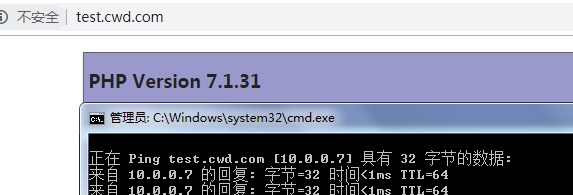
9.在主机上测试配置hosts文件,并测试web01:
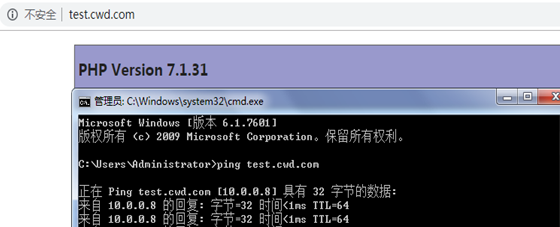
10.在主机上测试配置hosts文件,并测试web02:
3.7 在数据库服务器上安装mysql
1.SQL官方扩展源
[root@mysql ~]#rpm -ivh
http://repo.mysql.com/yum/mysql-5.7-community/el/6/x86_64/mysql57-community-release-el6-
10.noarch.rpm
2.数据库
yum install mysql-community-server -y
3.数据库,并加入开机自启;
[root@mysql ~]#/etc/init.d/mysqld start
Initializing MySQL database: [ OK ]
Starting mysqld: [ OK ]
[root@mysql ~]#echo "/etc/init.d/mysqld start" >> /etc/rc.local
4.数据库并修改密码及远程连接权限,刷新权限;
[root@mysql ~]#mysql -uroot -p$(awk '/temporary password/{print $NF}' /var/log/mysqld.log)
mysql> ALTER USER 'root'@'localhost' IDENTIFIED BY 'Admin@1234';
Query OK, 0 rows affected (0.00 sec)
mysql> grant all privileges on *.* to 'root'@'%' identified by 'Admin@1234';
Query OK, 0 rows affected, 1 warning (0.00 sec)
mysql> flush privileges;
Query OK, 0 rows affected (0.00 sec)
5.eb01上测试是否可以远程连接:
[root@web01 ~]#mysql -h172.16.1.51 -uroot -pAdmin@1234
mysql: [Warning] Using a password on the command line interface can be insecure.
Welcome to the MySQL monitor. Commands end with ; or \g.
Your MySQL connection id is 7
Server version: 5.7.27 MySQL Community Server (GPL)
Copyright (c) 2000, 2019, Oracle and/or its affiliates. All rights reserved.
Oracle is a registered trademark of Oracle Corporation and/or its
affiliates. Other names may be trademarks of their respective
owners.
Type 'help;' or '\h' for help. Type '\c' to clear the current input statement.
mysql>
3.8 在防火墙及负载均衡服务器上安装keepalived
1.安装keepalived
[root@manage /ansible/playbook]#ansible keepalievd -m yum -a "name=keepalived
state=installed"
2.验证安装结果
[root@manage /ansible/playbook]#ansible keepalievd -m shell -a "rpm -qa keepalievd"
172.16.1.100 | SUCCESS | rc=0 >>
172.16.1.101 | SUCCESS | rc=0 >>
172.16.1.5 | SUCCESS | rc=0 >>
172.16.1.6 | SUCCESS | rc=0 >>
3.启动keepalived
[root@manage /ansible/playbook]#ansible keepalievd -m shell -a "/etc/init.d/keepalived
start"
172.16.1.6 | SUCCESS | rc=0 >>
Starting keepalived: [ OK ]
172.16.1.5 | SUCCESS | rc=0 >>
Starting keepalived: [ OK ]
172.16.1.100 | SUCCESS | rc=0 >>
Starting keepalived: [ OK ]
172.16.1.101 | SUCCESS | rc=0 >>
Starting keepalived: [ OK ]
4. 加入开机自启动
[root@manage /ansible/playbook]#ansible keepalievd -m shell -a "echo '/etc/init.d/keepalived
start'>>/etc/rc.local"
172.16.1.5 | SUCCESS | rc=0 >>
172.16.1.6 | SUCCESS | rc=0 >>
172.16.1.101 | SUCCESS | rc=0 >>
172.16.1.100 | SUCCESS | rc=0 >>
5. 配置lb01与lb02的vrrp与nginx联动的脚本:
vim /server/scripts/check_nignx.sh
#!/bin/bash
web_info=$(ps -ef | grep nginx | grep -v grep | wc -l)
if [ ${web_info} -lt 2 ];then
/etc/init.d/keepalived stop
fi
6. 配置lb01的vrrp:
[root@lb01 ~]#cat /etc/keepalived/keepalived.conf
global_defs {
router_id lb01
}
vrrp_script check_nignx {
script "/server/scripts/check_nignx.sh"
interval 2
weight 100
}
vrrp_instance group1 {
state MASTER
interface eth1
virtual_router_id 50
priority 150
advert_int 1
authentication {
auth_type PASS
auth_pass 1111
}
virtual_ipaddress {
172.16.1.200
}
track_script {
check_nignx
}
}
vrrp_instance group2 {
state BACKUP
interface eth1
virtual_router_id 51
priority 100
advert_int 1
authentication {
auth_type PASS
auth_pass 1111
}
virtual_ipaddress {
172.16.1.201
}
track_script {
check_nignx
}
}
7. 配置lb02的vrrp
[root@lb02 ~]#cat /etc/keepalived/keepalived.conf
global_defs {
router_id lb02
}
vrrp_script check_nignx {
script "/server/scripts/check_nignx.sh"
interval 2
weight 100
}
vrrp_instance group1 {
state BACKUP
interface eth1
virtual_router_id 50
priority 100
advert_int 1
authentication {
auth_type PASS
auth_pass 1111
}
virtual_ipaddress {
172.16.1.200
}
track_script {
check_nignx
}
}
vrrp_instance group2 {
state MASTER
interface eth1
virtual_router_id 51
priority 150
advert_int 1
authentication {
auth_type PASS
auth_pass 1111
}
virtual_ipaddress {
172.16.1.201
}
track_script {
check_nignx
}
}
9. 验证:lb01与lb02的IP地址
[root@lb01 ~]#ip a
3: eth1: <BROADCAST,MULTICAST,UP,LOWER_UP> mtu 1500 qdisc pfifo_fast state UP qlen 1000
link/ether 00:0c:29:8c:b8:c4 brd ff:ff:ff:ff:ff:ff
inet 172.16.1.5/24 brd 172.16.1.255 scope global eth1
inet 172.16.1.200/32 scope global eth1
inet6 fe80::20c:29ff:fe8c:b8c4/64 scope link
valid_lft forever preferred_lft forever
[root@lb02 ~]#ip a
3: eth1: <BROADCAST,MULTICAST,UP,LOWER_UP> mtu 1500 qdisc pfifo_fast state UP qlen 1000
link/ether 00:0c:29:67:9f:25 brd ff:ff:ff:ff:ff:ff
inet 172.16.1.6/24 brd 172.16.1.255 scope global eth1
inet 172.16.1.201/32 scope global eth1
inet6 fe80::20c:29ff:fe67:9f25/64 scope link
valid_lft forever preferred_lft forever
10. 分别关掉lb01和lb02的nginx再进行验证
lb01
[root@lb01 ~]#/etc/init.d/nginx stop
Stopping nginx: [ OK ]
[root@lb01 ~]#ip a
3: eth1: <BROADCAST,MULTICAST,UP,LOWER_UP> mtu 1500 qdisc pfifo_fast state UP qlen 1000
link/ether 00:0c:29:8c:b8:c4 brd ff:ff:ff:ff:ff:ff
inet 172.16.1.5/24 brd 172.16.1.255 scope global eth1
inet6 fe80::20c:29ff:fe8c:b8c4/64 scope link
valid_lft forever preferred_lft forever
[root@lb01 ~]#/etc/init.d/nginx start
Starting nginx: [ OK ]
[root@lb01 ~]#/etc/init.d/keepalived start
Starting keepalived: [ OK ]
[root@lb01 ~]#ip a
3: eth1: <BROADCAST,MULTICAST,UP,LOWER_UP> mtu 1500 qdisc pfifo_fast state UP qlen 1000
link/ether 00:0c:29:8c:b8:c4 brd ff:ff:ff:ff:ff:ff
inet 172.16.1.5/24 brd 172.16.1.255 scope global eth1
inet 172.16.1.200/32 scope global eth1
inet6 fe80::20c:29ff:fe8c:b8c4/64 scope link
valid_lft forever preferred_lft forever
lb02
[root@lb02 ~]#/etc/init.d/nginx stop
Stopping nginx: [ OK ]
[root@lb02 ~]#ip a
3: eth1: <BROADCAST,MULTICAST,UP,LOWER_UP> mtu 1500 qdisc pfifo_fast state UP qlen 1000
link/ether 00:0c:29:67:9f:25 brd ff:ff:ff:ff:ff:ff
inet 172.16.1.6/24 brd 172.16.1.255 scope global eth1
inet6 fe80::20c:29ff:fe67:9f25/64 scope link
valid_lft forever preferred_lft forever
开启
[root@lb02 ~]#/etc/init.d/nginx start
Starting nginx: [ OK ]
[root@lb02 ~]#/etc/init.d/keepalived start
Starting keepalived: [ OK ]
[root@lb02 ~]#ip a
3: eth1: <BROADCAST,MULTICAST,UP,LOWER_UP> mtu 1500 qdisc pfifo_fast state UP qlen 1000
link/ether 00:0c:29:67:9f:25 brd ff:ff:ff:ff:ff:ff
inet 172.16.1.6/24 brd 172.16.1.255 scope global eth1
inet 172.16.1.201/32 scope global eth1
inet6 fe80::20c:29ff:fe67:9f25/64 scope link
valid_lft forever preferred_lft forever
11. 配置FW01的keepalievd
[root@FW01 ~]#vim /etc/keepalived/keepalived.conf
global_defs {
router_id fw01
}
vrrp_instance group1 {
state MASTER
interface eth0
virtual_router_id 50
priority 150
advert_int 1
authentication {
auth_type PASS
auth_pass 1111
}
virtual_ipaddress {
10.0.0.200
}
}
vrrp_instance group2 {
state BACKUP
interface eth0
virtual_router_id 51
priority 100
advert_int 1
authentication {
auth_type PASS
auth_pass 1111
}
virtual_ipaddress {
10.0.0.201
}
}
vrrp_instance group3 {
state MASTER
interface eth1
virtual_router_id 52
priority 150
advert_int 1
authentication {
auth_type PASS
auth_pass 1111
}
virtual_ipaddress {
172.16.1.210
}
}
vrrp_instance group4 {
state BACKUP
interface eth1
virtual_router_id 53
priority 100
advert_int 1
authentication {
auth_type PASS
auth_pass 1111
}
virtual_ipaddress {
172.16.1.211
}
}
12. 配置FW02的keepalievd
[root@FW02 ~]#cat /etc/keepalived/keepalived.conf
global_defs {
router_id fw02
}
vrrp_instance group1 {
state BACKUP
interface eth0
virtual_router_id 50
priority 100
advert_int 1
authentication {
auth_type PASS
auth_pass 1111
}
virtual_ipaddress {
10.0.0.200
}
}
vrrp_instance group2 {
state MASTER
interface eth0
virtual_router_id 51
priority 150
advert_int 1
authentication {
auth_type PASS
auth_pass 1111
}
virtual_ipaddress {
10.0.0.201
}
}
vrrp_instance group3 {
state BACKUP
interface eth1
virtual_router_id 52
priority 100
advert_int 1
authentication {
auth_type PASS
auth_pass 1111
}
virtual_ipaddress {
172.16.1.210
}
}
vrrp_instance group4 {
state MASTER
interface eth1
virtual_router_id 53
priority 150
advert_int 1
authentication {
auth_type PASS
auth_pass 1111
}
virtual_ipaddress {
172.16.1.211
}
}
13. 分别查看fw01和fw02的ip地址
Fw01
[root@FW01 ~]#ip a
2: eth0: <BROADCAST,MULTICAST,UP,LOWER_UP> mtu 1500 qdisc pfifo_fast state UP qlen 1000
link/ether 00:0c:29:8b:16:87 brd ff:ff:ff:ff:ff:ff
inet 10.0.0.100/24 brd 10.0.0.255 scope global eth0
inet 10.0.0.200/32 scope global eth0
inet6 fe80::20c:29ff:fe8b:1687/64 scope link
valid_lft forever preferred_lft forever
3: eth1: <BROADCAST,MULTICAST,UP,LOWER_UP> mtu 1500 qdisc pfifo_fast state UP qlen 1000
link/ether 00:0c:29:8b:16:91 brd ff:ff:ff:ff:ff:ff
inet 172.16.1.100/24 brd 172.16.1.255 scope global eth1
inet 172.16.1.210/32 scope global eth1
inet6 fe80::20c:29ff:fe8b:1691/64 scope link
valid_lft forever preferred_lft forever
Fw02
[root@FW02 ~]#ip a
2: eth0: <BROADCAST,MULTICAST,UP,LOWER_UP> mtu 1500 qdisc pfifo_fast state UP qlen 1000
link/ether 00:0c:29:3e:c3:80 brd ff:ff:ff:ff:ff:ff
inet 10.0.0.101/24 brd 10.0.0.255 scope global eth0
inet 10.0.0.201/32 scope global eth0
inet6 fe80::20c:29ff:fe3e:c380/64 scope link
valid_lft forever preferred_lft forever
3: eth1: <BROADCAST,MULTICAST,UP,LOWER_UP> mtu 1500 qdisc pfifo_fast state UP qlen 1000
link/ether 00:0c:29:3e:c3:8a brd ff:ff:ff:ff:ff:ff
inet 172.16.1.101/24 brd 172.16.1.255 scope global eth1
inet 172.16.1.211/32 scope global eth1
inet6 fe80::20c:29ff:fe3e:c38a/64 scope link
valid_lft forever preferred_lft forever
14. 在防火墙上开启报文转发功能
[root@FW01 ~]#vim /etc/sysctl.conf
net.ipv4.ip_forward = 1
[root@FW01 ~]#sysctl -p
net.ipv4.ip_forward = 1
[root@FW02 ~]#vim /etc/sysctl.conf
net.ipv4.ip_forward = 1
[root@FW02 ~]#sysctl -p
net.ipv4.ip_forward = 1
15. 设置lb01和lb02的默认路由指向两台防火墙的内网虚拟IP
lb01
[root@lb01 ~]#route add default gw 172.16.1.210
[root@lb01 ~]#route add default gw 172.16.1.211
lb02
[root@lb02 ~]#route add default gw 172.16.1.210
[root@lb02 ~]#route add default gw 172.16.1.211
16. 验证系统路由
lb01
[root@lb01 ~]#route -n
0.0.0.0 172.16.1.211 0.0.0.0 UG 0 0 0 eth1
0.0.0.0 172.16.1.210 0.0.0.0 UG 0 0 0 eth1
lb02
[root@lb01 ~]#route -n
0.0.0.0 172.16.1.211 0.0.0.0 UG 0 0 0 eth1
0.0.0.0 172.16.1.210 0.0.0.0 UG 0 0 0 eth1
4 业务部署
4.1 部署电商系统(以WordPress为例,测试好后删除)
1.在web01上创建业务系统存放目录
mdkir /website
2.把WordPress文件上传到/website目录,解压;
[root@web01 /website]#tar xf wordpress-4.7.3-zh_CN.tar.gz
[root@web01 /website]#ls
wordpress wordpress-4.7.3-zh_CN.tar.gz
3. 在web01上创建生成证书文件
[root@web01 ~]#mkdir /etc/nginx/ssl_key -p
[root@web01 ~]#cd /etc/nginx/ssl_key/
[root@web01 /etc/nginx/ssl_key]#openssl genrsa -idea -out server.key 2048
[root@web01 /etc/nginx/ssl_key]#openssl req -days 36500 -x509 \
> -sha256 -nodes -newkey rsa:2048 -keyout server.key -out server.crt
Generating a 2048 bit RSA private key
[root@lb01 /etc/nginx/ssl_key]#ls
server.crt server.key
4.在web01上编写nginx配置文件
[root@web01 /website]#vim /etc/nginx/conf.d/blog.conf
server {
listen 443 ssl;
server_name blog.cwd.com;
ssl_certificate ssl_key/server.crt;
ssl_certificate_key ssl_key/server.key;
location / {
root /website/wordpress;
index index.html index.php;
}
location ~* \.php$ {
root /website/wordpress;
fastcgi_index index.php;
fastcgi_pass 127.0.0.1:9000;
fastcgi_param SCRIPT_FILENAME $document_root$fastcgi_script_name;
include fastcgi_params;
}
[root@web01 /website]#nginx -t
nginx: the configuration file /etc/nginx/nginx.conf syntax is ok
nginx: configuration file /etc/nginx/nginx.conf test is successful
[root@web01 /website]#nginx -s reload
5.创建wordpress数据库
mysql> create database wordpress;
Query OK, 1 row affected (0.01 sec)
6.在web01上安装wordpress,安装过程略。

7.安装好后,把存放静态资源的目录挂载到NFS上。
7.1)在nfs服务器上新建目录,改变/website/的属主及属组
[root@nfs ~]#mkdir -p /website/wordpress
[root@nfs ~]#chown -R www.www /website/
7.2)把web01服务器存放静态资源的/website/wordpress/wp-content目录拷贝到NFS服务器上。
[root@web01 /website/wordpress]#scp -rp wp-content/ root@172.16.1.31:/website/wordpress
7.3)把/website/wordpress/wp-content/目录增加到NFS的配置文件中,并更新NFS服务。
[root@nfs ~]#vim /etc/exports
/data 172.16.1.0/24(rw,sync,all_squash,anonuid=1000,anongid=1000)
/website/wordpress/wp-content/172.16.1.0/24(rw,sync,all_squash,anonuid=1000,anongid=1000
)
[root@nfs ~]#exportfs -rv
exporting 172.16.1.0/24:/website/wordpress/wp-content
exporting 172.16.1.0/24:/data
7.4)在web01服务器上进行挂载并设置开机自动挂载
[root@web01 /website]#mount.nfs 172.16.1.31:/website/wordpress/wp-content
/website/wordpress/wp-content
[root@web01 /website]#vim /etc/fstab
172.16.1.31:/website/wordpress/wp-content /website/wordpress/wp-content nfs defaults 0 0
8.把wordpress扩展到web02上;
8.1)拷贝nginx配置文件到web02
[root@web01 /website/wordpress]#scp /etc/nginx/conf.d/blog.conf
172.16.1.8:/etc/nginx/conf.d/
8.2)拷贝website目录到web02上;
[root@web01 /website/wordpress]#scp -rp /website 172.16.1.8:/
8.3)拷贝证书目录到web02、lb01、lb02上
[root@web01 /etc/nginx/ssl_key]#scp -rp /etc/nginx/ssl_key/ 172.16.1.8:/etc/nginx/
[root@web01 /etc/nginx/ssl_key]#scp -rp /etc/nginx/ssl_key/ 172.16.1.5:/etc/nginx/
[root@web01 /etc/nginx/ssl_key]#scp -rp /etc/nginx/ssl_key/ 172.16.1.6:/etc/nginx/
8.4)在web02上把静态目录挂载到NFS上,并设置开机自动挂载。
[root@web02 ~]#mount.nfs 172.16.1.31:/website/wordpress/wp-content
/website/wordpress/wp-content
[root@web02 /website]#vim /etc/fstab
172.16.1.31:/website/wordpress/wp-content /website/wordpress/wp-content nfs defaults 0 0
8.5)检查nignx配置语法、重新加载配置、设置hosts文件进行测试
[root@web02 ~]#nginx -t
nginx: the configuration file /etc/nginx/nginx.conf syntax is ok
nginx: configuration file /etc/nginx/nginx.conf test is successful
[root@web02 ~]#nginx -s reload
9.在lb01上配置负载均衡
9.1)配置负载均衡参数
[root@lb01 /etc/nginx/ssl_key]#vim /etc/nginx/proxy_params
proxy_set_header Host $http_host;
proxy_set_header X-Real-IP $remote_addr;
proxy_set_header X-Forwarded-For $proxy_add_x_forwarded_for;
proxy_connect_timeout 30;
proxy_send_timeout 60;
proxy_read_timeout 60;
proxy_buffering on;
proxy_buffer_size 32k;
proxy_buffers 4 128k;
9.2)配置负载均衡及https
[root@lb01 /etc/nginx/ssl_key]#vim /etc/nginx/conf.d/blog.conf
upstream blog {
server 172.16.1.7:443;
server 172.16.1.8:443;
}
server {
listen 443 ssl;
server_name blog.cwd.com;
ssl_certificate ssl_key/server.crt;
ssl_certificate_key ssl_key/server.key;
locaticon / {
proxy_pass https://blog;
include proxy_params;
}
}
server {
listen 80;
server_name r.cwd.com;
rewrite (.*) https://$server_name$request_uri;
}
10.把lb01上负载均衡的参数文件、配置拷贝到lb02上。
[root@lb01 /etc/nginx/ssl_key]#scp /etc/nginx/conf.d/blog.conf
172.16.1.6:/etc/nginx/conf.d/
root@172.16.1.6's password:
blog.conf 100%
390 0.4KB/s 00:00
[root@lb01 /etc/nginx/ssl_key]#scp /etc/nginx/proxy_params 172.16.1.6:/etc/nginx/
root@172.16.1.6's password:
proxy_params 100%
275 0.3KB/s 00:00
11.在lb02上检查、重新加载nginx配置
[root@lb02 ~]#nginx -t
nginx: the configuration file /etc/nginx/nginx.conf syntax is ok
nginx: configuration file /etc/nginx/nginx.conf test is successful
[root@lb02 ~]#nginx -s reload
13.配置防火墙FW1安全策略
13.1)开启并初始化防火墙
[root@FW01 ~]#/etc/init.d/iptables start
[root@FW01 ~]#iptables -F
[root@FW01 ~]#iptables -X
[root@FW01 ~]#iptables -Z
13.2)配置fw1、fw2防火墙安全策略
#允许源地址172.16.1.0/24访问本防火墙
[root@FW01 ~]#iptables -t filter -A INPUT -s 172.16.1.0/24 -j ACCEPT
[root@FW02 ~]#iptables -t filter -A INPUT -s 172.16.1.0/24 -j ACCEPT
#允许任意地址访问本防火墙的22端口
[root@FW01 ~]#iptables -t filter -A INPUT -p tcp --dport 22 -j ACCEPT
[root@FW02 ~]#iptables -t filter -A INPUT -p tcp --dport 22 -j ACCEPT
#允许本防火墙访问任意区域
[root@FW01 ~]#iptables -t filter -A OUTPUT
[root@FW02 ~]#iptables -t filter -A OUTPUT
#允许从公网访问防火墙内网的22,443,80端口
[root@FW01 ~]#iptables -t filter -A FORWARD -d 172.16.1.0/24 -m multiport -p tcp --dport
22,80,443 -j ACCEPT
[root@FW02~]#iptables -t filter -A FORWARD -d 172.16.1.0/24 -m multiport -p tcp --dport
22,80,443 -j ACCEPT
#允许172.16.1.0/24访问公网
[root@FW01 ~]#iptables -t filter -A FORWARD -s 172.16.1.0/24 -j ACCEPT
[root@FW02 ~]#iptables -t filter -A FORWARD -s 172.16.1.0/24 -j ACCEPT
#允许防火墙公网IP地址互通
[root@FW01 ~]#iptables -t filter -I INPUT -s 10.0.0.0/24 -j ACCEPT
[root@FW02 ~]#iptables -t filter -I INPUT -s 10.0.0.0/24 -j ACCEPT
#过滤其他所有数据
[root@FW01 ~]#iptables -t filter -A INPUT -j DROP
[root@FW01 ~]#iptables -t filter -A FORWARD -j DROP
[root@FW02 ~]#iptables -t filter -A INPUT -j DROP
[root@FW02 ~]#iptables -t filter -A FORWARD -j DROP
13.3)最终两台防火墙的安全策略配置如下:
[root@FW02 ~]#iptables -L -n -v
Chain INPUT (policy ACCEPT 0 packets, 0 bytes)
pkts bytes target prot opt in out source destination
90 4096 ACCEPT all -- * * 10.0.0.0/24 0.0.0.0/0
736 29440 ACCEPT all -- * * 172.16.1.0/24 0.0.0.0/0
495 40024 ACCEPT tcp -- * * 0.0.0.0/0 0.0.0.0/0 tcp
dpt:22
4912 197K DROP all -- * * 0.0.0.0/0 0.0.0.0/0
Chain FORWARD (policy ACCEPT 0 packets, 0 bytes)
pkts bytes target prot opt in out source destination
233 31150 ACCEPT all -- * * 172.16.1.0/24 0.0.0.0/0
18 1496 ACCEPT tcp -- * * 0.0.0.0/0 172.16.1.0/24
multiport dports 22,80,443
2 176 DROP all -- * * 0.0.0.0/0 0.0.0.0/0
Chain OUTPUT (policy ACCEPT 166 packets, 7552 bytes)
pkts bytes target prot opt in out source destination
5192 248K all -- * * 0.0.0.0/0 0.0.0.0/0
13.4)配置两台防火墙的NAT策略
#配置源NAT,允许两台LB访问公网
[root@FW01 ~]#iptables -t nat -A POSTROUTING -s 172.16.1.0/24 -o eth0 -j SNAT --to-source
10.0.0.200
[root@FW02 ~]#iptables -t nat -A POSTROUTING -s 172.16.1.0/24 -o eth0 -j SNAT --to-source
10.0.0.201
#配置目的NAT,从公网访问LB的80和443端口
[root@FW01 ~]#iptables -t nat -A PREROUTING -d 10.0.0.200 -i eth0 -p tcp --dport 443 -j
DNAT --to-destination 172.16.1.200:443
[root@FW02 ~]#iptables -t nat -A PREROUTING -d 10.0.0.200 -i eth0 -p tcp --dport 80 -j DNAT
--to-destination 172.16.1.200:80
13.5)最终两台防火墙的NAT策略如下:
[root@FW01 ~]#iptables -t nat -L -n -v
Chain PREROUTING (policy ACCEPT 136 packets, 8836 bytes)
pkts bytes target prot opt in out source destination
9 468 DNAT tcp -- eth0 * 0.0.0.0/0 10.0.0.200
tcp dpt:11122 to:172.16.1.200:22
65 3380 DNAT tcp -- eth0 * 0.0.0.0/0 10.0.0.200
tcp dpt:443 to:172.16.1.200:443
6 312 DNAT tcp -- eth0 * 0.0.0.0/0 10.0.0.200
tcp dpt:80 to:172.16.1.200:80
Chain POSTROUTING (policy ACCEPT 67 packets, 3484 bytes)
pkts bytes target prot opt in out source destination
180 11043 SNAT all -- * eth0 172.16.1.0/24 0.0.0.0/0
to:10.0.0.200
0 0 SNAT all -- * eth0 172.16.1.0/24 0.0.0.0/0
to:10.0.0.201
Chain OUTPUT (policy ACCEPT 0 packets, 0 bytes)
pkts bytes target prot opt in out source destination
[root@FW02 ~]#iptables -t nat -L -n -v
Chain PREROUTING (policy ACCEPT 0 packets, 0 bytes)
pkts bytes target prot opt in out source destination
1 52 DNAT tcp -- eth0 * 0.0.0.0/0 10.0.0.201
tcp dpt:11022 to:172.16.1.201:22
0 0 DNAT tcp -- eth0 * 0.0.0.0/0 10.0.0.200
tcp dpt:443 to:172.16.1.200:443
0 0 DNAT tcp -- eth0 * 0.0.0.0/0 10.0.0.200
tcp dpt:80 to:172.16.1.200:80
Chain POSTROUTING (policy ACCEPT 0 packets, 0 bytes)
pkts bytes target prot opt in out source destination
50 3346 SNAT all -- * eth0 172.16.1.0/24 0.0.0.0/0
to:10.0.0.201
0 0 SNAT all -- * eth0 172.16.1.0/24 0.0.0.0/0
to:10.0.0.200
Chain OUTPUT (policy ACCEPT 0 packets, 0 bytes)
pkts bytes target prot opt in out source destination
14)在终端上访问blog.cwd.com进行测试

4.2 部署网上图书馆
1.两台web服务器安装Java
yum install java -y
2.web01下载安装tomcat
[root@web01 /website]#wget
http://mirrors.tuna.tsinghua.edu.cn/apache/tomcat/tomcat-9/v9.0.24/bin/apache-tomcat-9.0.24.tar.gz
3.解压文件,重命名目录
[root@web01 /website]#tar xf apache-tomcat-9.0.24.tar.gz
[root@web01 /website]#mv apache-tomcat-9.0.24 tomcat
4.启动tomcat
[root@web01 /website/tomcat/bin]#./startup.sh
Using CATALINA_BASE: /website/tomcat
Using CATALINA_HOME: /website/tomcat
Using CATALINA_TMPDIR: /website/tomcat/temp
Using JRE_HOME: /usr
Using CLASSPATH:
/website/tomcat/bin/bootstrap.jar:/website/tomcat/bin/tomcat-juli.jar
Tomcat started.
5.拷贝/website/tomcat目录到web02上。
[root@web01 /website]#scp -rp /website/tomcat 172.16.1.8:/website/
6.web02上启动tomcat
[root@web02 /website/tomcat/bin]#./startup.sh
Using CATALINA_BASE: /website/tomcat
Using CATALINA_HOME: /website/tomcat
Using CATALINA_TMPDIR: /website/tomcat/temp
Using JRE_HOME: /usr
Using CLASSPATH:
/website/tomcat/bin/bootstrap.jar:/website/tomcat/bin/tomcat-juli.jar
Tomcat started.
7.在web01上把/website/tomcat/webapps拷贝到NFS服务器
[root@web01 /website/tomcat]#scp -rp /website/tomcat/webapps 172.16.1.31:/website/tomcat/
8.增加NFS服务器的配置
[root@nfs /website/tomcat/webapps]#vim /etc/exports
/website/tomcat/webapps 172.16.1.0/24(rw,sync,all_squash,anonuid=1000,anongid=1000)
更新配置
[root@nfs /website/tomcat/webapps]#exportfs -rv
exporting 172.16.1.0/24:/website/tomcat/webapps
exporting 172.16.1.0/24:/website/wordpress/wp-content
exporting 172.16.1.0/24:/data
9.分别把web01和web02的/website/tomcat/webapps目录挂载到NFS服务器上。
[root@web01 /website/tomcat/bin]#mount.nfs 172.16.1.31:/website/tomcat/webapps
/website/tomcat/webapps
[root@web01 /website/tomcat/bin]#vim /etc/fstab
172.16.1.31:/website/tomcat/webapps /website/tomcat/webapps nfs defaults 0 0
[root@web02 /website/tomcat/bin]#mount.nfs 172.16.1.31:/website/tomcat/webapps
/website/tomcat/webapps
[root@web02 /website/tomcat/bin]#vim /etc/fstab
172.16.1.31:/website/tomcat/webapps /website/tomcat/webapps nfs defaults 0 0
10.在lb01上配置负载均衡及https
[root@lb01 ~]#cat /etc/nginx/conf.d/tomcat.conf
upstream tomcat {
server 172.16.1.7:8080;
server 172.16.1.8:8080;
}
server {
listen 443 ssl;
server_name tomcat.cwd.com;
ssl_certificate ssl_key/server.crt;
ssl_certificate_key ssl_key/server.key;
location / {
proxy_pass http://tomcat;
include proxy_params;
}
}
server {
listen 80;
server_name tomcat.cwd.com;
rewrite (.*) https://$server_name$request_uri;
}
11.把lb01上的配置文件拷贝到lb02上。
[root@lb01 ~]#scp /etc/nginx/conf.d/tomcat.conf 172.16.1.6:/etc/nginx/conf.d/
[root@lb02 ~]#nginx -t
nginx: the configuration file /etc/nginx/nginx.conf syntax is ok
nginx: configuration file /etc/nginx/nginx.conf test is successful
[root@lb02 ~]#nginx -s reload
12.在两台防火墙上把lb的VIP172.16.1.201的80,443端口映射到公网10.0.0.201的80,443端口上。
[root@FW01 ~]#iptables -t nat -A PREROUTING -d 10.0.0.201 -i eth0 -p tcp --dport 80 -j DNAT
--to-destination 172.16.1.201:80
[root@FW01 ~]#iptables -t nat -A PREROUTING -d 10.0.0.201 -i eth0 -p tcp --dport 443 -j DNAT
--to-destination 172.16.1.201:443
[root@FW02 ~]#iptables -t nat -A PREROUTING -d 10.0.0.201 -i eth0 -p tcp --dport 80 -j DNAT
--to-destination 172.16.1.201:80
[root@FW02 ~]#iptables -t nat -A PREROUTING -d 10.0.0.201 -i eth0 -p tcp --dport 443 -j DNAT
--to-destination 172.16.1.201:443
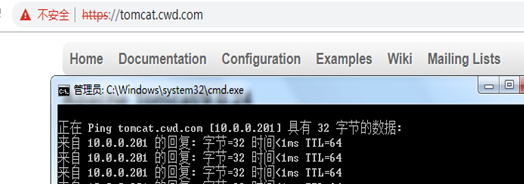
13.在终端上验证
14.保存防火墙配置
[root@FW01 ~]#/etc/init.d/iptables save
iptables: Saving firewall rules to /etc/sysconfig/iptables:[ OK ]
[root@FW02 ~]#/etc/init.d/iptables save
iptables: Saving firewall rules to /etc/sysconfig/iptables:[ OK ]
5 优化
5.1 更换实时同步目录
现网环境中,NFS服务器把/data目录实时同步到backup服务器的/data目录中。
现两个系统均放在NFS服务器的/website目录上。所以,需要在backup服务器中创建/website,并把NFS服务器的/website的数据实时同步到backup服务器的/website目录上。
1.在backup服务器上创建目录
[root@backup ~]#mkdir /website
[root@backup ~]#chown -R www.www /website/
2.更改rsync的配置文件,增加website模块
[root@backup ~]#vim /etc/rsyncd.conf
[website]
path = /website
3.更改sersync的配置文件,重启服务;
[root@nfs /website]#vim /usr/local/sersync/confxml.xml
<localpath watch="/website">
<remote ip="172.16.1.41" name="website"/>
[root@nfs /website]#ps -aux | grep sersync
Warning: bad syntax, perhaps a bogus '-'? See /usr/share/doc/procps-3.2.8/FAQ
root 28343 0.0 0.0 125048 840 ? Ssl 10:45 0:00
/usr/local/sersync/sersync2 -dro /usr/local/sersync/confxml.xml
root 28991 0.0 0.0 103308 848 pts/0 S+ 21:20 0:00 grep sersync
[root@nfs /website]#kill -9 28343
[root@nfs /website]#/usr/local/sersync/sersync2 -dro /usr/local/sersync/confxml.xml
4.在backup服务器上验证实时同步
[root@backup ~]#ls /website/
tomcat wordpress
5.2 下发定时备份脚本
1.定时备份客户端脚本
[root@manage ~]# vim /server/scripts/rsync_client.sh
#!/bin/bash
export PATH=/usr/local/sbin:/usr/local/bin:/sbin:/bin:/usr/sbin:/usr/bin:/root/bin
Path=/backup
Host=$(hostname)
Addr=$(ifconfig eth1 | awk -F "[ :]+" 'NR==2{print $4}')
Date=$(date +%F_%w)
Dest=${Host}_${Addr}_${Date}
[ -d $Path/$Dest ] || mkdir -p $Path/$Dest
cd / && \
[ -f $Path/$Dest/sys.tar.gz ] || tar zcf $Path/$Dest/sys.tar.gz etc/hosts etc/rc.local
etc/nginx/conf.d/ \
etc/keepalived/keepalived.conf
md5sum $Path/$Dest/sys.tar.gz > $Path/$Dest/flag
export RSYNC_PASSWORD=Admin@1234
rsync -avz $Path/ rsync_backup@172.16.1.41::backup
find $Path/ -type d -mtime +7| xargs rm -fr
2.下发脚本给所有服务器
[root@manage ~]#ansible all -m copy -a "src=/server/scripts/rsync_client.sh
dest=/server/scripts/"
3.配置客户端定时任务
[root@manage ~]#ansible all -m cron -a "name='Rsync_backup' minute=00 hour=00 job='sh
/server/scripts/rsync_client.sh >/dev/null 2>&1'"
4.验证定时任务
[root@manage ~]#ansible all -m shell -a "crontab -l "
172.16.1.8 | SUCCESS | rc=0 >>
#Ansible: Rsync_backup
00 00 * * * sh /server/scripts/rsync_client.sh >/dev/null 2>&1
172.16.1.7 | SUCCESS | rc=0 >>
#Ansible: Rsync_backup
00 00 * * * sh /server/scripts/rsync_client.sh >/dev/null 2>&1
172.16.1.5 | SUCCESS | rc=0 >>
#Ansible: Rsync_backup
00 00 * * * sh /server/scripts/rsync_client.sh >/dev/null 2>&1
172.16.1.6 | SUCCESS | rc=0 >>
#Ansible: Rsync_backup
00 00 * * * sh /server/scripts/rsync_client.sh >/dev/null 2>&1
172.16.1.100 | SUCCESS | rc=0 >>
#Ansible: Rsync_backup
00 00 * * * sh /server/scripts/rsync_client.sh >/dev/null 2>&1
172.16.1.101 | SUCCESS | rc=0 >>
#Ansible: Rsync_backup
00 00 * * * sh /server/scripts/rsync_client.sh >/dev/null 2>&1
172.16.1.31 | SUCCESS | rc=0 >>
#Ansible: Rsync_backup
00 00 * * * sh /server/scripts/rsync_client.sh >/dev/null 2>&1
172.16.1.41 | SUCCESS | rc=0 >>
#Ansible: Rsync_backup
00 00 * * * sh /server/scripts/rsync_client.sh >/dev/null 2>&1
6.配置backup服务器邮件服务
cat>>/etc/mail.rc<<EOF
set from=467770590@qq.com
set smtp=smtps://smtp.qq.com:465
set smtp-auth-user=467770590@qq.com
set smtp-auth-password=xxxxxxxxxxxx
set smtp-auth=login
set ssl-verify=ignore
set nss-config-dir=/etc/pki/nssdb/
EOF
7.配置backup服务器服务端脚本
[root@backup ~]#vim /server/scripts/rsync_server.sh
#!/bin/bash
export PATH=/usr/local/sbin:/usr/local/bin:/sbin:/bin:/usr/sbin:/usr/bin:/root/bin
Path=/backup
Date=$(date +%F_%w)
md5sum -c $Path/*_$Date/flag>$Path/result_$Date
mail -s "RSYNC_DATA" 467770590@qq.com <$Path/result_$Date
find $Path/ -type d -mtime +180 | xargs rm -fr
8.执行脚本进行测试
[root@manage ~]#ansible all -m shell -a "sh /server/scripts/rsync_client.sh"
[root@backup ~]#sh /server/scripts/rsync_server.sh
[root@backup ~]#ls /backup/
backup_172.16.1.41_2019-09-11_3 lb01_172.16.1.200_2019-09-11_3
nfs_172.16.1.31_2019-09-11_3
FW01_172.16.1.100_2019-09-11_3 lb02_172.16.1.6_2019-09-11_3
web01_172.16.1.7_2019-09-11_3
FW02_172.16.1.101_2019-09-11_3 manage_172.16.1.61_2019-09-11_3
web02_172.16.1.8_2019-09-11_3
评论暂时关闭