CenOS5.6下安装nagios3.2监控服务器群的运行状况
CenOS5.6下安装nagios3.2监控服务器群的运行状况
CenOS5.6下安装nagios3.2监控服务器群的运行状况
Nagios功能列表 所需软件包及环境
基本的监控:
NAGIOS gcc、gcc-devel、appache、php、gd、gd-devel
NAGIOS-PLUGINS mysql-devel(防止安装之后无法生存check_mysql的监控文件)
NRPE openssl-devel (Linux系统安装。监控端和被监控端)
NSCLIENT 无(windows系统安装,只安装在被监控端)
邮件告警功能
安装centos时候定制软件选择DNS服务和邮件服务.
绘图功能
Pnp cairo、 pango、 libart_lgpl、 libart_lgpl-devel、 zlib、 zlib-devel 、freetype 、freetype-devel
rrdtool
飞信告警功能
Fetion libACE
MSN告警功能
暂无测试
一:安装nagios
1:安装支持包
#yum -y install gcc gcc-c++ gd gd-devel php httpd openssl-devel mysql-devel
具体依赖的对应服务见上结构
2:添加用户和组
#useradd nagios
#passwd nagios
#groupadd nagcmd
#usermod -G nagcmd nagios
#usermod -G nagcmd apache
记得把apache加入到该用户组
chkconfig httpd on
3:正式安装nagios
tar –xzf nagios-3.2.0.tar.gz
cd nagios-3.2.0
./configure --with-command-group=nagcmd --prefix=/usr/local/nagios
make all
make install
make install-init
make install-config
make install-commandmode
4:配置apache的httpd.conf,允许文件目录被访问
默认安装位置在/etc/httpd/conf/httpd.conf
如何不知道也可以使用如下命令查找
find / name httpd.conf|grep httpd.conf
然后添加以下代码
[plain]
ScriptAlias /nagios/cgi-bin "/usr/local/nagios/sbin"
<Directory "/usr/local/nagios/sbin">
Options ExecCGI
AllowOverride None
Order allow,deny
Allow from all
AuthName "Nagios Access"
AuthType Basic
AuthUserFile /usr/local/nagios/etc/htpasswd.users
Require valid-user
</Directory>
Alias /nagios "/usr/local/nagios/share"
<Directory "/usr/local/nagios/share">
Options None
AllowOverride None
Order allow,deny
Allow from all
AuthName "Nagios Access"
AuthType Basic
AuthUserFile /usr/local/nagios/etc/htpasswd.users
Require valid-user
</Directory>
5:创建apache目录验证文件
htpasswd -c /usr/local/nagios/etc/htpasswd.users nagiosadmin
New password: (输入密码)
Re-type new password: (再输入一次密码)
Adding password for user nagiosadmin
service httpd restart
6:安装nagios插件
tar –xzf nagios-plugins-1.4.13.tar.gz
cd nagios-plugins-1.4.13
./configure --with-nagios-user=nagios --with-nagios-group=nagios --prefix=/usr/local/nagios
make
make install
7:将nagios加入到开机启动项
chkconfig nagios on
8:检查配置文件
/usr/local/nagios/bin/nagios -v /usr/local/nagios/etc/nagios.cfg
//这个检测非常有用,可以很快的判断我们的错误在哪里。
9:配置nagios
首先/usr/local/nagios/etc/nagios.cfg,取消前面的”#”即可.如下:
[plain]
# You can specify individual object config files as shown below:
cfg_file=/usr/local/nagios/etc/objects/commands.cfg
cfg_file=/usr/local/nagios/etc/objects/contacts.cfg
cfg_file=/usr/local/nagios/etc/objects/timeperiods.cfg
cfg_file=/usr/local/nagios/etc/objects/templates.cfg
# Definitions for monitoring the local (Linux) host
cfg_file=/usr/local/nagios/etc/objects/localhost.cfg
# Definitions for monitoring a Windows machine
#cfg_file=/usr/local/nagios/etc/objects/windows.cfg
# Definitions for monitoring a router/switch
#cfg_file=/usr/local/nagios/etc/objects/switch.cfg
# Definitions for monitoring a network printer
#cfg_file=/usr/local/nagios/etc/objects/printer.cfg
# You can also tell Nagios to process all config files (with a .cfg
# extension) in a particular directory by using the cfg_dir
# directive as shown below:
# cfg_dir=/usr/local/nagios/etc/servers
上面有些配置文件没有,需要自己手动创建
Commands.cfg主要是监控命令的配置文件。Contacts.cfg主要是联系人的配置文件
Timeperiods.cfg主要是时间配置,监控的时间段设置。Hots.cfg是主机配置.
Localhost.cfg监控服务器的配置文件.
Windows.cfg监控微软系统的配置文件.
chown -R nagios.nagios /usr/local/nagios
10.修改commands.cfg配置文件
新增以下内容:
[plain]
# 'check_nrpe' command definition
define command{
command_name check_nrpe
command_line $USER1$/check_nrpe -H $HOSTADDRESS$ -c $ARG1$
}
define command{
command_name check_nrpe
command_line $USER1$/check_nrpe -H $HOSTADDRESS$ -c $ARG1$
}
11.修改localhost.cfg
[plain]
define host {
host_name nagios-server
alias nagios server
address 192.168.152.156
contact_groups sagroup
check_command check-host-alive
max_check_attempts 5
notification_interval 10
notification_period 24x7
notification_options d,u,r
}
define hostgroup {
hostgroup_name sa-servers
alias sa servers
members nagios-server
}
#加入如下服务(也可以删除当前文件夹下的其他所有service,我删除了否则验证的时候会报错,只预留以下几个)
[plain]
define service {
host_name nagios-server
service_description check-host-alive
check_period 24x7
max_check_attempts 4
normal_check_interval 3
retry_check_interval 2
contact_groups sagroup
notification_interval 10
notification_period 24x7
notification_options w,u,c,r
check_command check-host-alive
}
define service {
host_name nagios-server
service_description check_tcp 80
check_period 24x7
max_check_attempts 4
normal_check_interval 3
retry_check_interval 2
contact_groups sagroup
notification_interval 10
notification_period 24x7
notification_options w,u,c,r
check_command check_tcp!80
}
define service{
host_name nagios-server
service_description check-disk
check_command check_nrpe!check_df
max_check_attempts 4
normal_check_interval 3
retry_check_interval 2
check_period 24x7
notification_interval 10
notification_period 24x7
notification_options w,u,c,r
contact_groups sagroup
}
define service{
host_name nagios-server
service_description check-load
check_command check_nrpe!check_load
max_check_attempts 4
normal_check_interval 3
retry_check_interval 2
check_period 24x7
notification_interval 10
notification_period 24x7
notification_options w,u,c,r
contact_groups sagroup
}
define service{
host_name nagios-server
service_description total_procs
check_command check_nrpe!check_total_procs
max_check_attempts 4
normal_check_interval 3
retry_check_interval 2
check_period 24x7
notification_interval 10
notification_period 24x7
notification_options w,u,c,r
contact_groups sagroup
}
host_name nagios-server
service_description check-host-alive
check_period 24x7
max_check_attempts 4
normal_check_interval 3
retry_check_interval 2
contact_groups sagroup
notification_interval 10
notification_period 24x7
notification_options w,u,c,r
check_command check-host-alive
}
define service {
host_name nagios-server
service_description check_tcp 80
check_period 24x7
max_check_attempts 4
normal_check_interval 3
retry_check_interval 2
contact_groups sagroup
notification_interval 10
notification_period 24x7
notification_options w,u,c,r
check_command check_tcp!80
}
define service{
host_name nagios-server
service_description check-disk
check_command check_nrpe!check_df
max_check_attempts 4
normal_check_interval 3
retry_check_interval 2
check_period 24x7
notification_interval 10
notification_period 24x7
notification_options w,u,c,r
contact_groups sagroup
}
define service{
host_name nagios-server
service_description check-load
check_command check_nrpe!check_load
max_check_attempts 4
normal_check_interval 3
retry_check_interval 2
check_period 24x7
notification_interval 10
notification_period 24x7
notification_options w,u,c,r
contact_groups sagroup
}
define service{
host_name nagios-server
service_description total_procs
check_command check_nrpe!check_total_procs
max_check_attempts 4
normal_check_interval 3
retry_check_interval 2
check_period 24x7
notification_interval 10
notification_period 24x7
notification_options w,u,c,r
contact_groups sagroup
}
#也可以将服务和以上的host配置分别独立为两个文件,方便管理,这样也需要在nagios.cfg中重新指定和修改localhost.cfg
12.配置文件contacts.cfg
[plain]
#定义联系人
define contact {
contact_name sid
alias system administrator
service_notification_period 24x7
host_notification_period 24x7
service_notification_options w,u,c,r
host_notification_options d,u,r
service_notification_commands notify-service-by-email
host_notification_commands notify-host-by-email
email devilzy2656@163.com
pager 1581127****
}
#定义联系人组
define contactgroup {
contactgroup_name sagroup
alias system administrator group
members sid
}
二.部署nrpe安装nrpe(用于监控Linux系统)
1.安装nrpe
tar –xzvf nrpe-2.12.tar.gz
cd nrpe-2.12
./configure --prefix=/usr/local/nrpe
make
make install
注:如果在其他被监控机安装nrpe,需要添加系统用户nagios.
2.复制文件
安装完nrpe后,在安装目录/usr/local/nrpe/libexec只有一个文件check_nrpe,而在nagios插件目录,却缺少这个文件,因此需要把这个文件复制到nagios插件目录;同样,因为nrpe需要调用的诸如check_disk等插件在自己的目录没有,可是这些文件确是nagios插件所存在的,所以也需要从nagios目录复制一份过来。我们把复制过程列举出来:
cp /usr/local/nrpe/libexec/check_nrpe /usr/local/nagios/libexec
cp /usr/local/nagios/libexec/check_disk /usr/local/nrpe/libexec
cp /usr/local/nagios/libexec/check_load /usr/local/nrpe/libexec
cp /usr/local/nagios/libexec/check_ping /usr/local/nrpe/libexec
cp /usr/local/nagios/libexec/check_procs /usr/local/nrpe/libexec
3.配置nrpe
安装完nrpe以后,在安装目录并没有可用的配置文件,但我们只需把解压目录的样例文件复制到安装目录,然后修改这个文件.
mkdir /usr/local/nrpe/etc
vi nrpe.cfg
修改后如下:
[plain]
pid_file=/var/run/nrpe.pid
server_port=5666
server_address=192.168.152.156
nrpe_user=nagios
nrpe_group=nagios
allowed_hosts=127.0.0.1,192.168.152.156
dont_blame_nrpe=0
debug=0
command_timeout=60
connection_timeout=300
#The following examples use hardcoded command arguments...
command[check_users]=/usr/local/nrpe/libexec/check_users -w 5 -c 10
command[check_load]=/usr/local/nrpe/libexec/check_load -w 15,10,5 -c 30,25,20
#command[check_hda1]=/usr/local/nrpe/libexec/check_disk -w 20 -c 10 -p /dev/hda1
command[check_df]=/usr/local/nrpe/libexec/check_disk -w 20 -c 10
command[check_zombie_procs]=/usr/local/nrpe/libexec/check_procs -w 5 -c 10 -s Z
command[check_total_procs]=/usr/local/nrpe/libexec/check_procs -w 150 -c 200
command[check_ips]=/usr/local/nrpe/libexec/ip_conn.sh 8000 10000
vi /usr/local/nrpe/libexec/ip_conn.sh
[plain]
#!/bin/sh
#if [ $# -ne 2 ]
#then
# echo "Usage:$0 -w num1 -c num2"
#exit 3
#fi
ip_conns=`netstat -an | grep tcp | grep EST | wc -l`
if [ $ip_conns -lt $1 ]
then
echo "OK -connect counts is $ip_conns"
exit 0
fi
if [ $ip_conns -gt $1 -a $ip_conns -lt $2 ]
then
echo "Warning -connect counts is $ip_conns"
exit 1
fi
if [ $ip_conns -gt $2 ]
then
echo "Critical -connect counts is $ip_conns"
exit 2
fi
chmod +x ip_conn.sh
4.启动nrpe服务并检验其配置
如果有防火墙需要开启防火墙
iptables -I eth0 -p tcp -m tcp -dport 5666 -j ACCEPT
然后保存:
/etc/rc.d/init.d/iptables save
重启防火墙:
/etc/init.d/iptables restart
5.以独立守护进程启动nrpe服务
/usr/local/nrpe/bin/nrpe -c /usr/local/nrpe/etc/nrpe.cfg -d
6.察看端口,也能看见5666端口处于监听状态
tail /var/log/messages
7.察看端口,也能看见5666端口处于监听状态
netstat -an
8.ps aux | grep nrpe | grep -v grep
9.检查插件功能
(1)检查nrpe服务
/usr/local/nrpe/libexec/check_nrpe -H 192.168.152.156
(2)通过nrpe检查主机资源
/usr/local/nrpe/libexec/check_nrpe -H 192.168.152.156 -c check_df
/usr/local/nrpe/libexec/check_nrpe -H 192.168.152.156 -c check_ips
#用nrpe可以更清晰的监控服务器的运行状态,
#配置客户端也非常简单,不需要在客户端安装nagios和其他服务,只需要安装第二部安装nrpe,其中唯一需要修改的是配置文件的server_address,需要修改成客户端的ip地址
三:启动nagios服务
1、检查配置
/usr/local/nagios/bin/nagios -v /usr/local/nagios/etc/nagios.cfg
2、启动nagios
/usr/local/nagios/bin/nagios -d /usr/local/nagios/etc/nagios.cfg
重启后执行:分别保证下属操作正确执行
service httpd start
/usr/local/nrpe/bin/nrpe -c /usr/local/nrpe/etc/nrpe.cfg -d
/usr/local/nagios/bin/nagios -d /usr/local/nagios/etc/nagios.cfg
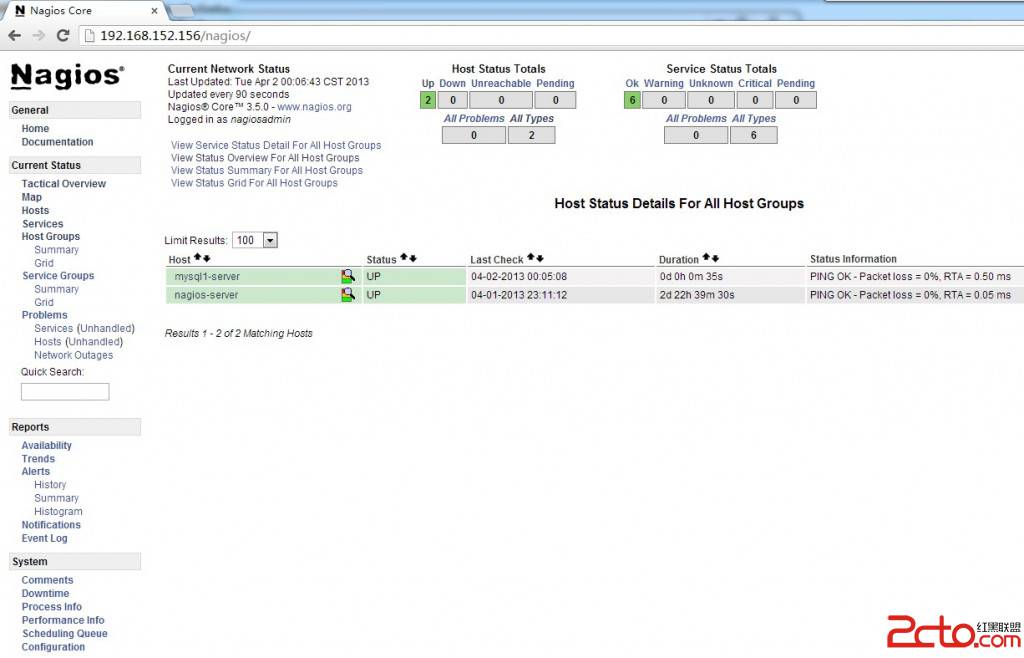
启动之后在浏览器输入:http://192.168.152.156/nagios
再键入你的nagiosadmin和刚刚设置的密码,就可以进入nagios的管理界面了
==========================遇到的才错误1=====================================
Internal Server Error
The server encountered an internal error or misconfiguration and was unable to complete your request.
查询日志:
[Thu Sep 17 22:50:02 2009] [error] [client 10.0.0.73] Premature end of script headers: status.cgi, referer: http://10.0.0.193/side.html
试试apache的SuExec:(此命令用来关闭防火墙)
[root@centos sbin]# setenforce 0
==========================遇到的才错误1=====================================
四、监控mysql服务器
#useradd nagios
#passwd nagios
1、按照之前说过的在mysql客户端上安装nrpe并修改server_address的地址(拷贝check_*的时候一定要记得添加执行权限)
2、创建mysql访问用户nagios。这个账号仅仅是nagios监控程序用来访问mysql数据库所用,与其它帐号毫无关系。为了安全起见,nagios这个账号的权限应该特别低,仅仅有数据库的select权限即可。再进一步,我们创建一个空的数据库nagdb,然后让nagios账号访问这个空库,就可以通过check_mysql插件测试和监控mysql数据库。
mysql > create database nagdb; identified by 'nagios'
mysql > GRANT select ON nagdb.* TO 'nagios'@'%';
#用插件检查配置:
/usr/local/nrpe/libexec/check_mysql -H 192.168.152.148 -u nagios -d nagdb
#从nagios服务器上再检查一次:
/usr/local/nrpe/libexec/check_mysql -H 192.168.152.148 -u nagios -d nagdb
一切正常以后,mysql服务器这边的配置和测试就算完成了。
检查插件功能
(1)检查nrpe服务
/usr/local/nrpe/libexec/check_nrpe -H 192.168.152.148
(2)通过nrpe检查主机资源
/usr/local/nrpe/libexec/check_nrpe -H 192.168.152.148 -c check_df
/usr/local/nrpe/libexec/check_nrpe -H 192.168.152.148 -c check_ips
3、nagios服务器上的操作.即在nagios配置文件后面追加内容。
(一)、主机配置文件追加mysql主机定义,联系组contactgroups 的值为sagroup,dbgroup,具体步骤参照前面的操作。
[plain]
define host {
host_name mysql1-server
alias mysql1 server
address 192.168.152.148
contact_groups sagroup,dbgroup
check_command check-host-alive
max_check_attempts 5
notification_interval 10
notification_period 24x7
notification_options d,u,r
}
define hostgroup {
hostgroup_name mysql-servers
alias mysql servers
members mysql1-server
}
(二)、联系人配置文件(contacts.cfg)追加数据库管理员定义(dba1),具体步骤参照前面的操作。define contact {
[plain]
contact_name dba1
alias system administrator
service_notification_period 24x7
host_notification_period 24x7
service_notification_options w,u,c,r
host_notification_options d,u,r
service_notification_commands notify-service-by-email
host_notification_commands notify-host-by-email
email 306798132@qq.com
pager 1581127****
}
define contactgroup {
contactgroup_name dbgroup
alias system administrator group
members dba1
}
(三)、服务配置文件(localhost.cfg)追加mysql服务监控,除了mysql服务监控而外,其他几个对象都于前面的类似,只不过联系组多了一个dbgroup。这里列出mysql服务这个定义:
[plain]
define service {
host_name mysql1-server
service_description check_mysql
check_period 24x7
max_check_attempts 4
normal_check_interval 3
retry_check_interval 2
contact_groups sagroup,dbgroup
notification_interval 10
notification_period 24x7
notification_options w,u,c,r
check_command check_mysql
}
host_name mysql1-server
service_description check_mysql
check_period 24x7
max_check_attempts 4
normal_check_interval 3
retry_check_interval 2
contact_groups sagroup,dbgroup
notification_interval 10
notification_period 24x7
notification_options w,u,c,r
check_command check_mysql
}
(五)、命令配置文件(command.cfg)追加检查mysql的定义,其追加内容为:
[plain]
define command {
command_name check_mysql
command_line $USER1$/check_mysql -H $HOSTADDRESS$ -u nagios -d nagdb
}
command_name check_mysql
command_line $USER1$/check_mysql -H $HOSTADDRESS$ -u nagios -d nagdb
}
(六)、检查并启动nagios
/usr/local/nrpe/bin/nrpe -c /usr/local/nrpe/etc/nrpe.cfg -d
/usr/local/nagios/bin/nagios -v /usr/local/nagios/etc/nagios.cfg
/usr/local/nagios/bin/nagios -d /usr/local/nagios/etc/nagios.cfg
(七)增加apache验证帐号
此账号是值给数据库管理员查看数据库服务器的状态,用之前的管理员账号可以查看所有的服务器状态
/usr/local/apache/bin/htpasswd /usr/local/nagios/etc/htpasswd dba1
输入两次密码后,从别的计算机的浏览器地址栏输入 http://59.26.240.63/nagios ,再输入用户名db1及刚才设定的密码,进入页面后,点击左上方的链接“Service Detail”,就可以看到mysql服务器当前的运行状态(db1用户只能看到mysql服务器状态,而管理员sery账号则可以看所有被监控对象的状态)。
==========================遇到的问题1=====================================
问题:安装完成nagios后,发现居然没有这个插件,怎么办?
解决方法:
# yum install mysql-devel <我系统默认没装mysql的>
重装下nagios-plugins插件包
# ./configure
--with-apt-get-command:
--with-ping6-command: /bin/ping6 -n -U -w %d -c %d %s
--with-ping-command: /bin/ping -n -U -w %d -c %d %s
--with-ipv6: yes
--with-mysql: /usr/bin/mysql_config
--with-openssl: yes
--with-gnutls: no
--enable-extra-opts: no
--with-perl: /usr/bin/perl
--enable-perl-modules: no
--with-cgiurl: /nagios/cgi-bin
--with-trusted-path: /bin:/sbin:/usr/bin:/usr/sbin
--enable-libtap: no
# make && make install
==========================遇到的问题1=====================================
==========================遇到的问题2=====================================
运行check_mysql的时候出现下面的错误提示
error while loading shared libraries: libmysqlclient.so.14: cannot open shared object file: No such file or directory
[root@app104 lib]# locate libmysqlclient.so.14
/usr/local/mysql/lib/mysql/libmysqlclient.so.14
/usr/local/mysql/lib/mysql/libmysqlclient.so.14.0.0
vi /etc/ld.so.conf 加入
/usr/local/mysql/lib/mysql
然後跑
/sbin/ldconfig -v
更新即可使用
如果是64位的,貌似需要重新获取;执行如下命令
wget -O /usr/lib64/libmysqlclient.so.15 http://files.directadmin.com/services/es_5.0_64/libmysqlclient.so.15
chmod 755 /usr/lib64/libmysqlclient.so.15
==========================遇到的问题2=====================================
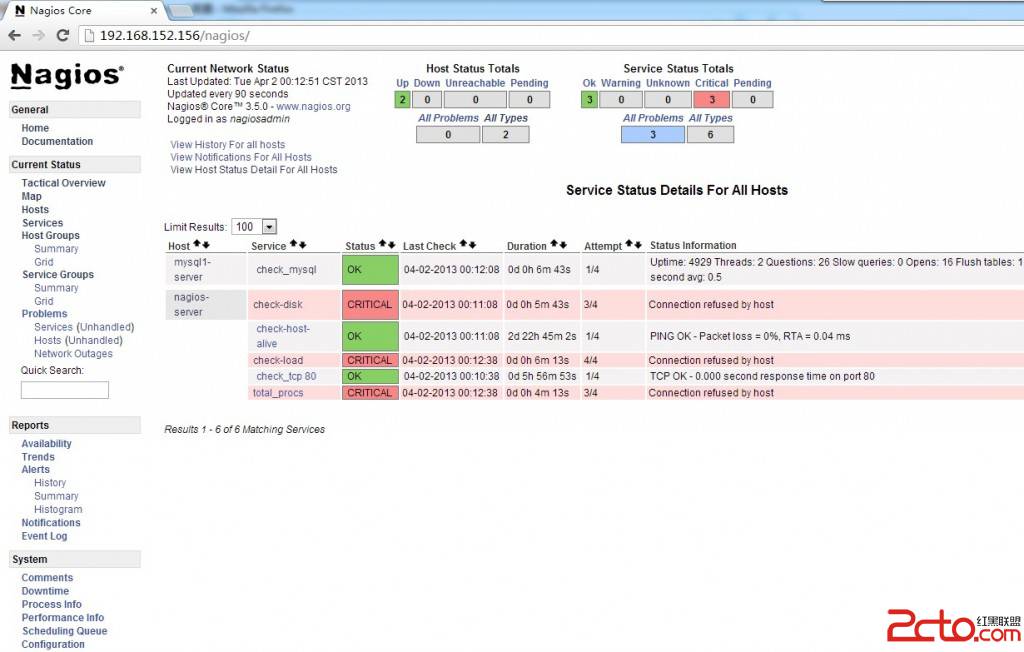
上截图:
点进services查看命令,下面三个红的,是命令启动慢,等待10分钟之后再看看命令的效果,就恢复正常了。(个人见解)
五、监控数据主从服务(此步骤引子博客http://sery.blog.51cto.com/10037/244794/ 并稍作修改)
操作步骤:
1、在主数据库服务器增加一个用户,给予较低的权限,操作为
mysql> grant Replication client on *.* to 'nagios'@'%' identified by 'nagios';
mysql> flush privileges;
2、登陆从服务器验证一下,看是否正常。操作为
mysql -unagios -pnagios -e "show slave status\G"
3、在从服务器安装 nrpe,然后在配置文件nrpe.cfg加入一行
command[check_mysql_slave]=/usr/local/nrpe/libexec/check_mysql_slave
4、编写脚本/usr/local/nrpe/libexec/check_mysql_slave(这是监控其作用的核心),其内容如下:
vi /usr/local/nrpe/libexec/check_mysql_slave
[plain]
#!/bin/sh
declare -a slave_is
slave_is=($(/usr/local/mysql/bin/mysql -unagios -pnagios -e "show slave status\G"|grep Running |awk '{print $2}'))
if [ "${slave_is[0]}" = "Yes" -a "${slave_is[1]}" = "Yes" ]
then
echo "OK -slave is running"
exit 0
else
echo "Critical -slave is error"
exit 2
fi
declare -a slave_is
slave_is=($(/usr/local/mysql/bin/mysql -unagios -pnagios -e "show slave status\G"|grep Running |awk '{print $2}'))
if [ "${slave_is[0]}" = "Yes" -a "${slave_is[1]}" = "Yes" ]
then
echo "OK -slave is running"
exit 0
else
echo "Critical -slave is error"
exit 2
fi
chmod +x check_mysql_slave
5、手动运行这个脚本,观察输出。
6、执行
/usr/local/nrpe/bin/nrpe -c /usr/local/nrpe/etc/nrpe.cfg -d
/usr/local/nrpe/libexec/check_nrpe -H 192.168.152.149 -c check_mysql_slave
观察其输出
7、修改nagios,并测试。
(1)、主机配置文件追加mysql主机定义,联系组contactgroups 的值为sagroup,dbgroup,具体步骤参照前面的操作。
[plain]
define host {
host_name mysql2-server
alias mysql2 server
address 192.168.152.149
contact_groups sagroup,dbgroup
check_command check-host-alive
max_check_attempts 5
notification_interval 10
notification_period 24x7
notification_options d,u,r
}
define hostgroup {
hostgroup_name mysql-servers
alias mysql servers
members mysql1-server,mysql2-server
}
(2)、服务配置文件(localhost.cfg)追加mysql服务监控,除了mysql服务监控而外,其他几个对象都于前面的类似,只不过联系组多了一个dbgroup。这里列出mysql服务这个定义:
[plain]
define service {
host_name mysql2-server
service_description check_mysql_slave
check_period 24x7
max_check_attempts 4
normal_check_interval 3
retry_check_interval 2
contact_groups sagroup,dbgroup
notification_interval 10
notification_period 24x7
notification_options w,u,c,r
check_command check_nrpe!check_mysql_slave
}
(3)、命令配置文件(command.cfg)追加检查mysql的定义,其追加内容为:
[plain]
define command {
command_name check_mysqli_slave
command_line $USER1$/check_nrpe -H $HOSTADDRESS$ -c check_mysql_slave
}
command_name check_mysqli_slave
command_line $USER1$/check_nrpe -H $HOSTADDRESS$ -c check_mysql_slave
}
(4)、检查并启动nagios
/usr/local/nrpe/bin/nrpe -c /usr/local/nrpe/etc/nrpe.cfg -d
/usr/local/nagios/bin/nagios -v /usr/local/nagios/etc/nagios.cfg
/usr/local/nagios/bin/nagios -d /usr/local/nagios/etc/nagios.cfg
==============遇到问题和解决方法==========================
问题:在没有任何信息的情况下怎么来获取NRPE执行的日志呢
就是要确定问题在哪,经过一大番的查找眼睛偶尔看到一个有趣的小方法
修复nrpe.conf配置文件 在要检查的命令后面添加>>/tmp/output 2>&1 将错误导出到文件中进行查看
command[check_sda_health]=/usr/bin/sudo /usr/local/nagios/libexec/check_disk_health.sh -d /dev/sda >>/tmp/output 2>&1
重记nrpe服务
远程调用 结果当然还是NRPE: Unable to read output
查看/tmp/output
sudo: sorry, you must have a tty to run sudo
有错误就简单了 原来这个是默认不允许sudo 在后端进行
visudo
注释Defaults requiretty 就OK了
==============遇到问题和解决方法==========================
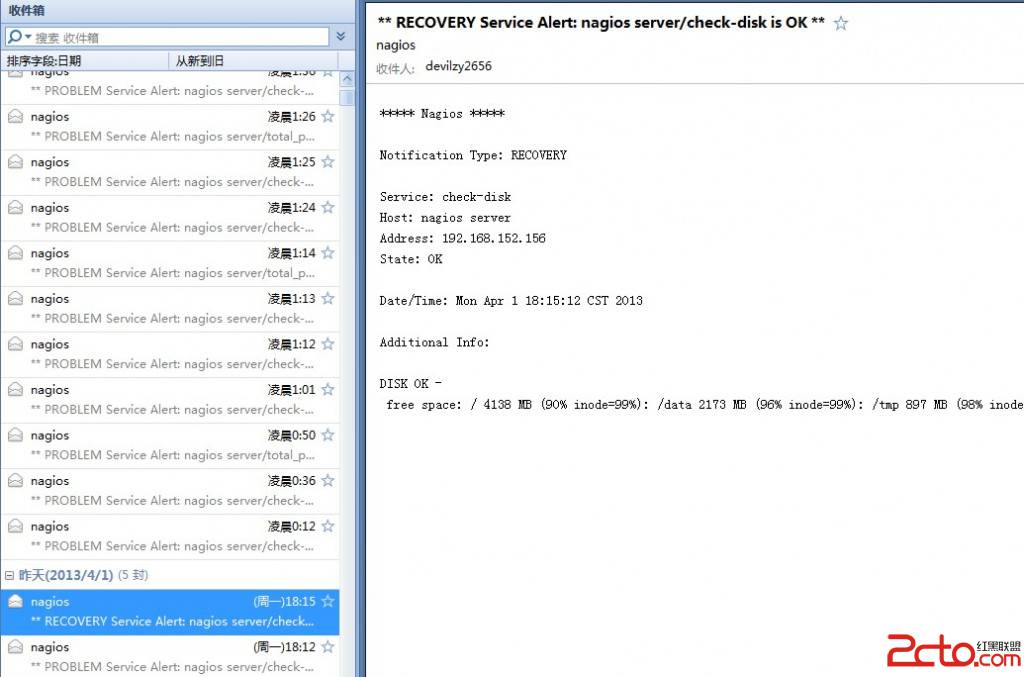
六、配置邮件发送功能
因为报警邮件发送给用户邮箱后,监控系统本身没有必要接受别的邮件服务器发送的邮件,因此只需要使用服务器本身自带的sendmail来发送报警信息即可。用sendmail的另外一个目的就是简便。
如果系统是redhat 或 centos ,只需执行:(为保证邮件可以发送,需要开机后直接启动sendmail服务)
service sendmail start
这里给一个发送邮件的例子:
mail -s “This is sid's nagiosServer send mail” devilzy2656@163.com < install.log
至此:基本的控制安装都已经实现了。上面的所有功能和配置,加上看文档的时间,基本上用了两周,虽然刚刚开始的时候看配置项那么多觉得很烦躁,但是成功之后真的挺开心的。
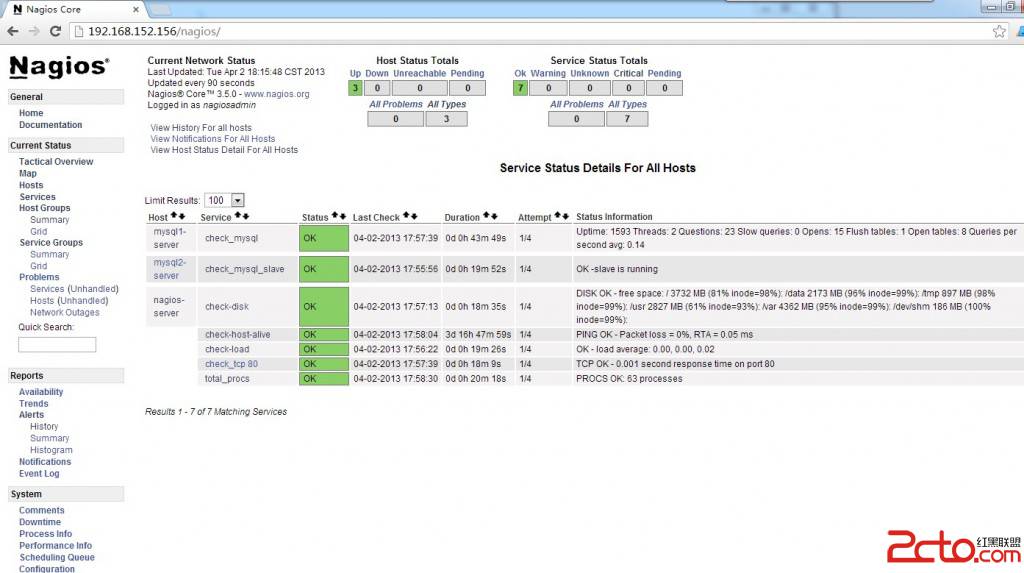
若此时关闭mysql从库,过一会,check_mysql_slave就会出现Critical,然后就知道当前的从数据出现问题了,其他的命令看名字应该也知道了吧。
这只是监控3个主机,也可以加入更多的主机。相信聪明的大家,也知道怎么做了
===================最后的提醒===============================
安装完成之后,需要开启的服务如下:
1、服务器端:
sendmail
nrpe
nagios
httpd
setenforce 0(可以直接设置开启,不必每次都开启)
2、客户端:(客户端如果不开nrpe,通过浏览器访问的时候客户端仍然是好用的,但是实际上并没有监控到)
nrpe
===================最后的提醒===============================
其他功能的安装:
说明:下面两个的安装步骤引子百度文库,本人并没有进行实际配置。喜欢的人可以试试。本人不保证下面的操作步骤可以安装成功,
如果不是什么大型的电子商务的网站个人认为邮件客户端的提醒就足够了,虽然有时会有延迟,图形界面不认为有多实用。
短信提醒还是比较实用的,喜欢的朋友可以用来配置一下,看看效果。
二:绘图工具的安装
1:安装相应的支持包
#yum install cairo pango libart_lgpl libart_lgpl-devel zlib zlib-devel freetype freetype-devel
2:安装rrdtool
#./configure
#make
#make install
3:做一些配置
#vi /usr/local/nagios/etc/nagios.cfg
process_performance_data=1
host_perfdata_command=host-service-perfdata
service_perfdata_command=process-service-perfdata
上面三项处于允许状态,取消前面的”;”.
在commands.cfg做如下配置。注释掉process-service-prefdata这个命令的command_line,写上新的command_line.
# 'process-service-perfdata' command definition
define command{
command_name process-service-perfdata
#command_line /usr/bin/printf "%b" "$LASTSERVICECHECK$\t$HOSTNAME$\t$SERVICEDESC$\t$SERVICESTATE$\t$SERVICEATTEMPT$\t$SERVICESTATETYPE$\t$SERVICEEXECUTIONTIME$\t$SERVICELATENCY$\t$SERVICEOUTPUT$\t$SERVICEPERFDATA$\n" >> /usr/local/nagios/var/service-perfdata.out
command_line /usr/local/nagios/libexec/process_perfdata.pl
}
4:安装pnp
#./configure –with-rrdtool=/usr/local/rrdtool-1.0.50/bin/rrdtool
#make all
#make install
5:配置被监控端的文件
加入action_url和process_perf_data2个变量。
在使用该绘图功能的时候,一定要配置apache支持php功能。
6:重启httpd服务器和nagios服务.
三:飞信报警功能
1:安装飞信所需要的的libACE库文件
2:安装飞信软件
#tar –zxvf feition20091117-linux.tar.gz –C /usr/local
#mv /usr/local/fx /usr/local/fetion
3:加入执行权限、更换属组
#Chmod +x fetion
#chown –R nagios.nagcmd fetion
4:复制安装libACE下的lib目录中的文件到/usr/lib
[root@nagios library32]# ls
libACE.so.5.4.7 libACE_SSL.so.5.4.7 libcrypto.so.0.9.8 libssl.so.0.9.8
[root@nagios library32]# cp *.* /lib/
[root@nagios library32]# cp *.* /usr/lib/
5:加入飞信.so文件到系统链接库
#vi /etc/ld.so.conf.d/fetion.conf
加入/usr/local/fetion
#ldconfig
6:配置commands.cfg文件
define command{
command_name host-notify-by-fetion
command_line /usr/local/fetion/fetion --hide --mobile=150xxxxxxx2 --pwd=xxx --to=$CONTACTPAGER$ --msg-utf8="HOST $HOSTSTATE$ Alert for $HOSTNAME$!on '$LONGDATETIME$'" $CONTACTPAGER$
}
define command{
command_name service-notify-by-fetion
command_line /usr/local/fetion/fetion --hide --mobile=150xxxxx2 --pwd=xxxxx --to=$CONTACTPAGER$ --msg-utf8="$HOSTADDRESS$ $HOSTALIAS$/$SERVICEDESC$ is $SERVICESTATE$ on $LONGDATETIME$" $CONTACTPAGER$
}
加入上面2个command,关于fetion的。
7:配置contacts.cfg
define contact{
contact_name nagiosadmin ; Short name of user
use generic-contact ; Inherit default values from generic-contact template (defined above)
alias Nagios Admin ; Full name of user
email zjj17xx1@xxxxxx.com
;,rtong@xxxxxt.com ; <<***** CHANGE THIS TO YOUR EMAIL ADDRESS ******
service_notification_period 24x7
host_notification_period 24x7
service_notification_options w,u,c,r
host_notification_options d,u,r
service_notification_commands notify-service-by-email,service-notify-by-fetion
host_notification_commands notify-host-by-email,host-notify-by-fetion
contactgroups sagroup
;pager 1386xxxxxx
注意pager变量是一个手机号。注意注释的fetion。
8:重启httpd和nagios服务。
nagios安装基本结束。
评论暂时关闭