制作Debian风格的Tengine deb包
制作Debian风格的Tengine deb包
制作Debian风格的Tengine deb包
前面尝试了一下tengine的动态加载模块的功能,觉得这样就有可能有大量部署的机会了,之前没用nginx是因为每次需要添加新的功能都需要重新编译一次,虽然nginx在性能上比apache好,但是如果有上百台机器部署了nginx就不好搞了,每个部门的web需求都不一样,所需要的模块也不一样,即使把所有自带模块都编译进去,但是还是会遇到一些很好的第三方模块的,现在tengine支持动态加载模块,就有希望了,一两台编译是可以接受的,大量部署tengine还是用包管理的比较好。 www.2cto.com
下面开始制作以debian6系统为基础的tengine deb包,tengine包风格还是类似于debian一般web服务器软件包的风格。
要把所有支持动态加载的模块都编译进去,需要以下包的支持:
1
apt-get install libxml2
2
apt-get install libxslt1.1
3
apt-get install libxslt1-dev
4
apt-get install libgd2-xpm libgd2-xpm-dev
5
apt-get install libgeoip1 libgeoip-dev
6
apt-get install libssl-dev
7
apt-get install libpcre3 libpcre3-dev
8
apt-get install libssl.so.0.9.8
首先,在/tmp目录下建一个制作deb包的环境目录tengine,先不必建立其他目录,最后的总体结构如下图: www.2cto.com
01
└── tengine
02
├── DEBIAN 这个目录存放关于包的一些控制信息文件
03
├── etc
04
│ ├── init.d 存放/etc/init.d/nginx文件
05
│ ├── logrotate.d 存放nginx日志轮转配置文件
06
│ └── nginx
07
│ ├── conf 存放nginx的配置文件
08
│ ├── modules 存放可以动态加载的模块
09
│ └── sbin 存放dso_tool工具
10
├── usr
11
│ └── sbin 存放nginx二进制文件
12
└── var
13
├── lib
14
│ └── nginx
15
├── log
16
│ └── nginx 存放nginx日志
17
└── www 存放web站点
下载tengine源码包:tengine-1.4.2.tar.gz,进行编译安装,编译参数如下
1
./configure --prefix=/etc/nginx --sbin-path=/usr/sbin --error-log-path=/var/log/nginx/error.log --conf-path=/etc/nginx/conf/nginx.conf --pid-path=/var/run --with-http_addition_module=shared --with-http_xslt_module=shared --with-http_geoip_module=shared --with-http_image_filter_module=shared --with-http_sub_module=shared --with-http_flv_module=shared --with-http_slice_module=shared --with-http_mp4_module=shared --with-http_concat_module=shared --with-http_random_index_module=shared --with-http_map_module=shared --with-http_split_clients_module=shared --with-http_charset_filter_module=shared --with-http_access_module=shared --with-http_userid_filter_module=shared --with-http_footer_filter_module=shared --with-http_upstream_least_conn_module=shared --with-http_upstream_ip_hash_module=shared --with-http_user_agent_module=shared --with-http_memcached_module=shared --with-http_referer_module=shared --with-http_limit_conn_module=shared --with-http_limit_req_module=shared --with-http_scgi_module=shared --with-http_secure_link_module=shared --with-http_autoindex_module=shared --with-http_sysguard_module=shared --with-http_rewrite_module=shared --with-http_fastcgi_module=shared --with-http_empty_gif_module=shared --with-http_browser_module=shared --with-http_uwsgi_module=shared
--prefix=/etc/nginx 这个目录存放除nginx二进制文件外的其余文件
--sbin-path=/usr/sbin 这个目录有编译好的nginx二进制文件
之前已经把所有依赖的包已经安装过了,所以不会出现问题,只要make&&make install即可,安装完成后在/etc/nginx中的目录结构如下: www.2cto.com
01
nginx
02
├── conf
03
│ ├── browsers
04
│ └── 若干配置文件...
05
├── html
06
│ ├── 50x.html
07
│ └── index.html
08
├── logs
09
├── modules
10
│ ├── ngx_http_access_module.so
11
│ ├── ngx_http_addition_filter_module.so
12
│ ├── ngx_http_uwsgi_module.so
13
│ └── 若干模块...
14
└── sbin
15
└── dso_tool
开始进行乾坤大挪移... www.2cto.com
1
mv /etc/nginx/conf /tmp/tengine/etc/nginx/
2
mv /etc/nginx/html/* /tmp/tengine/var/www/
3
mv /etc/nginx/modules /tmp/tengine/etc/nginx/
4
mv /etc/nginx/sbin /tmp/tengine/etc/nginx/
5
mv /usr/sbin/nginx /tmp/tengine/usr/sbin/
开始补全在/tmp/tengine的其他目录。
logrotate.d/nginx内容如下,nginx日志轮训用
01
/var/log/nginx/*.log {
02
daily
03
missingok
04
rotate 52
05
compress
06
delaycompress
07
notifempty
08
create 640 root adm
09
sharedscripts
10
postrotate
11
[ ! -f /var/run/nginx.pid ] || kill -USR1 `cat /var/run/nginx.pid`
12
endscript
13
}
init.d/nginx内容如下,init启动nginx用 www.2cto.com
01
PATH=/usr/local/sbin:/usr/local/bin:/sbin:/bin:/usr/sbin:/usr/bin
02
DAEMON=/usr/sbin/nginx
03
NAME=nginx
04
DESC=nginx
05
test -x $DAEMON || exit 0
06
if [ -f /etc/default/nginx ] ; then
07
. /etc/default/nginx
08
fi
09
set -e
10
. /lib/lsb/init-functions
11
test_nginx_config() {
12
if $DAEMON -t $DAEMON_OPTS >/dev/null 2>&1
13
then
14
return 0
15
else
16
$DAEMON -t $DAEMON_OPTS
17
return $?
18
fi
19
}
20
case "$1" in
21
start)
22
echo -n "Starting $DESC: "
23
test_nginx_config
24
start-stop-daemon --start --quiet --pidfile /var/run/$NAME.pid \
25
--exec $DAEMON -- $DAEMON_OPTS || true
26
echo "$NAME."
27
;;
28
stop)
29
echo -n "Stopping $DESC: "
30
start-stop-daemon --stop --quiet --pidfile /var/run/$NAME.pid \
31
--exec $DAEMON || true
32
echo "$NAME."
33
;;
34
restart|force-reload)
35
echo -n "Restarting $DESC: "
36
start-stop-daemon --stop --quiet --pidfile \
37
/var/run/$NAME.pid --exec $DAEMON || true
38
sleep 1
39
test_nginx_config
40
start-stop-daemon --start --quiet --pidfile \
41
/var/run/$NAME.pid --exec $DAEMON -- $DAEMON_OPTS || true
42
echo "$NAME."
43
;;
44
reload)
45
echo -n "Reloading $DESC configuration: "
46
test_nginx_config
47
start-stop-daemon --stop --signal HUP --quiet --pidfile /var/run/$NAME.pid \
48
--exec $DAEMON || true
49
echo "$NAME."
50
;;
51
configtest)
52
echo -n "Testing $DESC configuration: "
53
if test_nginx_config
54
then
55
echo "$NAME."
56
else
57
exit $?
58
fi
59
;;
60
status)
61
status_of_proc -p /var/run/$NAME.pid "$DAEMON" nginx && exit 0 || exit $?
62
;;
63
*)
64
echo "Usage: $NAME {start|stop|restart|reload|force-reload|status|configtest}" >&2
65
exit 1
66
;;
67
esac
68
exit 0
nginx/conf/nginx.conf内容如下,因为web站点目录和log日志目录都有所改变,所以要小调一下
01
worker_processes 1;
02
error_log /var/logs/nginx/error.log;
03
pid /var/run/nginx.pid;
04
events {
05
worker_connections 1024;
06
}
07
http {
08
include mime.types;
09
default_type application/octet-stream;
10
log_format main '$remote_addr - $remote_user [$time_local] "$request" '
11
'$status $body_bytes_sent "$http_referer" '
12
'"$http_user_agent" "$http_x_forwarded_for"';
13
access_log /var/logs/nginx/access.log main;
14
sendfile on;
15
keepalive_timeout 65;
16
server {
17
listen 80;
18
server_name localhost;
19
location / {
20
root /var/www;
21
index index.html index.htm;
22
}
23
error_page 500 502 503 504 /var/www/50x.html;
24
location = /50x.html {
25
root /var/www;
26
}
27
}
28
}
剩下DEBIAN目录没有配置,结构如下:
1
DEBIAN/
2
├── control
3
├── postinst
4
├── postrm
5
├── preinst
6
└── prerm
control:提供软件包的关联信息, 用于软件包管理器显示软件包的信息,用于安装前校验的依赖关系.是必需提供的文件
postrm:在软件包从系统中卸载以后执行。dpkg告知这个脚本软件包是否已被卸载或清除。当因为冲突或升级,软件包被其它软件包卸载时也会执行这个脚本。
preinst:在安装或升级软件包之前执行。
prerm:脚本在软件包卸载之前执行。
postinst:脚本在解包之后作为配置过程的一部分运行。例如:监听本机ip地址,更换端口之类的修改。在本文中我不需要做调整,所以没有设置该文件。
DEBIAN/control内容如下,因为之前把依赖包都安装了,所以在控制文件中我去掉了依赖关系设置
1
Package: nginx
2
Version: 1.2.5
3
Architecture: amd64
4
Maintainer: Jose Parrella <bureado@debian.org>
5
Provides: httpd
6
Section: httpd
7
Priority: optional
8
Homepage: http://nginx.net
9
Description: xxxxxxxx
DEBIAN/prerm文件内容如下
01
#!/bin/sh
02
set -e
03
case "$1" in
04
remove|remove-in-favour|deconfigure|deconfigure-in-favour)
05
if [ -x /etc/init.d/nginx ]; then
06
if [ -x /usr/sbin/invoke-rc.d ] ; then
07
invoke-rc.d nginx stop
08
else
09
/etc/init.d/nginx stop
10
fi
11
fi
12
;;
13
upgrade|failed-upgrade)
14
;;
15
*)
16
echo "prerm called with unknown argument \`$1'" >&2
17
exit 1
18
;;
19
esac
20
exit 0
DEBIAN/postrm文件内容如下
01
#!/bin/sh
02
set -e
03
case "$1" in
04
05
purge)
06
rm -rf /var/lib/nginx /var/log/nginx /etc/nginx
07
;;
08
remove|upgrade|failed-upgrade|abort-install|abort-upgrade|disappear)
09
;;
10
*)
11
echo "postrm called with unknown argument \`$1'" >&2
12
exit 1
13
esac
14
# Automatically added by dh_installinit
15
if [ "$1" = "purge" ] ; then
16
update-rc.d nginx remove >/dev/null
17
fi
18
# End automatically added section
19
exit 0
DEBIAN/preinst文件内容如下
01
#!/bin/sh
02
set -e
03
if [ ! -d /var/lib/nginx ] ; then
04
mkdir -p /var/lib/nginx
05
fi
06
07
if [ ! -d /etc/nginx ] ; then
08
mkdir -p /etc/nginx/conf
09
mkdir -p /etc/nginx/modules
10
mkdir -p /etc/nginx/sbin
11
fi
12
13
if [ ! -d /var/log/nginx ] ; then
14
mkdir -p /var/log/nginx
15
touch /var/log/nginx/error.log
16
fi
17
18
exit 0
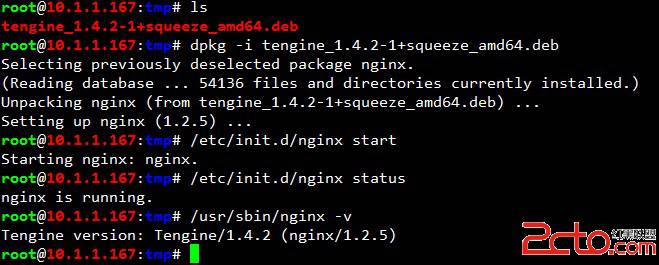
所有文件已经ok,剩下就是打包了
1
dpkg -b tengine/ tengine_1.4.2-1+squeeze_amd64.deb
测试如下图:
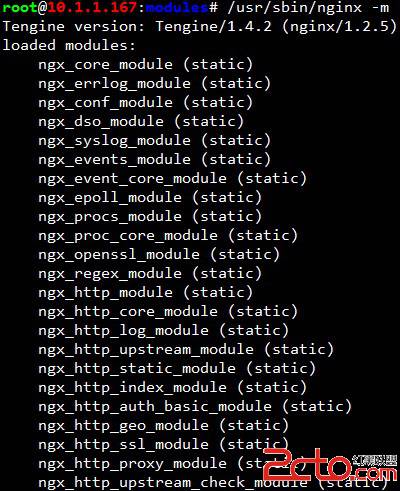
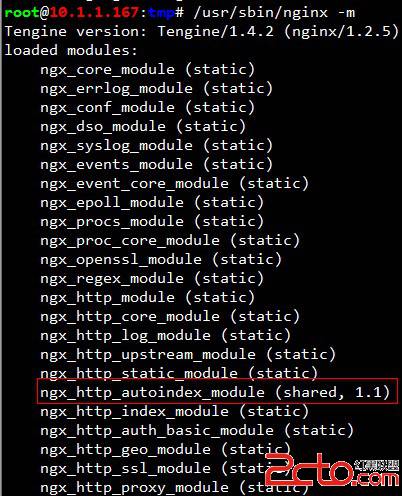
加载ngx_http_autoindex_module.so模块,在配置文件中加入如下配置
1
dso{
2
load ngx_http_autoindex_module.so;
3
}
重启nginx,加入前和加入后区别如下 www.2cto.com
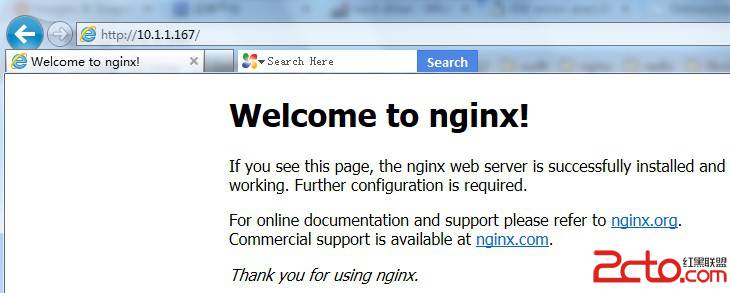
访问nginx默认界面
卸载tengine软件包
1
apt-get --purge remove nginx
评论暂时关闭