新手SSH基础框架搭建,
新手SSH基础框架搭建,
SSH 为 struts+spring+hibernate的一个集成框架,是目前较流行的一种Web应用程序开源框架。
首先我们先了解SSH的框架所需的包和基本概念:
一、下面我们先来了解一下struts2,下载地址:http://struts.apache.org/
Struts2作为系统的整体基础架构,负责MVC的分离,在Struts2框架的模型部分,控制业务跳转。
1、struts2所需十五个jar包
在你下载的里的struts-2.3.16.1\lib找出以下的包。
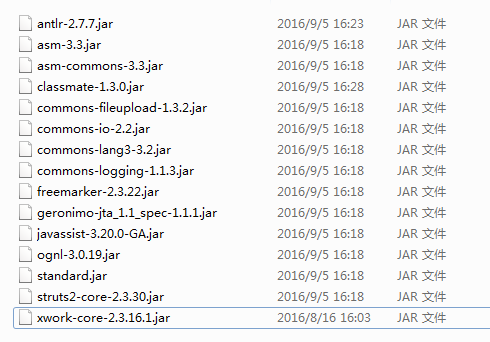
在相同目录下,以后我们将action注入到spring中必不可少的struts2-spring-plugin.jar插件

二、接下来我们了解一下spring,下载地址:http://projects.spring.io/spring-framework/
Spring做为管理,支持struts和hibernate基本的功能,当然还有aop切面处理功能,和集成框架功能。
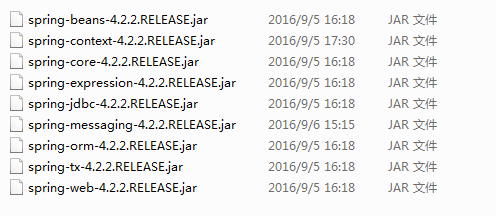
在你下载的目录spring-framework-4.2.2.RELEASE-dist\spring-framework-4.2.2.RELEASE\libs下
包比较多,可以全部倒出来,然后把javadoc.jar(帮助文档)后缀的,和sources.jar(源码)后缀的删除。

2、spring所需的九个jar包
三、然后我来看一下hibernate 下载地址:http://hibernate.org/orm/downloads/
利用Hibernate框架对持久层(就是把数据保存到可掉电式存储设备中供之后使用这里指的是数据库)提供支持。
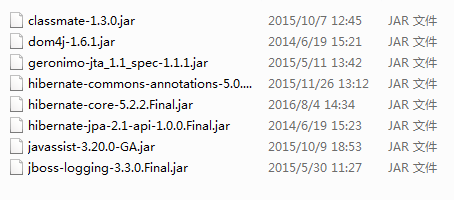
3、hibernate需要八个包
在目录E:hibernate-release-5.2.2.Final\lib\required下
hibernate中还有c3p0的jar包
在目录hibernate-release-5.2.2.Final\lib\optional\c3p0下

如果用dbcp 需要这两个包(百度包名下载就可以找到)

c3p0和dbcp的包不冲突可以同时存在,自由切换。
最后不要忘了导入对应数据库的驱动包:我这里用的是mysql
下载地址:http://dev.mysql.com/downloads/mysql/

环境配置完毕。
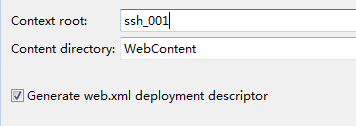
四、在web.xml配置文件加入Struts2(过滤器)和spring(监听器)
3.0之后的版本要自己勾上xml文件
在创建项目的时候选择next,最后一部记得勾上xml
然后分包:
在xml文件中加入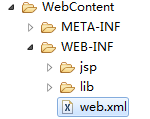
头文件信息
<?xml version="1.0" encoding="UTF-8"?>
<web-app xmlns:xsi="http://www.w3.org/2001/XMLSchema-instance" xmlns="http://xmlns.jcp.org/xml/ns/javaee"
xsi:schemaLocation="http://xmlns.jcp.org/xml/ns/javaee http://xmlns.jcp.org/xml/ns/javaee/web-app_3_1.xsd" id="WebApp_ID" version="3.1">
struts2过滤器
<filter>
  <filter-name>struts2</filter-name>
  <filter-class>org.apache.struts2.dispatcher.ng.filter.StrutsPrepareAndExecuteFilter</filter-class>
</filter>

<filter-mapping>
  <filter-name>struts2</filter-name>
  <url-pattern>/*</url-pattern>
<filter-mapping>
spring监听器
<context-param>
  <param-name>contextConfigLocation</param-name>
  <param-value>classpath:applicationContext.xml</param-value>
</context-param>
<listener>
    <listener-class>org.springframework.web.context.ContextLoaderListener</listener-class>
</listener>
写strut.xml文件
我们先来写action类
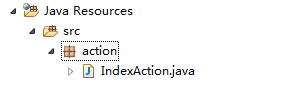 一般我们单独写在一个action包中
// 继承ActionSupport,让本类具备强大的功能(例如:校验、国际化等)
public class IndexAction extends ActionSupport {

  private static final long serialVersionUID = 1L;
  private IndexServices is;

  //这里用的是spring注入
  public void setIs(IndexServices is) {
    this.is = is;
  }
  //1.每一个对外的方法,都是返回String类型
  //2.返回的字符串,要跟配置文件一一对应,用于跳转
   //3.execute是默认方法(当struts.xml没有指定时,默认执行)
   // 类似于doGet和doPos
  public String execute(){
    return "success";
  }
当然返回的字符串不是唯一的,我们可以通过if语句控制放回值,通过下面的配置文件跳转到不同的页面
下面是struts.xml配置文件(struts控制跳转)
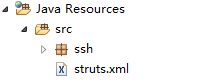 注意这个xml不是写在WEB-INF下面,默认写在src目录下。当然也可以通过配置<param-name>config</param-name>配置路径。
头文件信息:
<?xml version="1.0" encoding="UTF-8" ?>
<!DOCTYPE struts PUBLIC
"-//Apache Software Foundation//DTD Struts Configuration 2.5//EN"
"http://struts.apache.org/dtds/struts-2.5.dtd">
<!-- 上面的头,注意版本,从样例里复制过来 showcase.war\WEB-INF\src\java\struts.xml -->
<struts>
  <!--指定Struts2默认的ObjectFactoryBean,该属性默认值是spring--!>
  <constant name="struts.objectFactory" value="spring"></constant>

  <!-- 第1步:先定义一个包 -->
  <package name="mypck" extends="struts-default">
    <!-- 第2步:定义一个action,配置跳转信息 name 类似于Servlet @WebServlet("/IndexServlet")
    http://xxxx/xxx/Index.action http://xxxx/xxx/Index class 对应于自己写的Action类 当不写method属性时,默认调用的是execute -->
    <!--class属性在action注入spring后和bean中id一一对应 后面spring注入的时候会提到--!>
    <action name="Index" class="myIndexAction" method="execute">
      <!-- /WEB-INF/是防止jsp不经过action就可以访问-->
      <result name="success">/WEB-INF/jsp/index.jsp</result>
      <result name="error">/WEB-INF/jsp/error.jsp</result>
    </action>
  </package>
</struts>
接下来写applicationContext.xml(用于spring注入)
注意applicationcontext.xml和struts.xml位置一样,都是在src目录下。
<?xml version="1.0" encoding="UTF-8"?>
<beans xmlns="http://www.springframework.org/schema/beans"
xmlns:xsi="http://www.w3.org/2001/XMLSchema-instance"
xmlns:p="http://www.springframework.org/schema/p"
xmlns:aop="http://www.springframework.org/schema/aop"
xmlns:context="http://www.springframework.org/schema/context"
xmlns:jee="http://www.springframework.org/schema/jee"
xmlns:tx="http://www.springframework.org/schema/tx"
xsi:schemaLocation="
http://www.springframework.org/schema/aop http://www.springframework.org/schema/aop/spring-aop-4.2.xsd
http://www.springframework.org/schema/beans http://www.springframework.org/schema/beans/spring-beans-4.2.xsd
http://www.springframework.org/schema/context http://www.springframework.org/schema/context/spring-context-4.2.xsd
http://www.springframework.org/schema/jee http://www.springframework.org/schema/jee/spring-jee-4.2.xsd
http://www.springframework.org/schema/tx http://www.springframework.org/schema/tx/spring-tx-4.2.xsd">
至于头文件哪里来的,我们直接百度:“applicationcontext.xml头文件” 就可以轻易找到。
接下来写<bean>如下:
  <!-- 类似于财务部门一样,类就是钱,所有需要类的实例都由srping去管理 -->
    <bean id="myIndexAction" class="ssh.action.IndexAction" scope="prototype">
        <!-- setIs(myIndexService) -->
        <property name="is" ref="myIndexService"/>
    </bean>

    <!-- myIndexService = new service.IndexServiceImpl() -->
    <bean id="myIndexService" class="service.IndexServiceImpl" scope="prototype">
        <property name="id" ref="myIndexDao"/>
    </bean>

    <bean id="myIndexDao" class="dao.IndexDaoImpl" scope="prototype">
        <property name="sessionFactory" ref="mySessionFactory"></property>
    </bean>
最后配置Hibernate我们可以在刚刚的applicationContext.xml中编辑,也可以重写一个hibernate.cfg.xml文件
<bean id="mySessionFactory" class="org.springframework.orm.hibernate5.LocalSessionFactoryBean"> <!-- 注入连接池,包含了数据库用户名,密码等等信息 --> <property name="dataSource" ref="myDataSource"/>
<property name="hibernateProperties"> <props> <!--针对特点的关系型数据库生成优化的SQL --> <prop key="hibernate.dialect">org.hibernate.dialect.MySQL5Dialect</prop> <!--显示SQL--> <prop key="hibernate.show_sql">true</prop> <!-- 格式化SQL --> <prop key="hibernate.format_sql">true</prop> <prop key="hibernate.connection.autocommit">false</prop> <!-- 开机自动生成表 --> <prop key="hibernate.hbm2ddl.auto">update</prop> </props> </property>
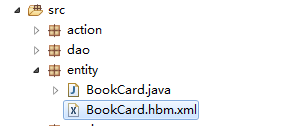
<!--数据库映射配置文件--> <property name="mappingResources"> <list> <!-- 映射文件位置 --> <value>entity/BookCard.hbm.xml</value> </list> </property> </bean>
我们先来写一下entity/BookCard.hbm.xml映射文件
文件位置必须与上面写的路径一致
c3p0
<!-- 引入外部属性文件 -->
<context:property-placeholder location="classpath:jdbc.properties"/>

<bean id="myDataSource" class="com.mchange.v2.c3p0.ComboPooledDataSource">
  <property name="driverClass" value="${jdbc.driver}"/>
  <property name="jdbcUrl" value="${jdbc.url}"/>
  <property name="user" value="${jdbc.user}"/>
  <property name="password" value="${jdbc.password}"/>
  <!-- 每300秒检查所有连接池中的空闲连接 -->
  <property name="idleConnectionTestPeriod" value="300"></property>
  <!-- 最大空闲时间,900秒内未使用则连接被丢弃。若为0则永不丢弃 -->
  <property name="maxIdleTime" value="900"></property>
  <!-- 最大连接数 -->
  <property name="maxPoolSize" value="2"></property>
</bean>
dbcp和c3p0除了写法和所需包不同其他基本一样
<bean id="myDataSource" destroy-method="close" class="org.apache.commons.dbcp2.BasicDataSource">
  <property name="driverClassName" value="${jdbc.driver}"/>
  <property name="url" value="${jdbc.url}"/>
  <property name="username" value="${jdbc.user}"/>
  <property name="password" value="${jdbc.password}"/>
</bean>
最后我们写一下jdbc.properties外部引用文件
jdbc.driver=com.mysql.jdbc.Driver
jdbc.url=jdbc:mysql://localhost:3306/CardDB
jdbc.user=root
jdbc.password=kkk
整个ssh框架就搭建完毕了,我们最后看一下每个文件的具体位置:
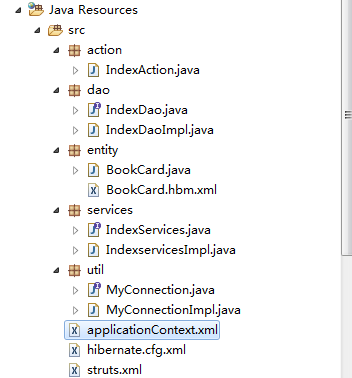

如果结合列子讲会更好一些。本人新手,如有不对的地方请及时指出,多多交流,共同进步,文明留言。
评论暂时关闭