在vmware上安装kvm(debian),
在vmware上安装kvm(debian),
| 1 2 3 4 5 6 7 8 9 10 11 12 13 14 15 16 17 18 19 20 21 22 23 24 25 26 27 28 |
我的博客已迁移到xdoujiang.com请去那边和我交流
kvm全称(Kernel-based Virtual Machine),是一个开源的系统虚拟化模块,
自Linux 2.6.20之后集成在Linux的各个主要发行版本中。它使用Linux自身的调度器进行管理,
所以相对于Xen,其核心源码很少。KVM目前已成为学术界的主流VMM之一。
KVM的虚拟化需要硬件支持(如Intel VT技术或者AMD V技术)。是基于硬件的完全虚拟化。
而Xen早期则是基于软件模拟的Para-Virtualization,新版本则是基于硬件支持的完全虚拟化。
但Xen本身有自己的进程调度器,存储管理模块等,所以代码较为庞大。
广为流传的商业系统虚拟化软件VMware ESX系列是基于软件模拟的Full-Virtualization。
一、基础环境
1、版本
cat /etc/debian_version
7.8
2、内核
uname -r
3.2.0-4-amd64
3、涉及ip
10.1.10.117(debian7.8)
10.1.10.131(windows)
4、虚拟机
vmware 11
内存1G
二、kvm安装
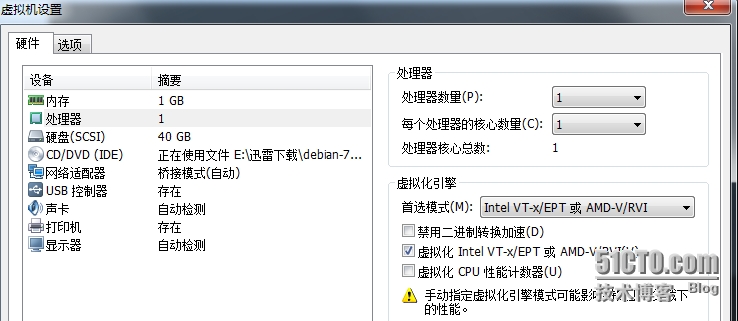
1、在vmware设置里打开支持虚拟化
在虚拟化引擎这边选择Intel VT-x/EPT或AMD-V/RVI,并在第二个方框内打钩
|

| 1 2 |
2、进入系统后查看下是否支持了
egrep '(vmx|svm)' --color /proc/cpuinfo
|

| 1 |
看到有vmx说明硬件支持kvm安装
|
| 1 2 3 4 5 6 7 8 9 10 11 12 13 14 15 16 17 18 19 20 21 22 23 24 25 26 27 28 29 30 31 32 33 34 35 36 37 38 39 40 41 42 43 44 45 46 47 48 49 50 51 52 53 54 55 56 57 58 59 60 61 62 63 64 65 66 67 68 69 70 71 72 73 74 75 76 77 78 79 80 81 82 83 84 85 86 87 88 89 90 91 92 93 94 95 96 97 98 99 100 101 102 103 104 105 106 107 108 109 110 111 112 113 114 115 116 117 118 119 120 121 122 123 124 125 126 127 128 129 130 131 132 133 134 135 136 137 138 139 140 141 142 143 144 145 |
3、安装kvm所需要的包并查看kvm模块是否加载成功
1)安装包
apt-get -y install libvirt-bin
apt-get -y install bridge-utils
apt-get -y install qemu-kvm
apt-get -y install virtinst
PS:相关包说明
libvirt-bin - programs for the libvirt library
bridge-utils - Utilities for configuring the Linux Ethernet bridge(brctl桥接命令)
qemu-kvm - Full virtualization on x86 hardware
virtinst - Programs to create and clone virtual machines(virt-install virt-clone等命令)
2)查看kvm模块是否加载成功
lsmod |grep kvm
kvm_intel 122053 3
kvm 291965 1 kvm_intel
4、配置网络
1)查看当前桥接情况
brctl show
bridge name bridge id STP enabled interfaces
2)修改配置
cat /etc/network/interfaces
# This file describes the network interfaces available on your system
# and how to activate them. For more information, see interfaces(5).
# The loopback network interface
auto lo
iface lo inet loopback
# The primary network interface
#allow-hotplug eth0
#auto eth0
#iface eth0 inet static
#address 10.1.10.117
#netmask 255.255.255.0
#gateway 10.1.10.254
auto br0
iface br0 inet static
address 10.1.10.117
netmask 255.255.255.0
gateway 10.1.10.254
bridge_ports eth0
bridge_stp off
bridge_waitport 0
bridge_fd 0
3)使用ifup命令将br0网口启来
ifup br0
Waiting for a max of 0 seconds for eth0 to become available.
Waiting for br0 to get ready (MAXWAIT is 2 seconds).
4)再次查看桥接情况
brctl show
bridge name bridge id STP enabled interfaces
br0 8000.000c29c887a1 no eth0
5)修改内核参数并使永久生效
在/etc/sysctl.conf添加到最后
net.bridge.bridge-nf-call-ip6tables = 0
net.bridge.bridge-nf-call-iptables = 0
net.bridge.bridge-nf-call-arptables = 0
sysctl -p
net.bridge.bridge-nf-call-ip6tables = 0
net.bridge.bridge-nf-call-iptables = 0
net.bridge.bridge-nf-call-arptables = 0
5、创建磁盘镜像文件
1)创建目录
mkdir /opt/kvmimage -p
2)使用qemu-img命令创建
qemu-img create -f raw /opt/kvmimage/debian7.raw 10G
Formatting '/opt/kvmimage/debian7.raw', fmt=raw size=10737418240
3)查看
qemu-img info /opt/kvmimage/debian7.raw
image: /opt/kvmimage/debian7.raw
file format: raw
virtual size: 10G (10737418240 bytes)
disk size: 0
6、使用virt-install命令创建系统
1)virt-install --virt-type kvm --name debian7 --ram 256 --vcpus=1 --cdrom=/opt/debian-7.8.0-amd64-CD-1.iso --network bridge=br0 --graphics vnc,listen=10.1.10.117,port=5900 --noautoconsole --os-type=linux --disk path=/opt/kvmimage/debian7.raw --debug
[Thu, 21 May 2015 00:44:16 virt-install 2599] DEBUG (cli:226) Launched with command line:
/usr/bin/virt-install --virt-type kvm --name debian7 --ram 256 --vcpus=1 --cdrom=/opt/debian-7.8.0-amd64-CD-1.iso --network bridge=br0 --graphics vnc,listen=10.1.10.117,port=5900 --noautoconsole --os-type=linux --disk path=/opt/kvmimage/debian7.raw --debug
[Thu, 21 May 2015 00:44:16 virt-install 2599] DEBUG (cli:332) Requesting libvirt URI default
[Thu, 21 May 2015 00:44:16 virt-install 2599] DEBUG (cli:334) Received libvirt URI qemu:///system
[Thu, 21 May 2015 00:44:16 virt-install 2599] DEBUG (virt-install:259) Requesting virt method 'default', hv type 'kvm'.
[Thu, 21 May 2015 00:44:16 virt-install 2599] DEBUG (virt-install:469) Received virt method 'hvm'
[Thu, 21 May 2015 00:44:16 virt-install 2599] DEBUG (virt-install:470) Hypervisor name is 'kvm'
[Thu, 21 May 2015 00:44:16 virt-install 2599] DEBUG (DistroInstaller:210) DistroInstaller location is a local file/path: /opt/debian-7.8.0-amd64-CD-1.iso
[Thu, 21 May 2015 00:44:16 virt-install 2599] DEBUG (virt-install:623) Guest.has_install_phase: True
Starting install...
[Thu, 21 May 2015 00:44:17 virt-install 2599] DEBUG (virt-install:707) Domain state after install: 1
Domain installation still in progress. You can reconnect to
the console to complete the installation process.
参数说明:
--name 新客户虚拟机实例名字
--virt-type 类型
--ram 以M为单位指定分配给虚拟机的内存大小
--vcpus 虚拟机的虚拟CPU数
--cdrom 对应全虚拟化客户机,文件或设备作为一个虚拟化CD-ROM设备使用,可以是ISO映像路径或者一个CDROM设备,它也可以是一个能够提取/访问最小引导ISO映像的URL
--network 连接客户机到主机网络
--graphics 在客户机中设置一个虚拟控制台并且将其导出为一个VNC服务
--noautoconsole 使用本选项指定不自动试图连接到客户机控制台
--os-type 针对一类操作系统优化虚拟机配置
--disk path 客户机存储
2)查看kvm进程
ps aux|grep kvm
root 580 0.0 0.0 0 0 ? S< 00:15 0:00 [kvm-irqfd-clean]
103 5990 29.0 1.9 527476 20220 ? Sl 08:34 0:01 /usr/bin/kvm -S -M pc-1.1 -enable-kvm -m 256 -smp 1,sockets=1,cores=1,threads=1 -name debian7 -uuid 576f2558-10c5-670a-0013-d0f8297de467 -no-user-config -nodefaults -chardev socket,id=charmonitor,path=/var/lib/libvirt/qemu/debian7.monitor,server,nowait -mon chardev=charmonitor,id=monitor,mode=control -rtc base=utc -no-reboot -no-shutdown -device piix3-usb-uhci,id=usb,bus=pci.0,addr=0x1.0x2 -drive file=/opt/kvmimage/debian7.raw,if=none,id=drive-ide0-0-0,format=raw -device ide-hd,bus=ide.0,unit=0,drive=drive-ide0-0-0,id=ide0-0-0,bootindex=2 -drive file=/opt/debian-7.8.0-amd64-CD-1.iso,if=none,id=drive-ide0-1-0,readonly=on,format=raw -device ide-cd,bus=ide.1,unit=0,drive=drive-ide0-1-0,id=ide0-1-0,bootindex=1 -netdev tap,fd=20,id=hostnet0 -device rtl8139,netdev=hostnet0,id=net0,mac=52:54:00:23:b3:c2,bus=pci.0,addr=0x3 -chardev pty,id=charserial0 -device isa-serial,chardev=charserial0,id=serial0 -vnc 10.1.10.117:0 -vga cirrus -device virtio-balloon-pci,id=balloon0,bus=pci.0,addr=0x4
root 5999 0.0 0.0 0 0 ? S< 08:34 0:00 [kvm-pit-wq]
root 6004 0.0 0.0 7836 880 pts/0 S+ 08:34 0:00 grep --color=auto kvm
3)查看kvm端口
netstat -tupnl|grep kvm
tcp 0 0 10.1.10.117:5900 0.0.0.0:* LISTEN 2662/kvm
4)使用virsh查看机器列表和状态
virsh --connect qemu:///system list --all
Id Name State
----------------------------------------------------
1 debian7 running
5)运行状态说明
running 虚拟机正在运行在cpu上
idel 虚拟机是闲置的,没有在运行,在等待IO或者休眠时虚拟机会进入这种状态
paused 虚拟机处于暂停状态,一般情况下是被admin运行了virsh suspend才会处于这种状态,但是仍然消耗资源,只不过不被超级管理程序调度而已。
shutdown 虚拟机在关闭过程中
shut off 虚拟机没有运行,已经完全关闭
crashed 虚拟机崩溃
dying 虚拟机处于垂死的状态,但是又没完全关闭或崩溃
6)查看下新建的虚拟机基本信息
virsh dominfo debian7
Id: 2
Name: debian7
UUID: 576f2558-10c5-670a-0013-d0f8297de467
OS Type: hvm
State: running
CPU(s): 1
CPU time: 1.7s
Max memory: 262144 KiB
Used memory: 262144 KiB
Persistent: yes
Autostart: disable
Managed save: no
三、客户端连接
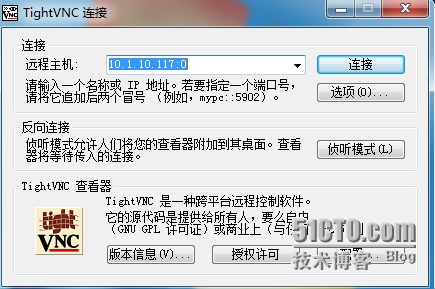
1、先查看vnc
virsh vncdisplay debian7
10.1.10.117:0
2、windows(10.1.10.131)
1)安装软件
TightVNC Version 2.7.7
|


| 1 |
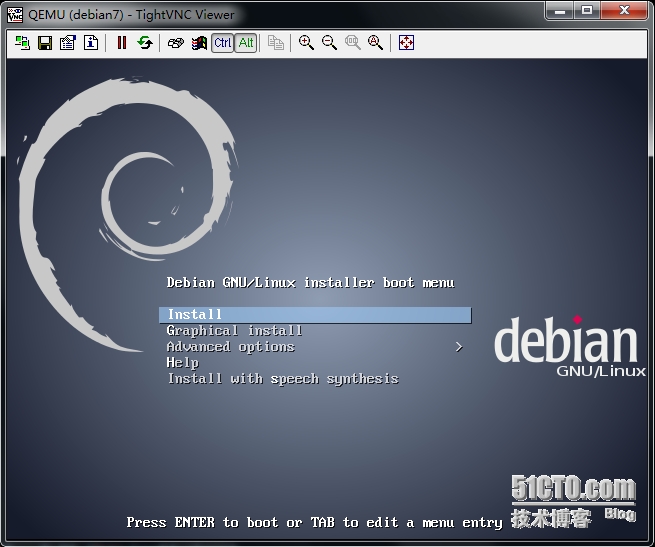
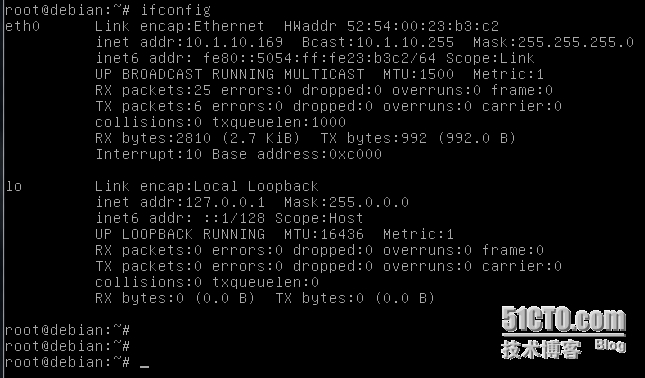
四、安装完成后结果
|

| 1 2 3 |
五、参考文章
http://xmodulo.com/use-kvm-command-line-debian-ubuntu.html
http://wiki.libvirt.org/page/Networking
|
本文转自 xdoujiang 51CTO博客,原文链接:http://blog.51cto.com/7938217/1665296,如需转载请自行联系原作者
评论暂时关闭