Ansible-安装配置,
Ansible-安装配置,
主机规划
| 主机名称 | 操作系统版本 | 内网IP | 外网IP(模拟) | 安装软件 |
|---|---|---|---|---|
| ansi-manager | CentOS7.5 | 172.16.1.180 | 10.0.0.180 | ansible |
| ansi-haproxy01 | CentOS7.5 | 172.16.1.181 | 10.0.0.181 | |
| ansi-haproxy02 | CentOS7.5 | 172.16.1.182 | 10.0.0.182 | |
| ansi-web01 | CentOS7.5 | 172.16.1.183 | 10.0.0.183 | |
| ansi-web02 | CentOS7.5 | 172.16.1.184 | 10.0.0.184 | |
| ansi-web03 | CentOS7.5 | 172.16.1.185 | 10.0.0.185 |
在实际使用中并不需要对ansible配置进行修改,或者说只有需要的时候才修改ansible配置。
添加用户账号
说明:
1、 运维人员使用的登录账号;
2、 所有的业务都放在 /app/ 下「yun用户的家目录」,避免业务数据乱放;
3、 该用户也被 ansible 使用,因为几乎所有的生产环境都是禁止 root 远程登录的(因此该 yun 用户也进行了 sudo 提权)。
1 # 使用一个专门的用户,避免直接使用root用户
2 # 添加用户、指定家目录并指定用户密码
3 # sudo提权
4 # 让其它普通用户可以进入该目录查看信息
5 useradd -u 1050 -d /app yun && echo '123456' | /usr/bin/passwd --stdin yun
6 echo "yun  ALL=(ALL)       NOPASSWD: ALL" >>  /etc/sudoers
7 chmod 755 /app/
Ansible 部署流程
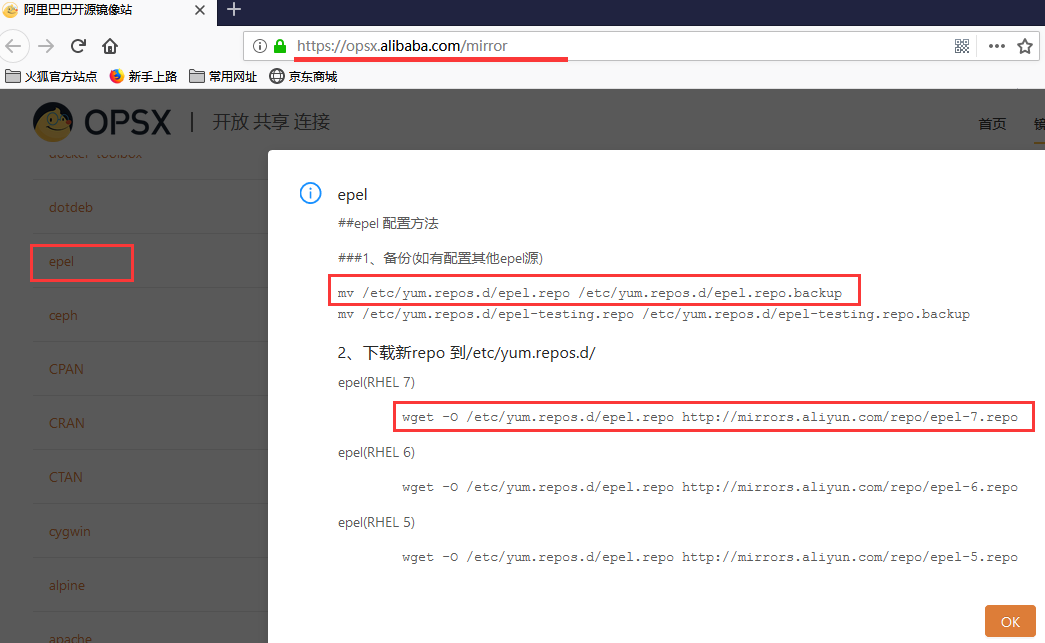
添加 epel 源「如果没有的话」
添加阿里云 epel 源
https://opsx.alibaba.com/mirror
Ansible 安装与版本信息查看
 1 [root@ansi-manager ~]# yum install -y ansible
 2 [root@ansi-manager ~]# whereis ansible  # ansible 位置信息
 3 ansible: /usr/bin/ansible /etc/ansible /usr/share/ansible /usr/share/man/man1/ansible.1.gz
 4 [root@ansi-manager ~]# ansible --version  # 版本信息查看
 5 ansible 2.8.1  # ansible 版本
 6   config file = /etc/ansible/ansible.cfg  # 使用的配置文件
 7   configured module search path = [u'/root/.ansible/plugins/modules', u'/usr/share/ansible/plugins/modules']  # 模块查找路径
 8   ansible python module location = /usr/lib/python2.7/site-packages/ansible  # ansible Python 模块位置,使用 Python 2.7
 9   executable location = /bin/ansible  # ansible 执行文件的位置
10   python version = 2.7.5 (default, Apr 11 2018, 07:36:10) [GCC 4.8.5 20150623 (Red Hat 4.8.5-28)]  # Python 版本信息
11 [yun@ansi-manager ~]$ ll /usr/bin/ansible  /bin/ansible  # ansible 命令位置
12 lrwxrwxrwx 1 root root 20 Jun 24 14:14 /bin/ansible -> /usr/bin/ansible-2.7
13 lrwxrwxrwx 1 root root 20 Jun 24 14:14 /usr/bin/ansible -> /usr/bin/ansible-2.7
Ansible 配置文件讲解
Ansible配置文件查找顺序
ansible 将从多个地方查找配置文件,顺序如下:
1、从环境变量 ANSIBLE_CONFIG 中查找,如果该环境变量有值的话;
2、当前目录的 ansible.cfg 文件;「每个项目都可以有一个该配置文件,这样可以更好的管理项目,移植时也更方便。」
3、当前用户家目录的 .ansible.cfg 文件;
4、/etc/ansible/ansible.cfg 文件。
可以使用 ansible –version 命令查看使用的配置文件。
在 /etc/ansible/ansible.cfg 配置文件中有该说明
Ansible 部分配置文件讲解
实际生产中可以无需做任何修改。
 1 [yun@ansi-manager ansible]$ pwd
 2 /etc/ansible
 3 [yun@ansi-manager ansible]$ vim ansible.cfg
 4 #inventory      = /etc/ansible/hosts      # 受控端主机资源清单
 5 #library        = /usr/share/my_modules/  # 所需依赖库路径
 6 #remote_tmp     = ~/.ansible/tmp          # 远端机器,临时文件存放位置
 7 #local_tmp      = ~/.ansible/tmp          # 本机临时文件存放位置
 8 #forks          = 5                       # 默认并发数
 9 #poll_interval  = 15                      # 默认轮询时间间隔(单位秒)
10 #sudo_user      = root                    # 默认sudo后的用户
11 #ask_sudo_pass = True                     # 使用sudo,是否需要输入密码
12 #ask_pass      = True                     # 是否需要输入密码
13 #transport      = smart                   # 传输方式
14 #remote_port    = 22                      # 默认远程主机的端口号
15 #module_lang    = C                       # 模块和系统之间通信的语言
16 #module_set_locale = False
17 ………………
18 # uncomment this to disable SSH key host checking  取消注释以禁用SSH key主机检查 【默认是注释掉的,要检查主机指纹】
19 host_key_checking = False                # 解开注释,即跳过检查主机指纹 【只有 root 用户执行时才有该取消指纹检测的权限】
20 ………………
21 # logging is off by default unless this path is defined
22 # if so defined, consider logrotate
23 #log_path = /var/log/ansible.log          # 开启ansible日志
24 ………………
25 [privilege_escalation]                    # 普通用户提权配置「使用地方:普通用户远程提权使用」
26 #become=True
27 #become_method=sudo
28 #become_user=root
29 #become_ask_pass=False
上述的 [privilege_escalation] 配置,可在 ansible -h 中查看如何使用。如下:
 1 [yun@ansi-manager ~]$ ansible -h
 2 ………………
 3   Privilege Escalation Options:  # 权限提升选项
 4     control how and which user you become as on target hosts
 5
 6     -b, --become        run operations with become (does not imply password
 7                         prompting)
 8     --become-method=BECOME_METHOD
 9                         privilege escalation method to use (default=sudo), use
10                         `ansible-doc -t become -l` to list valid choices.
11     --become-user=BECOME_USER
12                         run operations as this user (default=root)
13     -K, --ask-become-pass
14                         ask for privilege escalation password
15 ………………

评论暂时关闭